
Warrior XL Assembly
We know you are a true craftsman and assembling this masterpiece is just the challenge you don’t shy away from.

This assembly video is for the Warrior XL portable sawmill. There is no welding required for this assembly. You only need a handful of shop tools (see list below). This sawmill can out-perform the competition in its price and class. Designed to keep you ahead of wood milling challenges no matter the project. We built it tough!
See Complete Written Instructions Below
Looking for the Original Warrior Directions
(2022 and older) Click Here
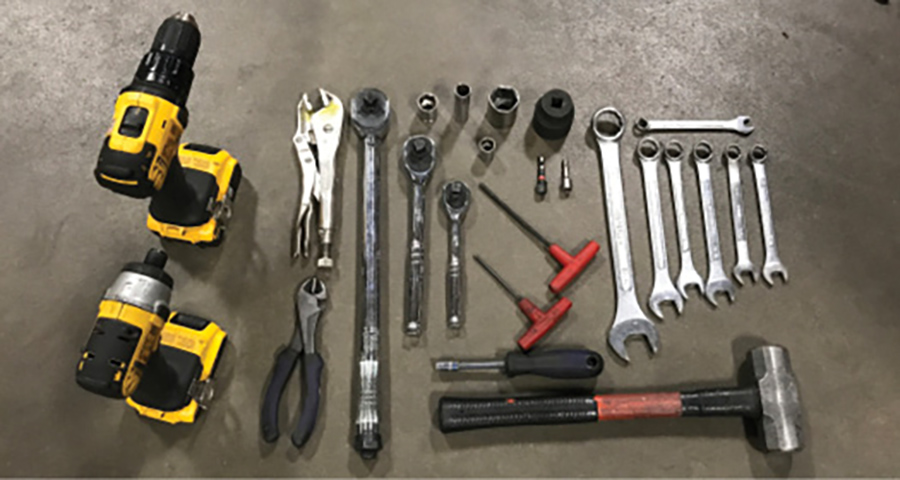
Here is the list of tools that you will need for assembly:
WRENCHES
2 – 9/16”
2 – 3/4”
7/16”
5/8”
1/2”
Allen Wrenches
3/16”
5/32”
Sockets
3/4”
1 3/8”
1 1/8”
9/16”
5/16”
1/2”
13mm
10mm
8mm
Drill Bits
1/4”
1/8”
Impact Gun
Vise Grips
Cutting Dikes
Torque Wrench
Hammer
Rubber Mallet
Ratchet Handle
We recommend assembly with two people. It’s safer, a lot more fun and some of the parts are so heavy that you need two people to move safely.
Unpacking Crate (Video-00:23)
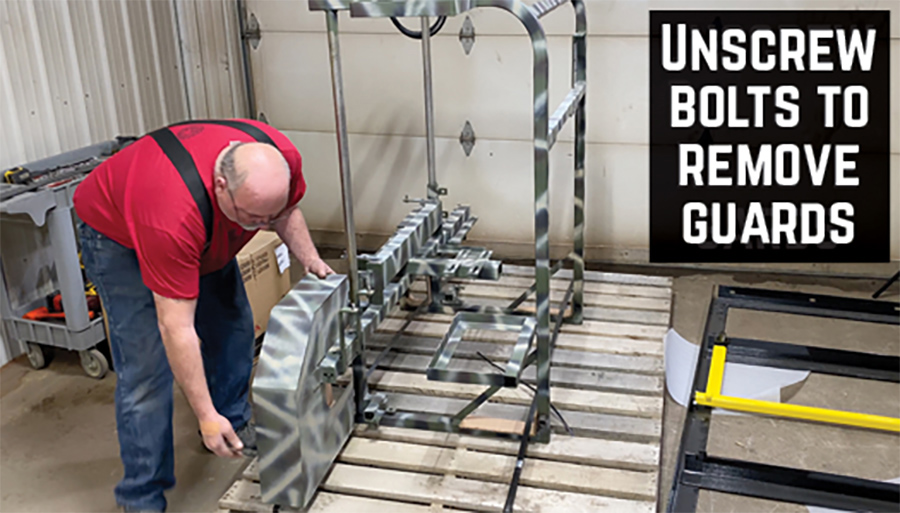
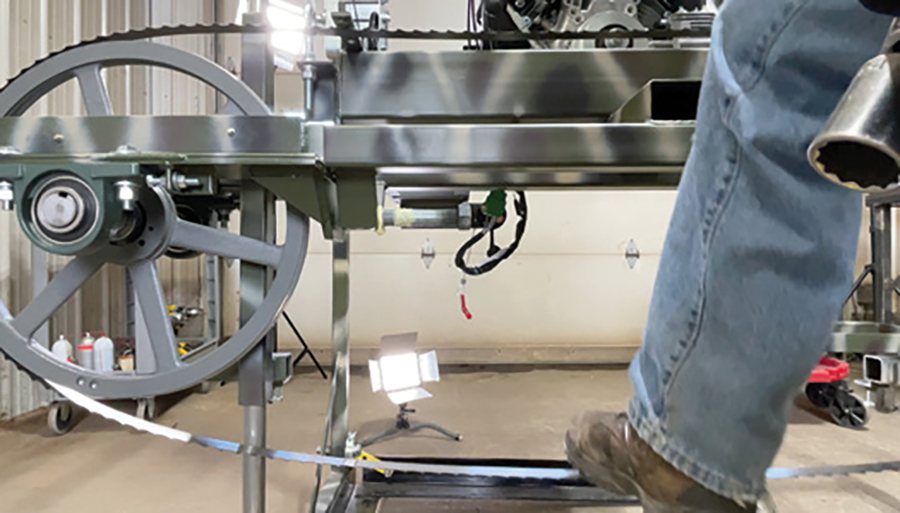
Separate all your boxes in a larger area where parts can be laid out and seen plainly. Two guys will be needed to remove the motor, the track, and the frame from the pallet assembly. All Sawmills are shipped with the guards attached to the mill head. Unscrew the nuts and remove the guards, cut the straps and release the mill frame. With two people, set it on a level area.
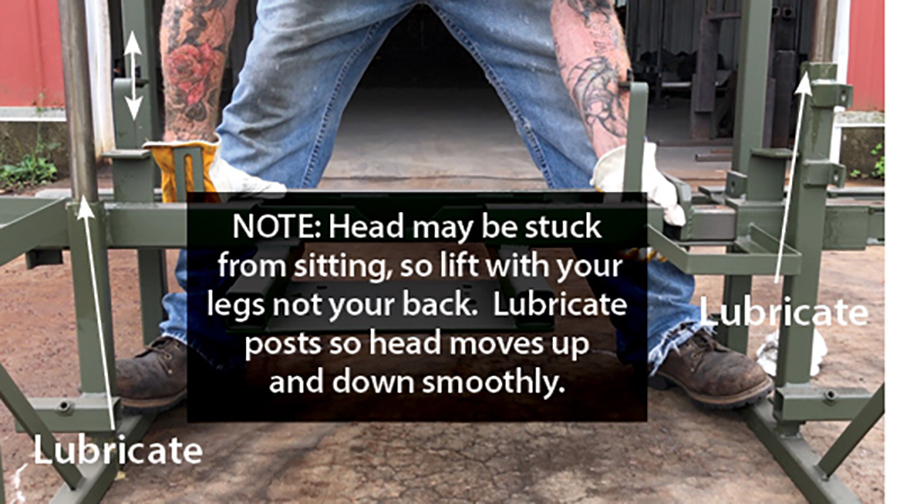

Lubricate Mill Head (Video-01:04)
Mill head may be stuck from sitting. You need to lubricate the two slide bars to raise and lower the head. Once you lubricate the bars, step on each side of the mill and raise the head up and make sure it moves freely. Lift evenly on both sides when attempting this.
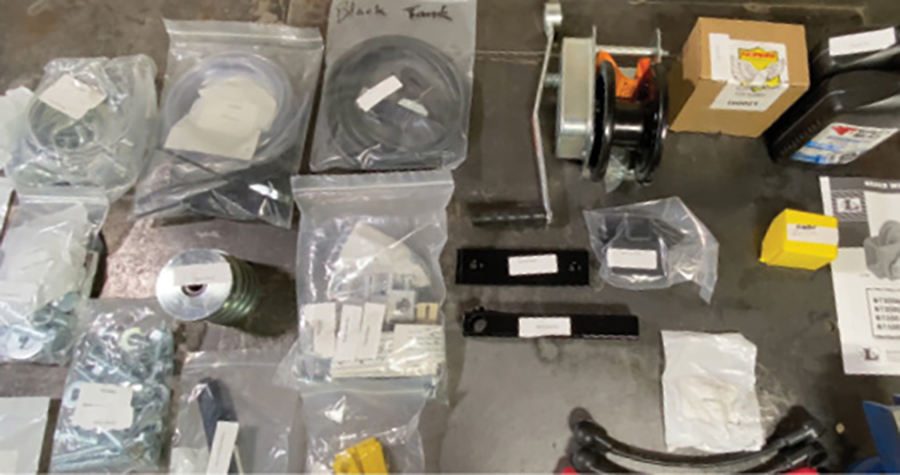
Take Stock of Parts. (Video-01:41)
Open your boxes one-by-one and lay the parts and bags out.
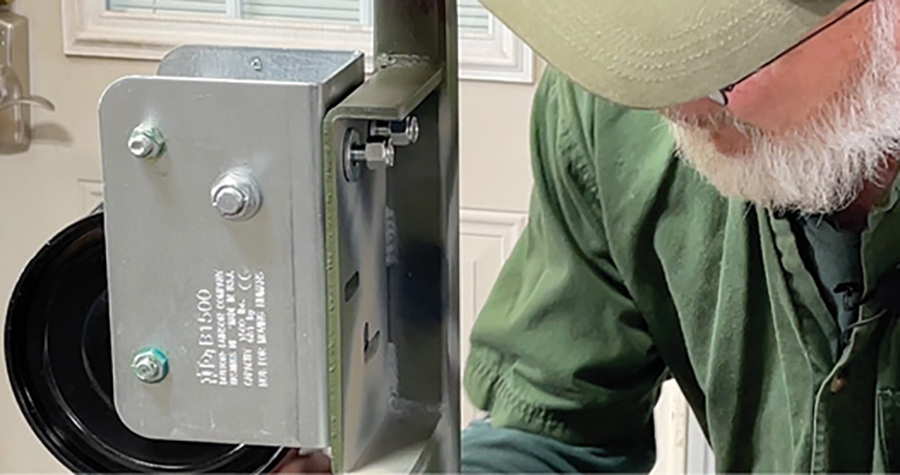
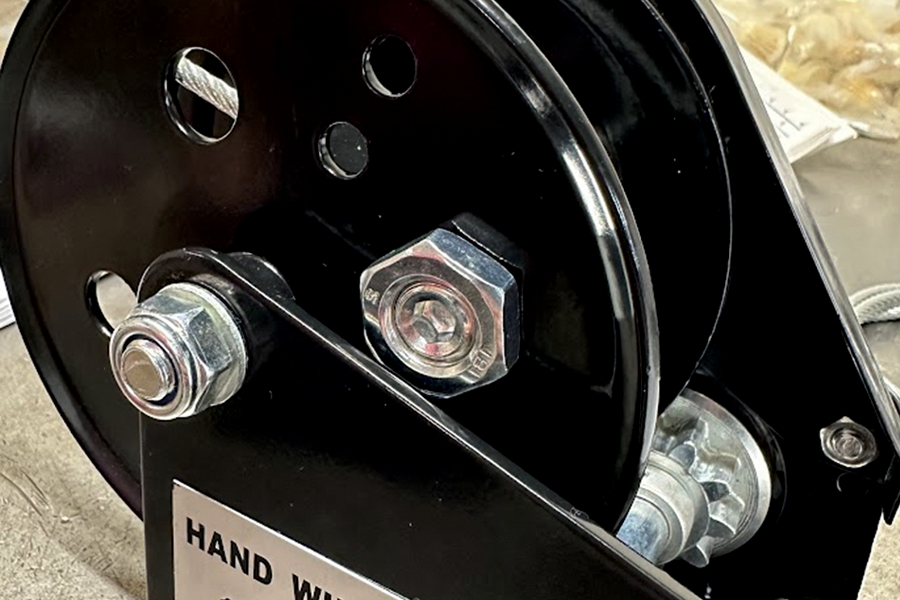
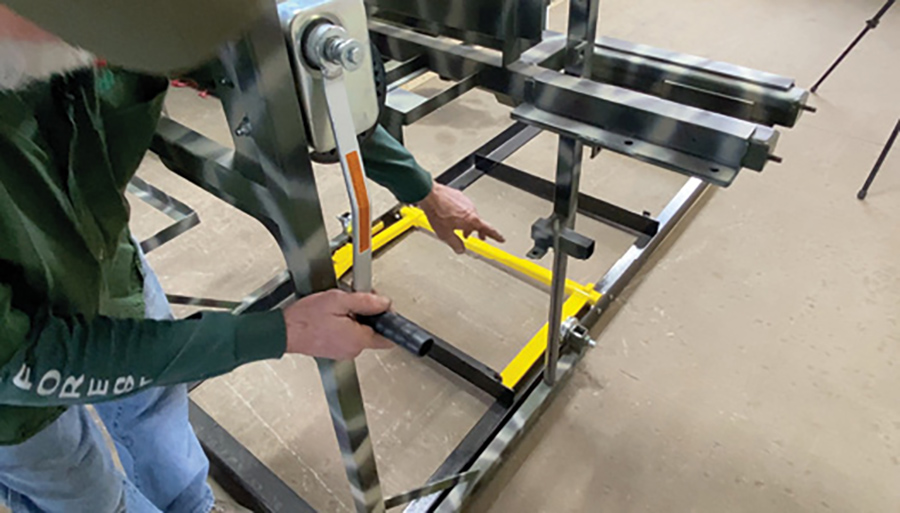
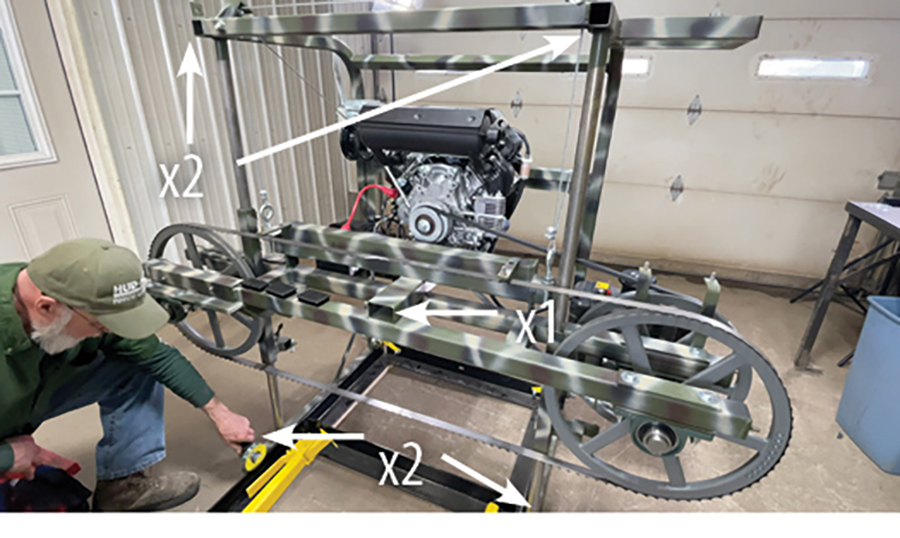
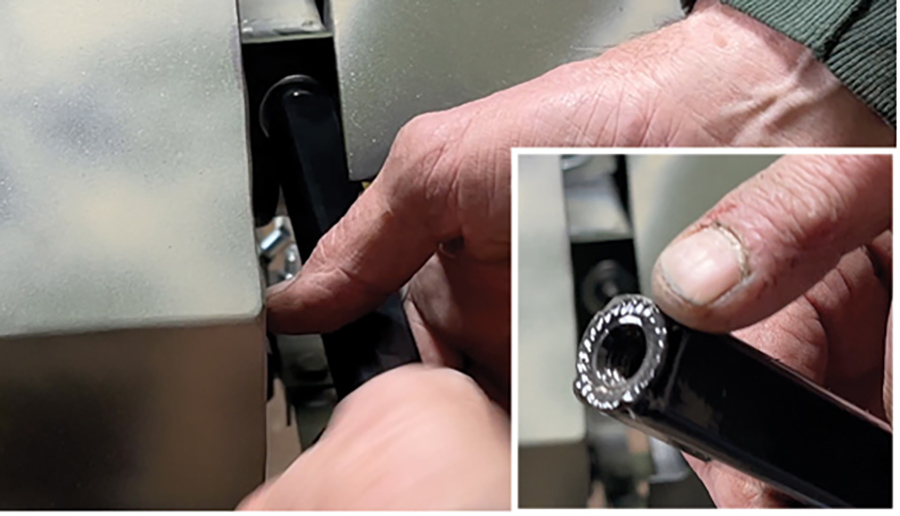
Installing Winch Frame. (Video- 01:54)
Locate the hardware kit marked Winch Hardware. There should be three bolts, flat washers, lock washers and nuts. Add the flat washer on each bolt and slide it through the winch. Install the winch on the inside of the frame. Install the flat washers and Nylock nuts and tighten.
Installing crank handle on winch.
Install the handle onto the winch, keeping the square shaft shape with the square shape on the handle.
Slide on until flush and install the washer and the nut. Hold the handle while tightening the nut.
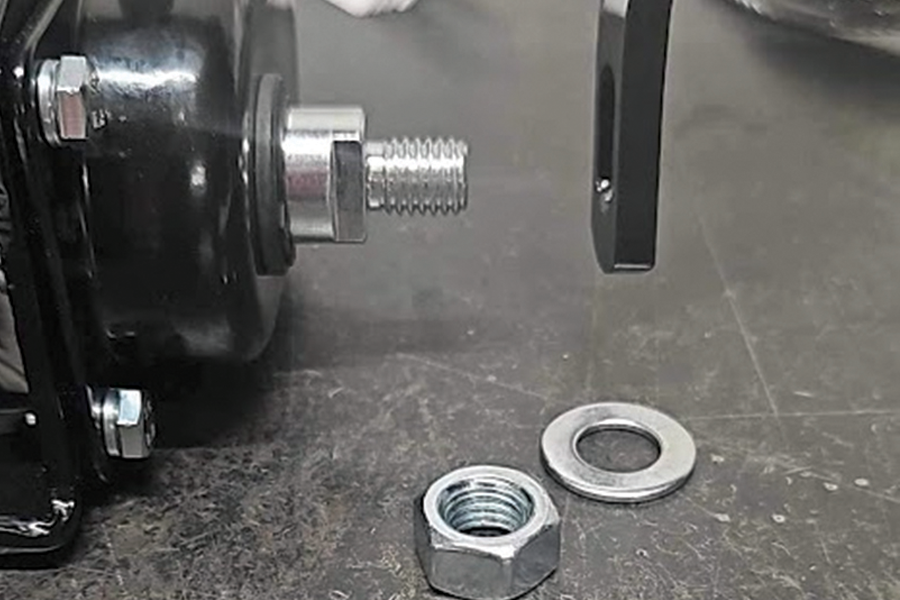
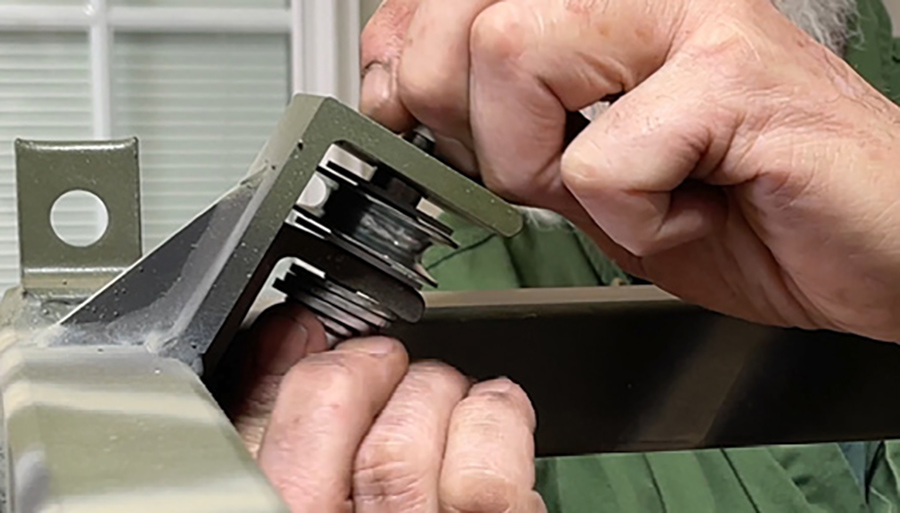
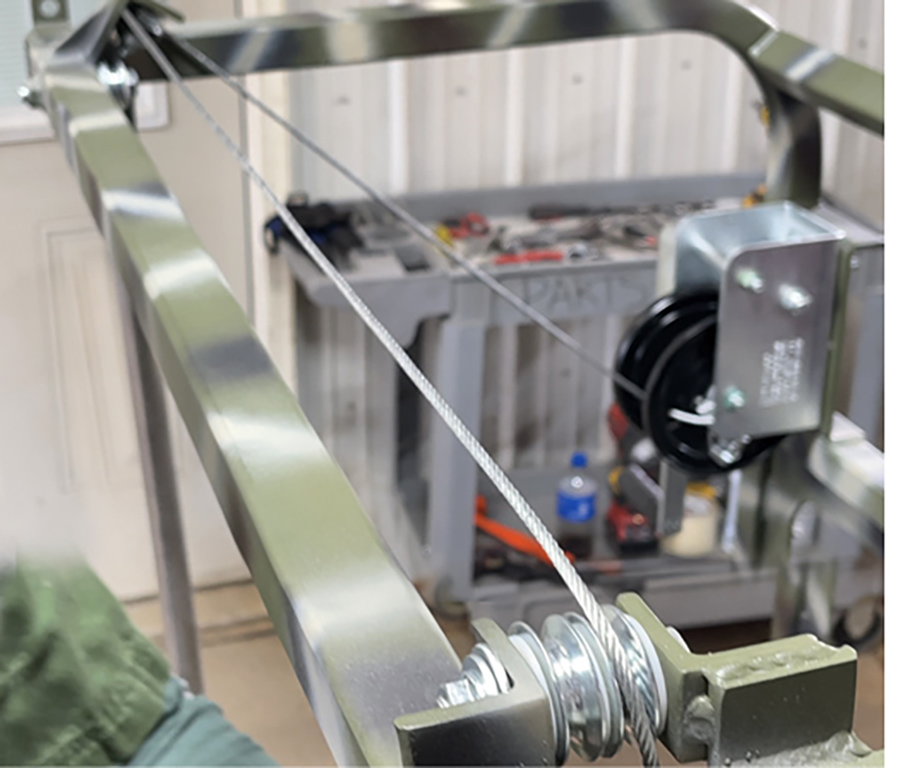
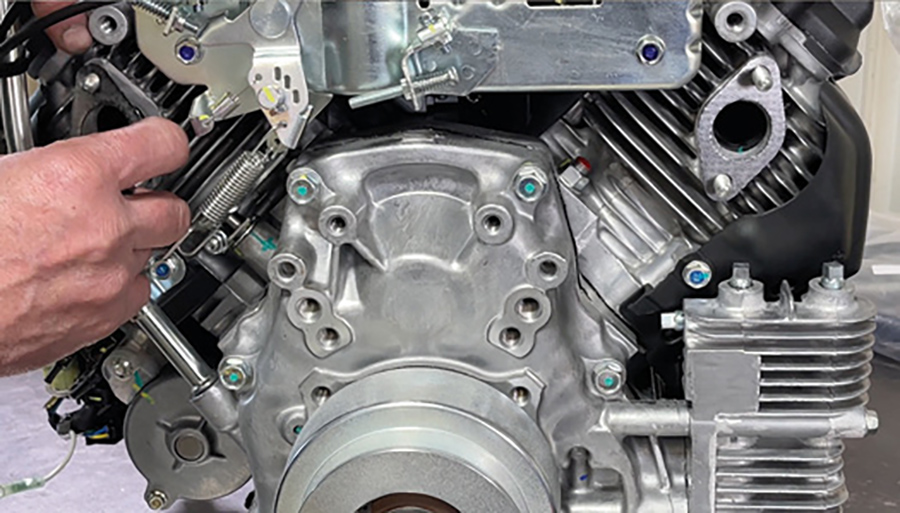
Installing Lift System. (Video-03:06)
Locate lift cables, eyebolts and lift pulleys. There are three cable pulley assemblies with two singles and one double pulley assembly. The nylon washer goes on first, then the cable pulley, and another nylon washer. When you get to the double cable pulley assembly, nylon washer goes between the two pulleys so there’s no friction against each pulley.
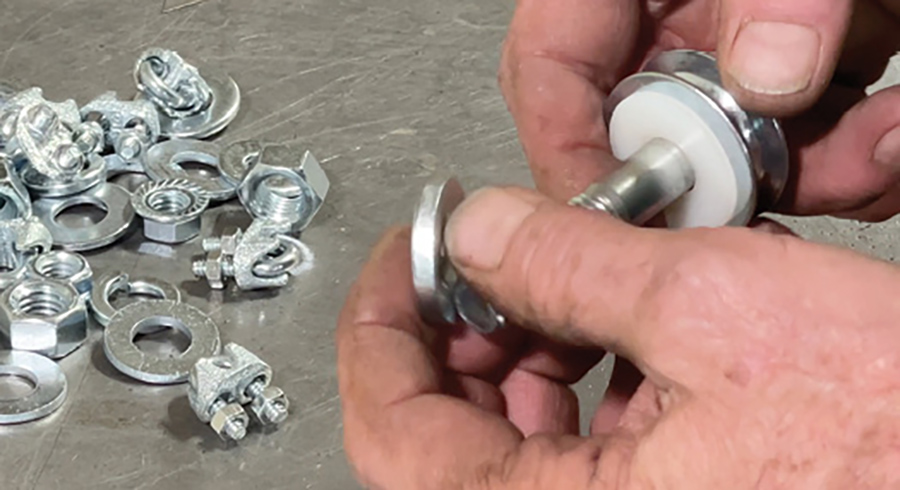
One of the single cable pulley assemblies has a longer bolt. That assembly uses a thicker washer as shown.
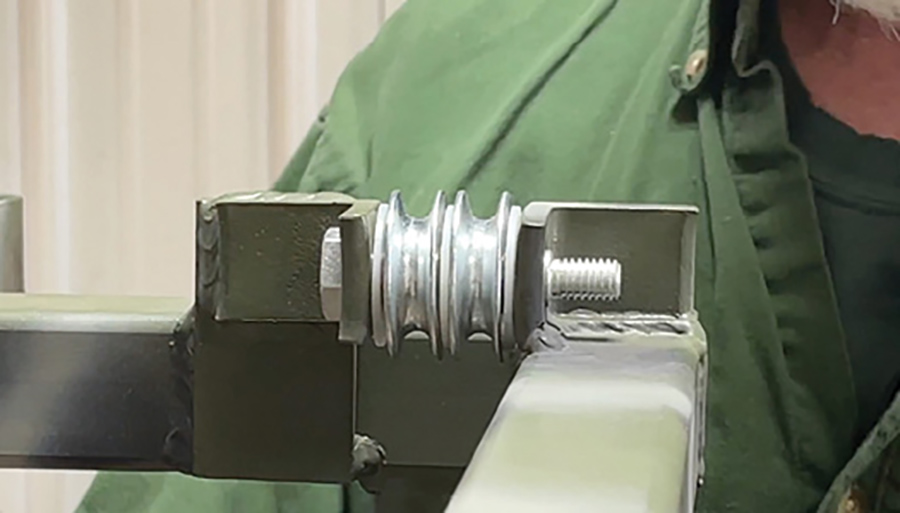
Install the double pulley system. (Video-03:48)
Slide the double pulley system off the bolt that you had pre-set-up. Slide it into the bracket on the mill and slide the bolt back through the pulleys being sure that you don’t drop any of the shims or the nylon washers out when sliding the bolt through.
When you get the bolt through, put two washers on the other side – a large one and a small one. The larger one goes against the frame on the mill. The smaller one goes against that washer.
Snug up the bolt nice and tight. The pulley should turn freely after tightening up the bolt.
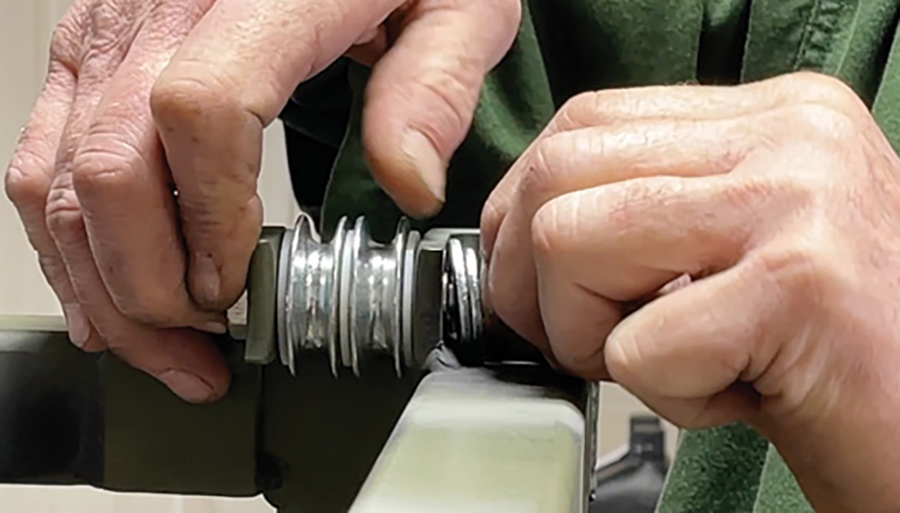
Now move to the other side of the mill and add in the single pulley (Video-04:32). Same set up – drop the bolt down to make sure that the with nylon shims are on either side of the pulley. If the bolt protrudes through the bracket farther than the thickness of one of your 9/16 washers, use the second 9/16 washer to take up that space. Add the small washer after that, tighten up the bolt and your cable pulley should turn freely on that bolt.

Now we’ll put the last cable wheel on. (Video-05:10)
This uses the 3 inch long bolt with the thick shim. The shim goes against the frame of the mill, nylon washer between the cable pulley, and thick washer. Tighten and make sure it spins freely.
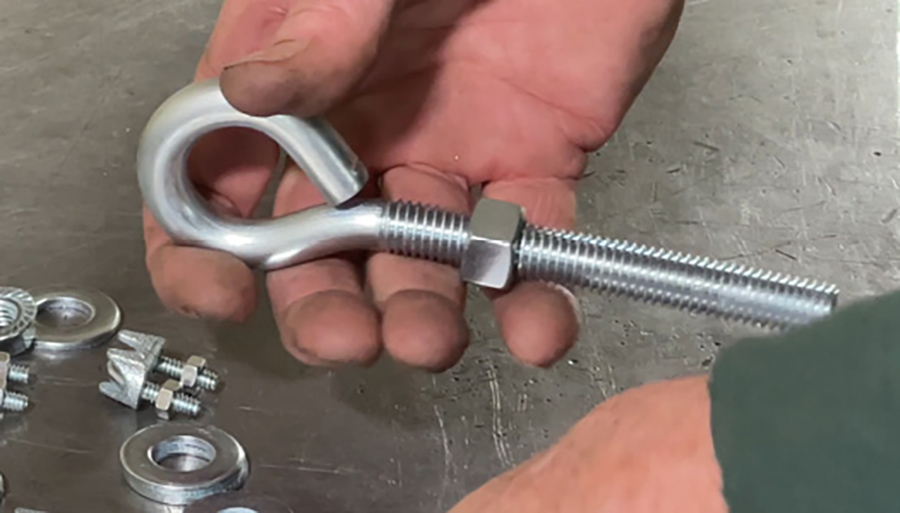
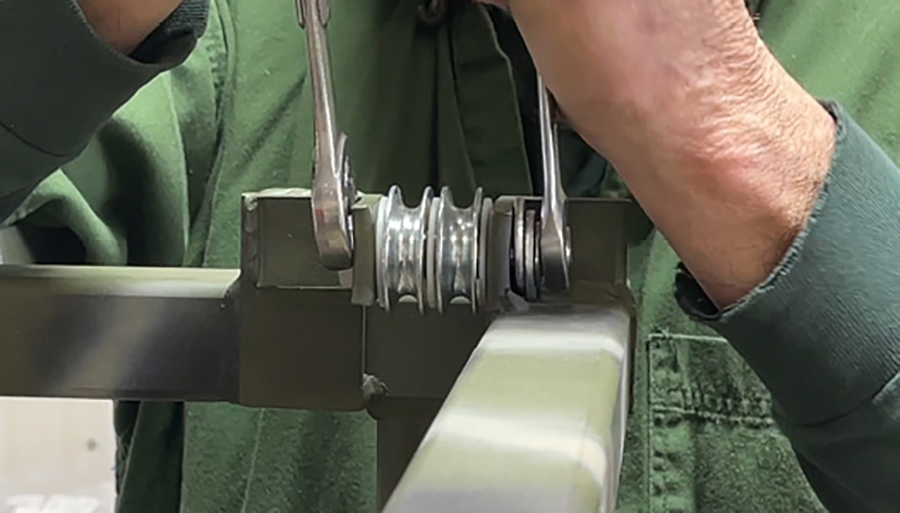
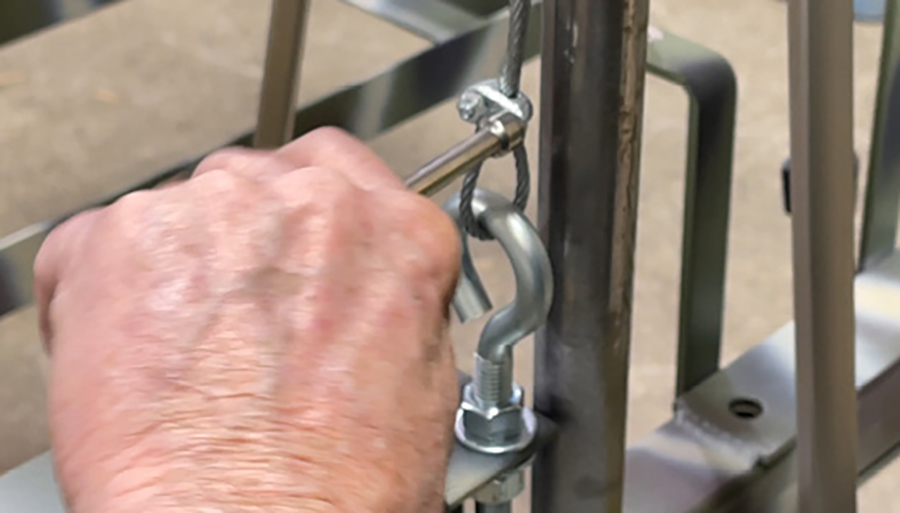
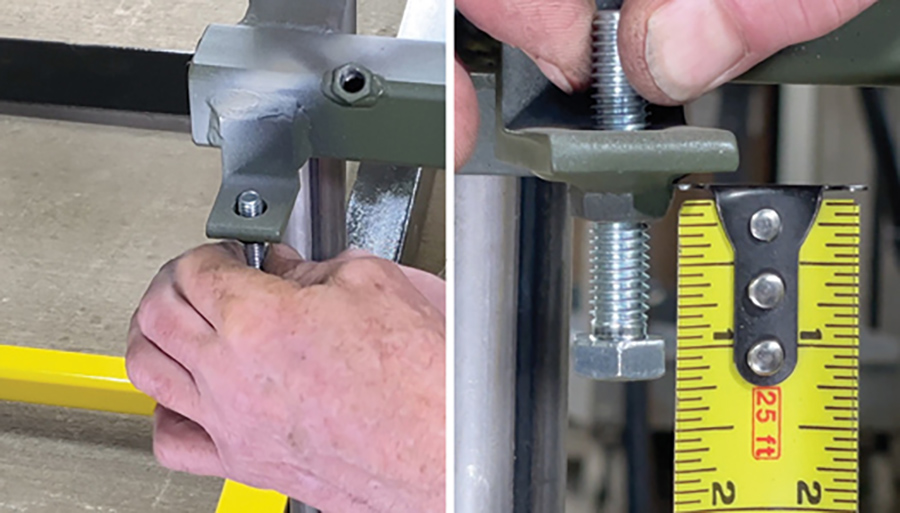
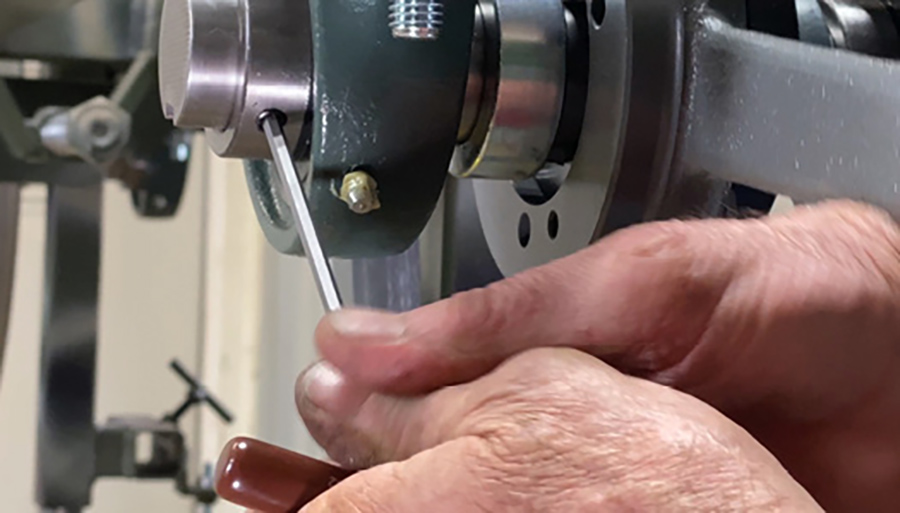
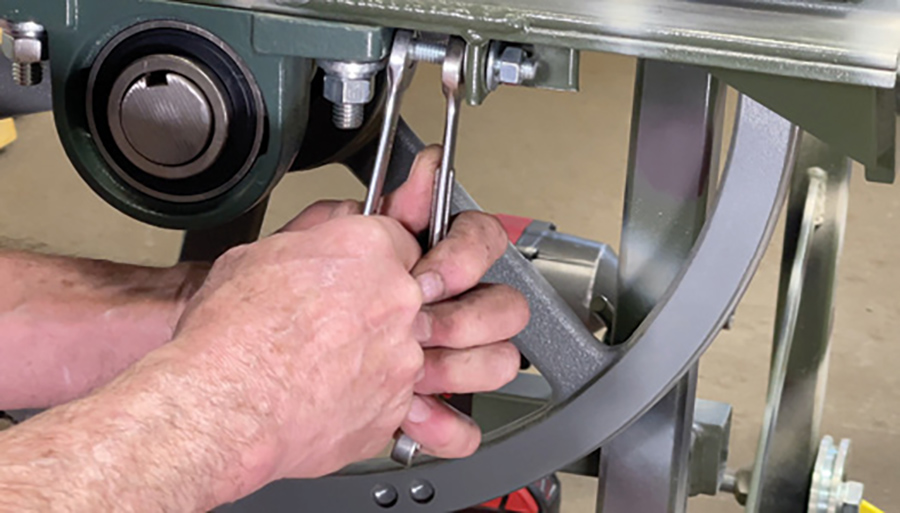
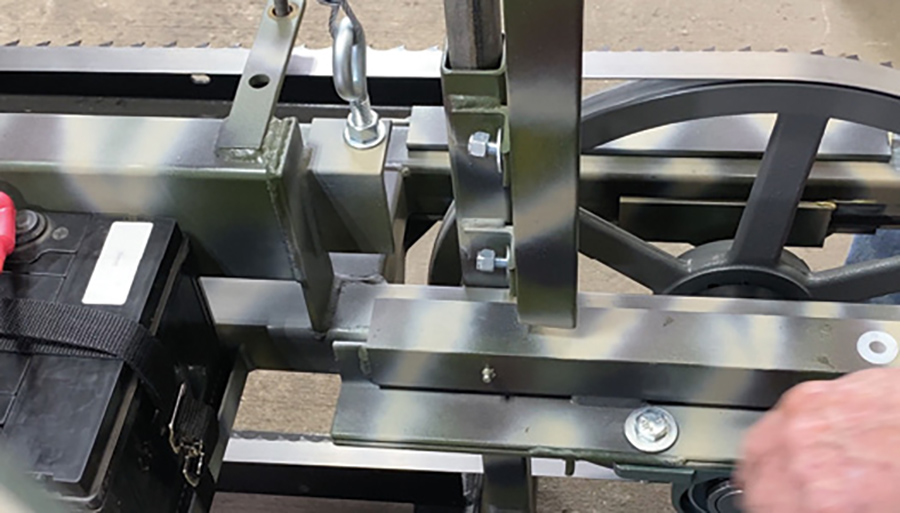
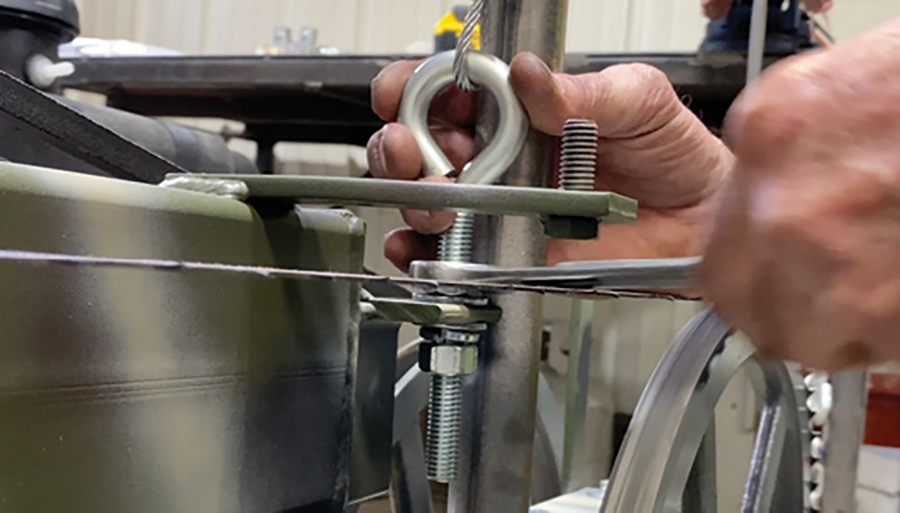
Installing the Eyebolts. (Video- 05:28)
Secure the two eyebolts from your kit, find (2)1/2 inch nuts and screw them all the way near the top, leaving 1 inch of thread exposed from the eyelet down to the top of the nut. This is for future adjustments on the mill. Align bolt and nuts to same height on your two eyelets.
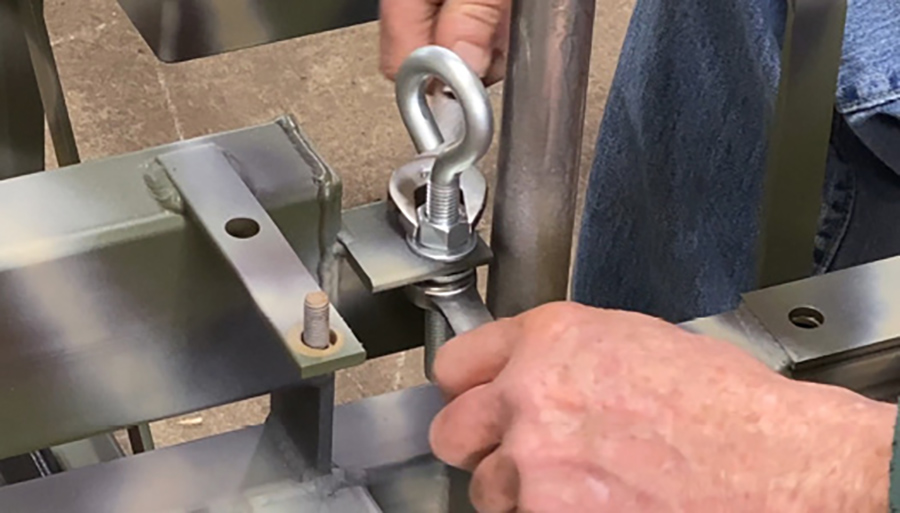
Put the flat washer up against the nut on the eyebolt and install in the bracket next to the lift tube. Secure one more flat washer, lock washer, and nut. Do not move the top nut. Tighten the bottom one up to the top. The eyebolt should be parallel with the track. Repeat the same steps on the other side.
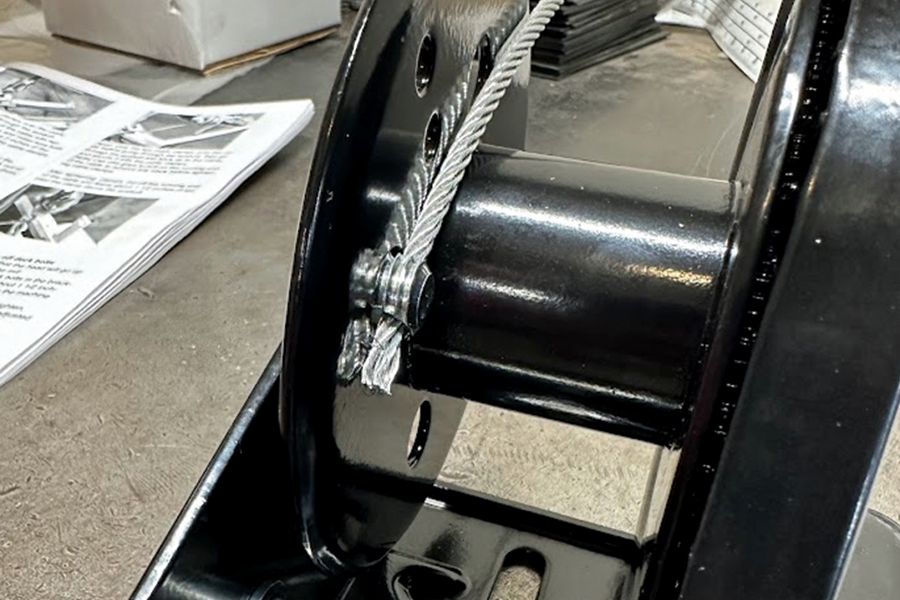
Install the winch cable.
Remove the zip tie on the winch drum holding the screw and nut. Thread the lock nut onto the screw finger tight. Put the screw into one of the bigger holes in the drum, with the hole facing the inside of the drum. The lift cable kit has two cables in it, a long one and a short one. You will use the longer one first. Put the cable through the hole in the screw, leaving some slack.
To fasten, use a 6mm hex key to prevent the screw from turning while tightening the 7/8” lock nut on the screw.
Run the cable across the top of the mill and over the top of the inside pulley. That’s the pulley you’re going to be pulling from on that cable. Run it down through to the eyelet on that side of the mill head.
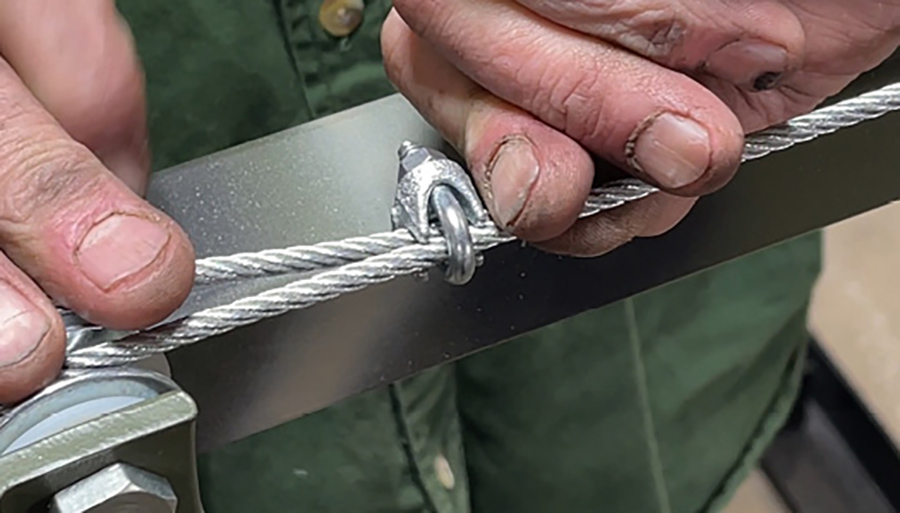
Before putting the cable through the eyelet, slide your cable clamp onto the cable (Video-07:40). Slide the cable through the eyelet from the inside to the outside, the tail of the cable toward the outside of the mill. Slide the cable up through the cable clamp. Make sure when installing the cable clamps, you put the nuts on the load side of the cable. Go over to the winch and start cranking the winch, taking up the slack in the cable.
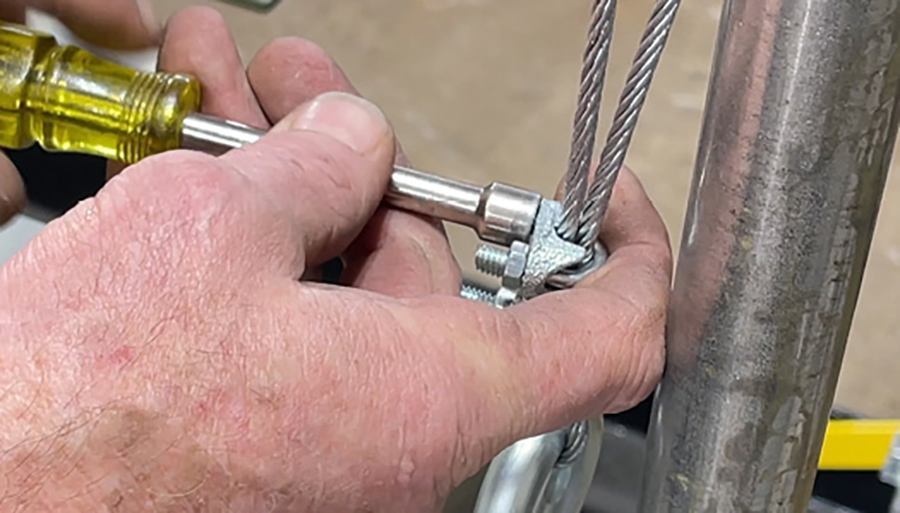
When you get all the slack taken up coming down to the clamp you want a 6-inch tail. Install the second cable clamp just above the first one. Remember when installing your cable clamps to put the nuts on the load side of your cable.
Installing the second cable. (Video-08:30)
Feed it up to the bottom of the double pulley assembly. Clamp it as close to the double pulley assembly as you can.
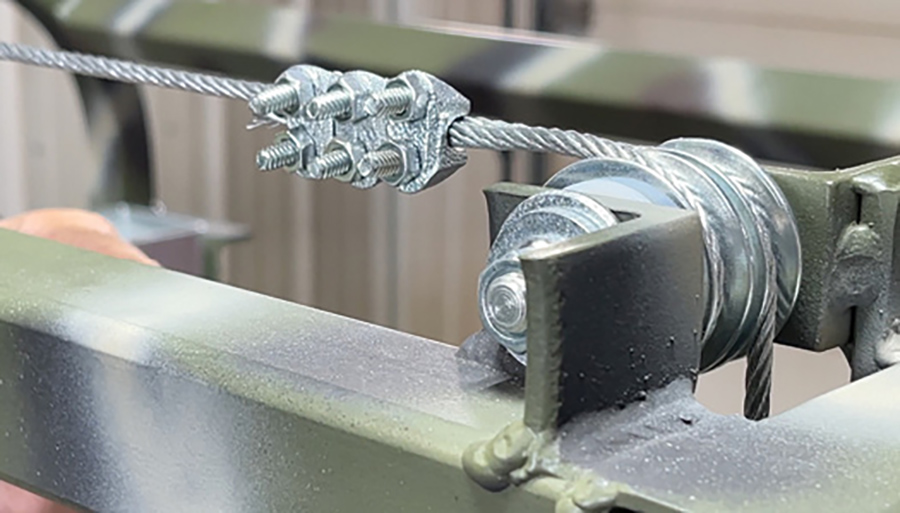
Secure second clamp and put it right next to your first one on the inside closer to the pulleys. Keep them as tight to the pulleys as you can get them. Secure the third clamp and tighten.
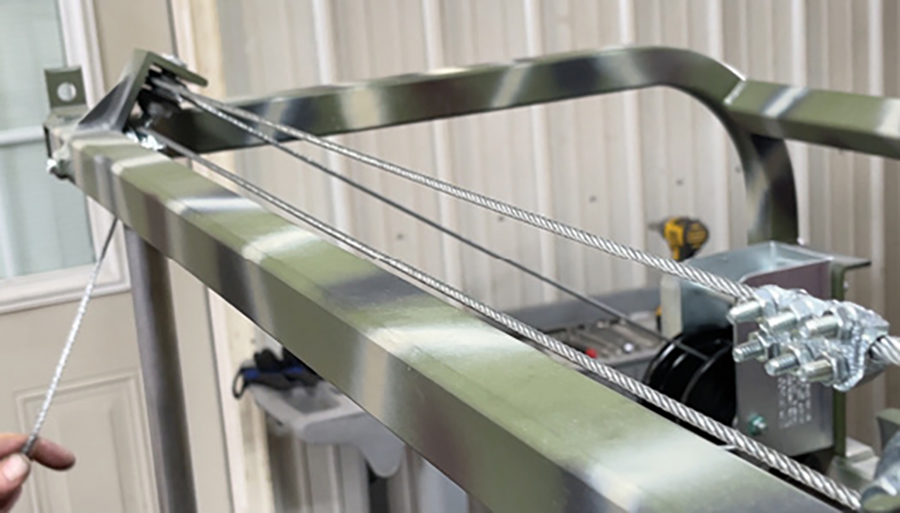
Feed the cable across the mill keeping it snug over the top of the other pulley that’s bolted to the frame. Go down to the eyelet on the other side of the sawmill. Feed from the inside to the outside so the tail of the cable is on the outside of the mill.

Slide your cable clamps on keeping one side of the cable taut with a pair of vice grips or your helper pulling on it. Slide the cable clamp all the way down to the eyelet and snug it up. Make sure that your nuts are on the load side of the cable.

Put the second one on there about a half an inch apart.
After securing the cable clamps and tightening them up, leave about a 6-inch tail and cut the end of that cable right off.
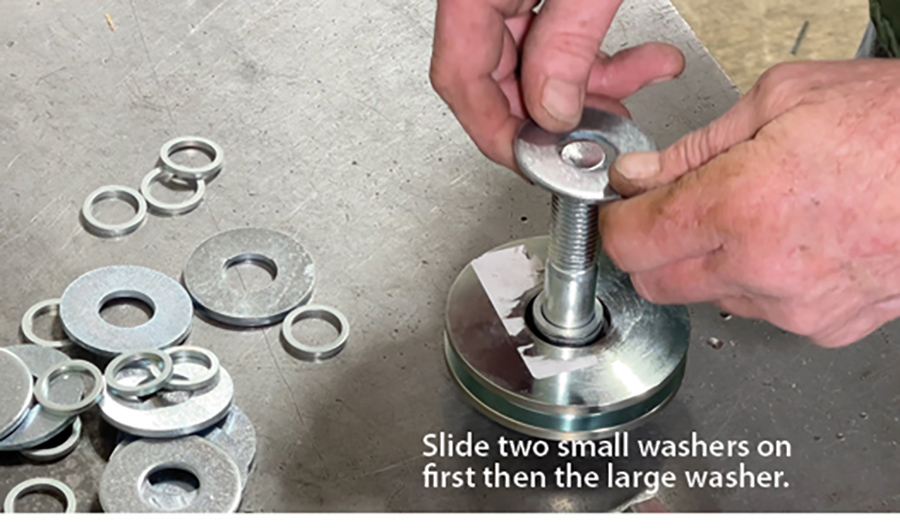
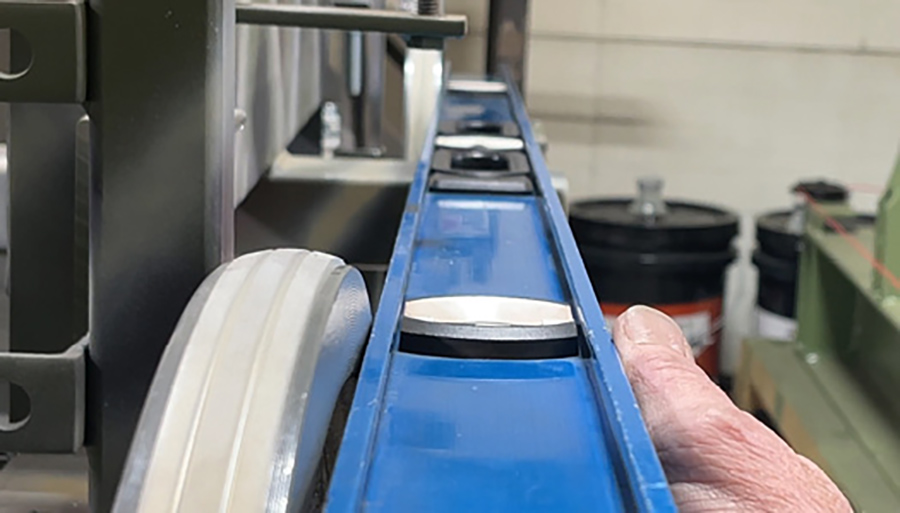
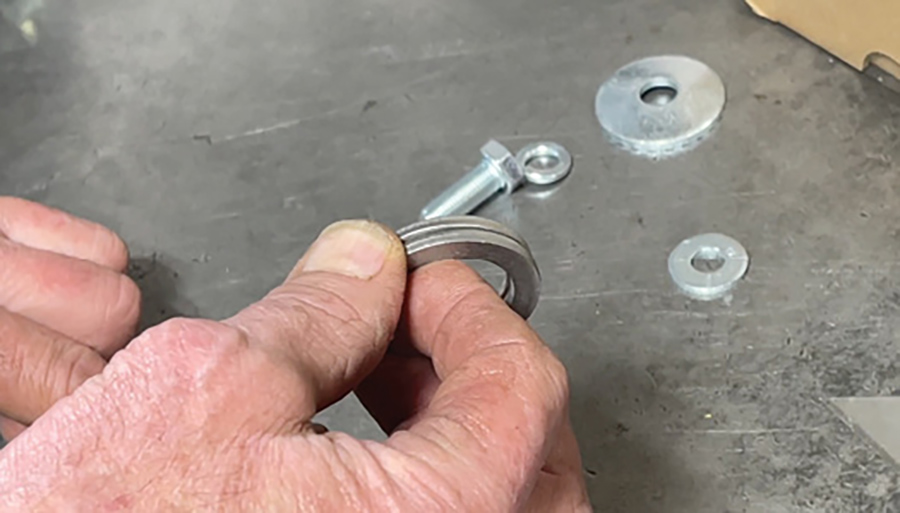
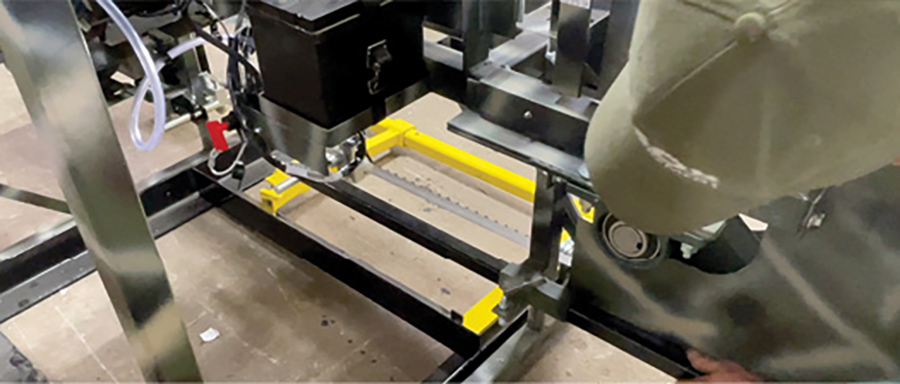
Installing Track Wheels & Kit (Video-09:56)
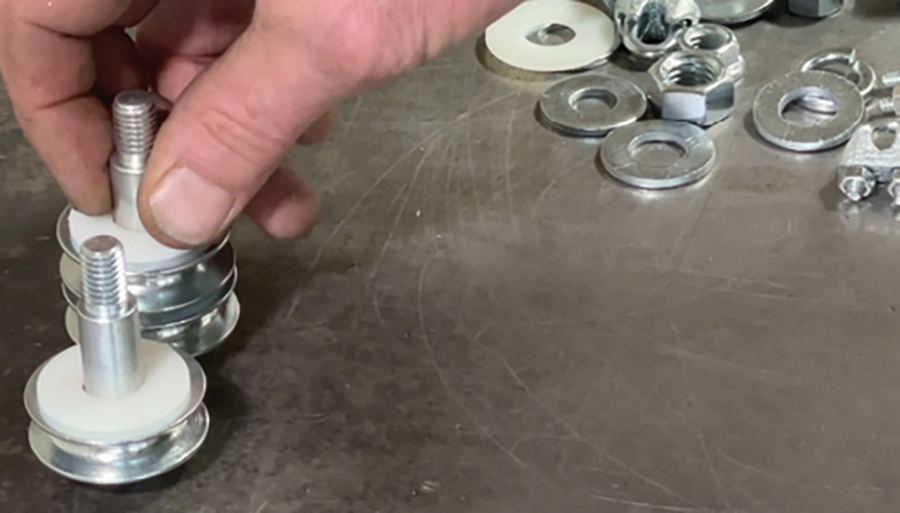
Find the track wheel kit that has the hardware: four bolts and the washers. Look at your track wheel; you’re going to see a snap ring on one side – that side goes toward the head of the bolt. Slide two small washers on after then one large washer. Repeat that assembly for all four bolts.

Install the track wheels
Using your inch and an eighth socket and impact wrench, place the bolt through the hole in the outside of the frame. Secure the track wheel through the frame. Tighten it up as far as you can making sure the wheel will still spin.
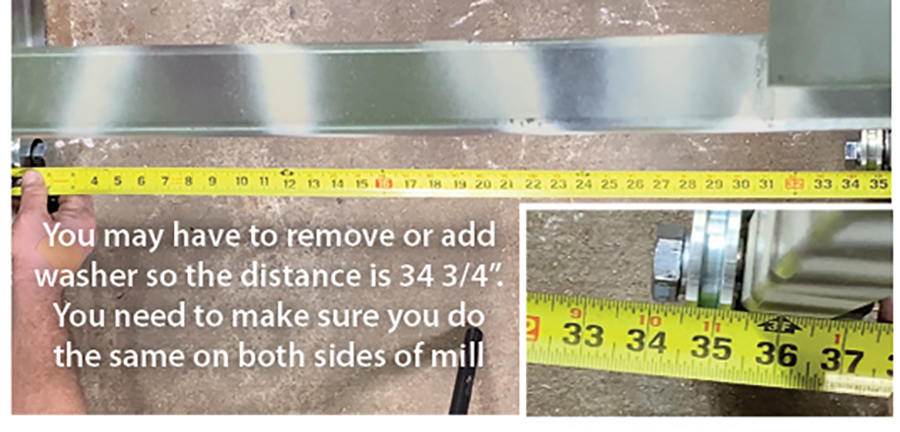
We are looking for a measurement of 34 & 3/4 in, from the outside of 1 wheel to the inside of the other wheel. If necessary, pull off or add one of the shim washers. Install the wheel on opposite side. Do the same thing on the other end of the mill- if you pull a shim washer off from one side on the first set, make sure that you pull that same shim washer off on the other side.
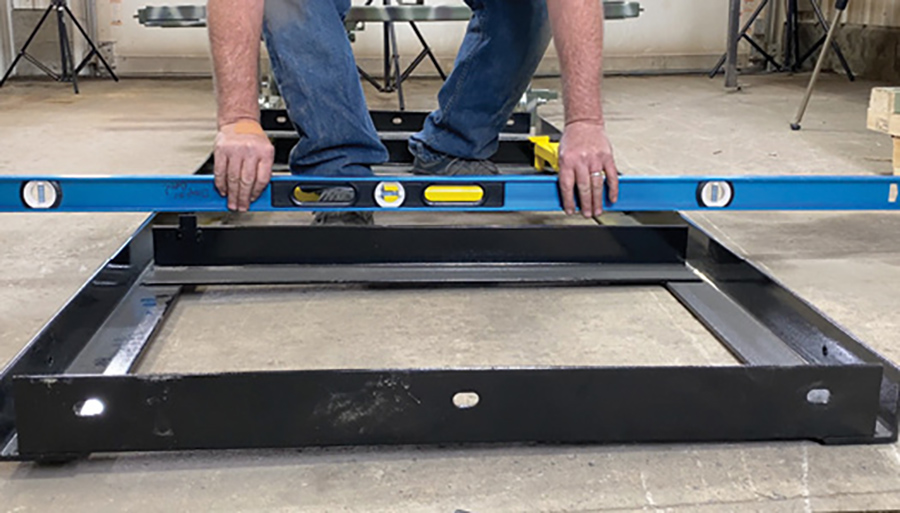
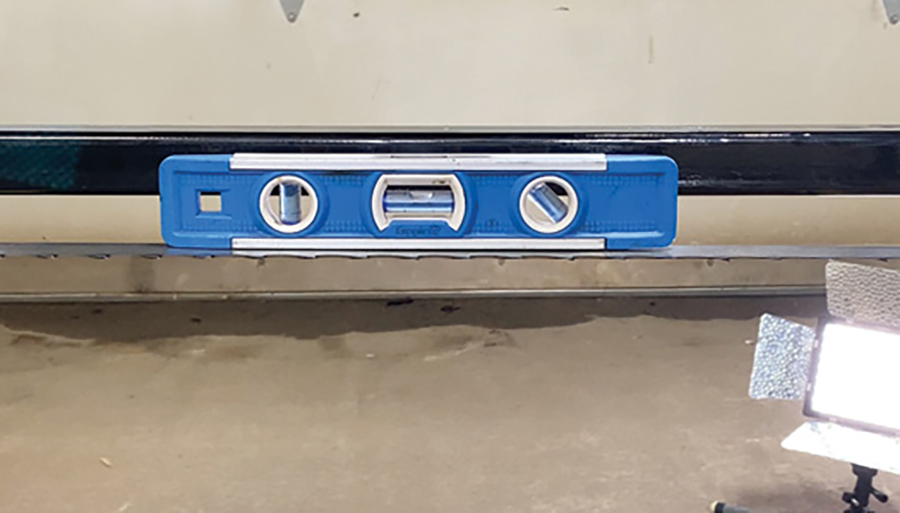
Level Track on Surface (Video-11:26)
Now we’re going to set up the track to get the mill frame set on. Make sure your track is level. If your floor is unlevel, get some shims so you can level the track. Use a 6ft level to level the track. It needs to be leveled from side to side and from end to end.
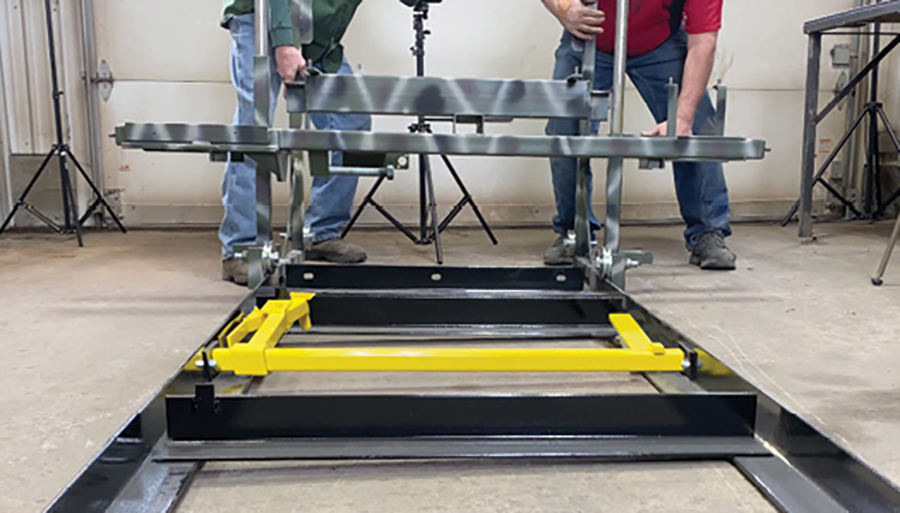
Put Mill on Track. (Video-11:26)
Lift the front of the mill up, drag it forward. Set your first two wheels on to the track. Go to the rear, raise up the mill head and slide forward. Be sure to block the wheels so the mill head cannot roll off the track before putting the track stops on.

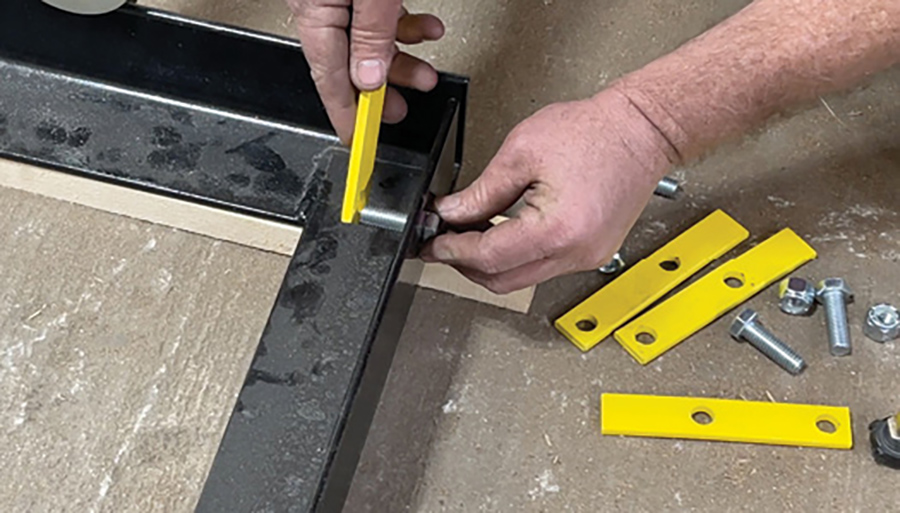
Install Track Stops. (Video-12:30)
Secure the track stop kit. The 1/2 – 13 x 1 inch bolt goes through the track frame first, put the track stop on the inside of the frame with the bolt facing inward.
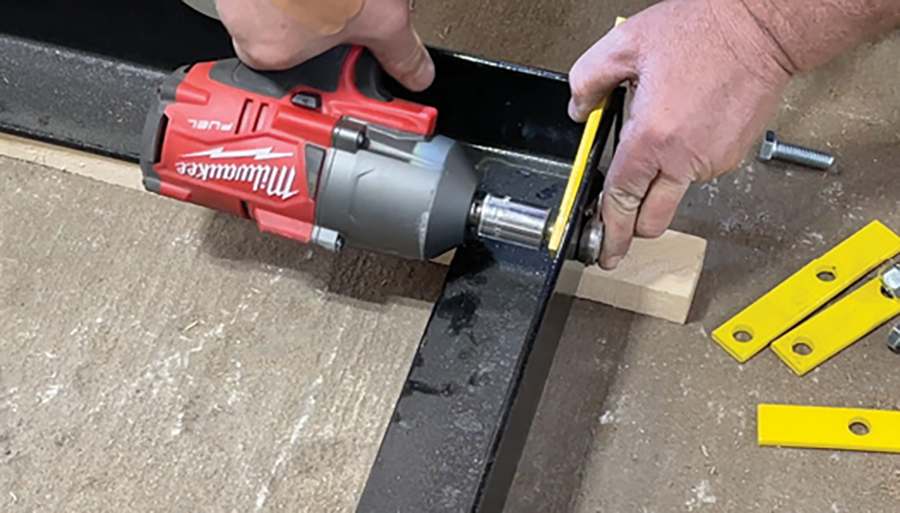
Put the nut on and tighten with a 3/4 wrench. Leave the track stops a little loose for easier mill assembly and tighten later. Install on all four corners.
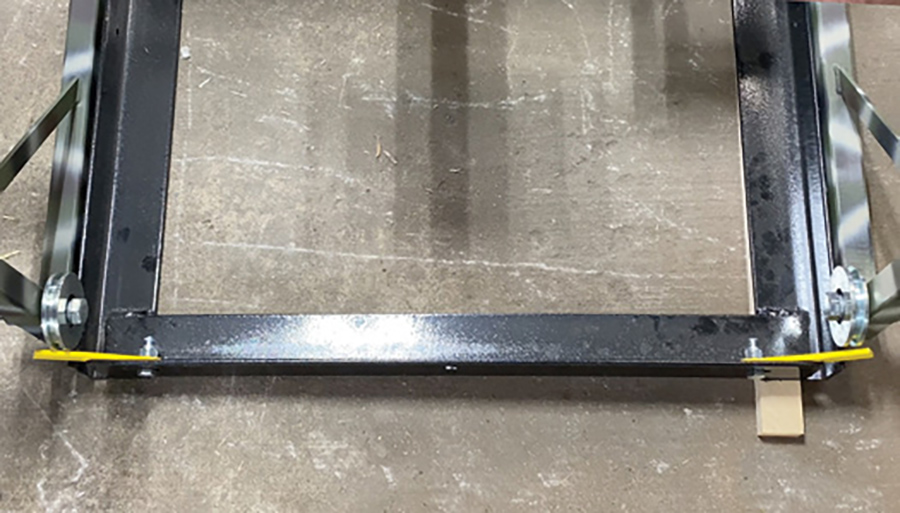
Snug the mill to the rear against the stops. Take a pair of vice grips, lock it onto the tracks so that the mill won’t roll during your assembly procedure.
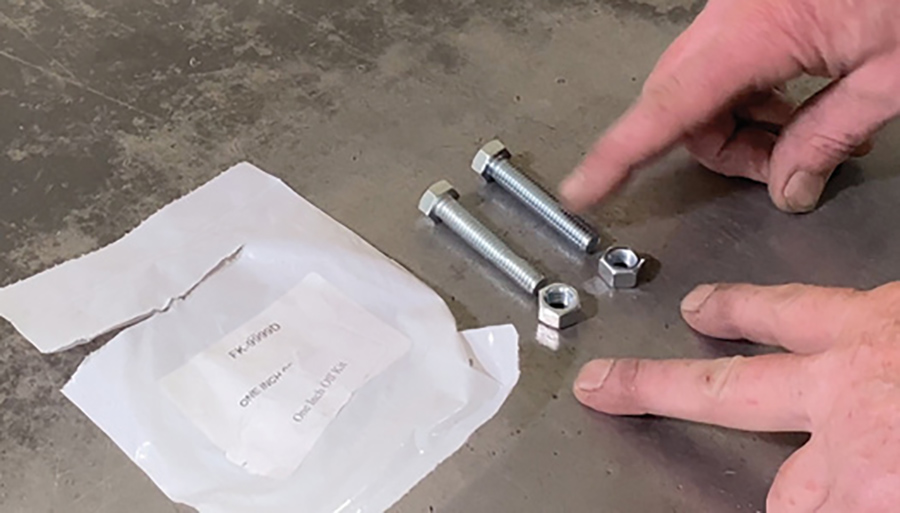
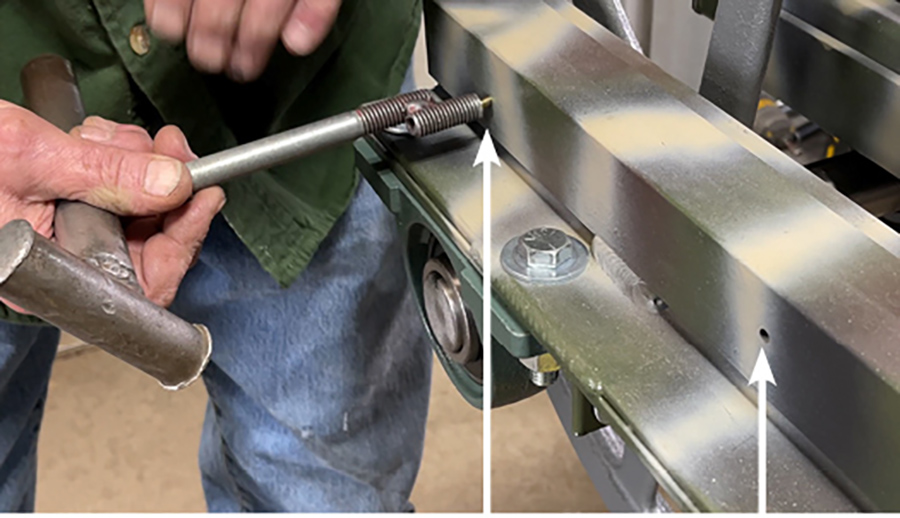
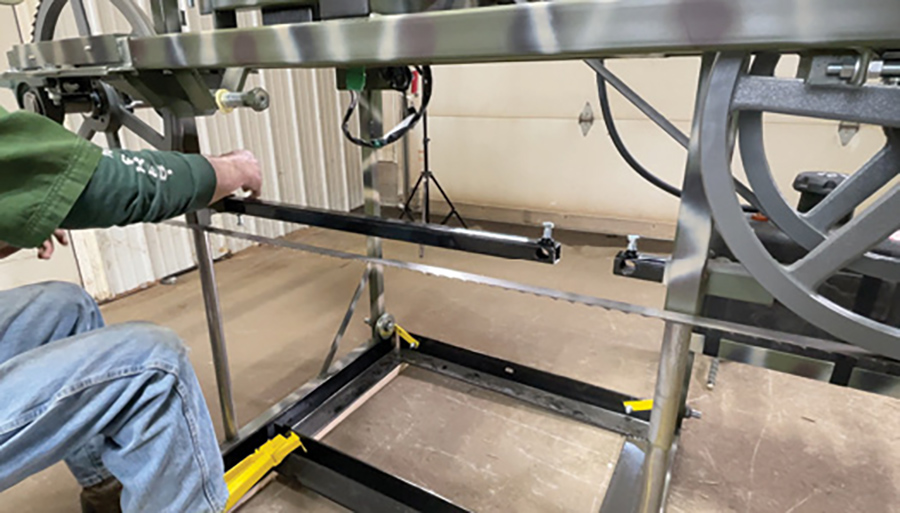
Installing 2” Off Deck Bolts. (Video-13:24)
The kit comes with (2) 2” bolts and jam lock nuts.
Raise the head up about midway on the frame.
On the bottom tab on the guide tube, screw the bolt up through leaving an 1 1/8” of the bolt exposed from the tab down to the top of the bolt. With your locknut on there, tighten it up just snug so it doesn’t turn and fall out. Repeat the same thing on the other side.
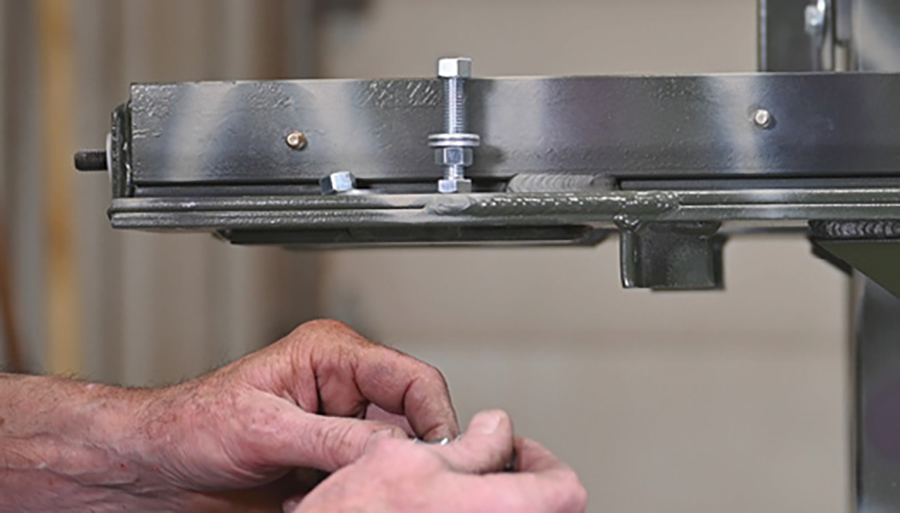
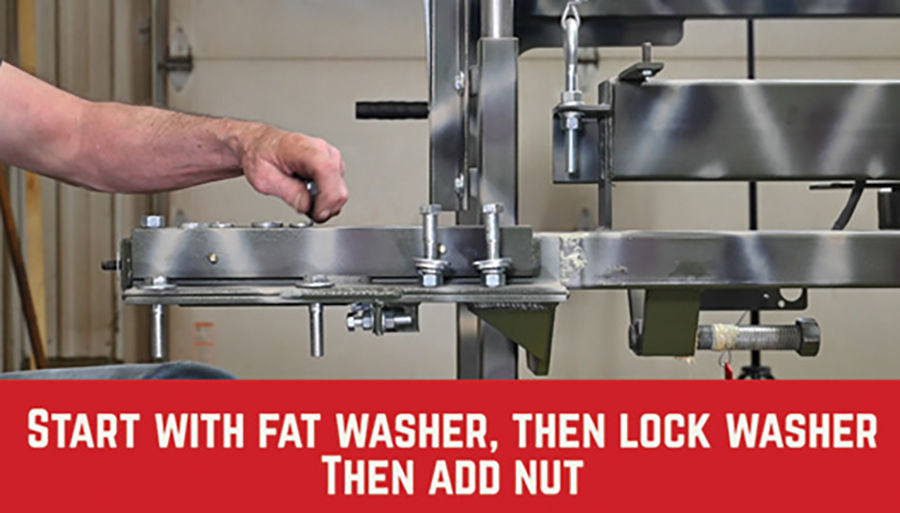
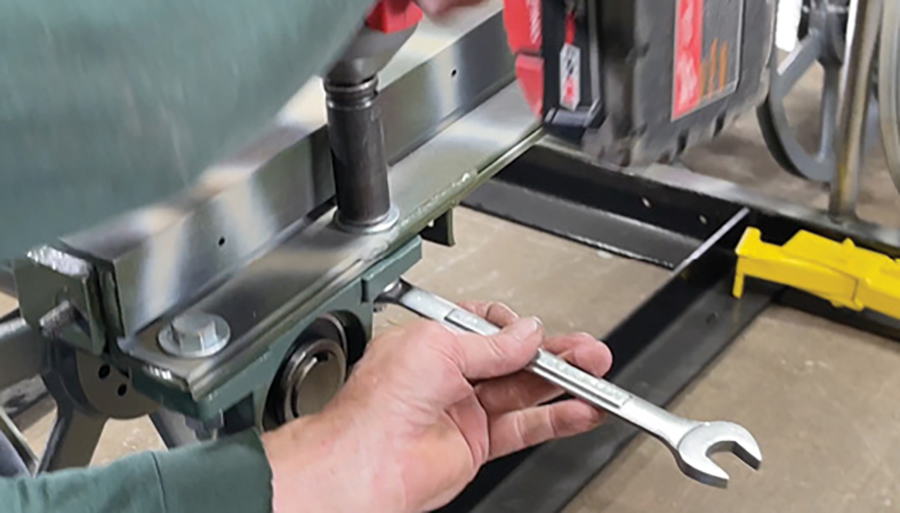
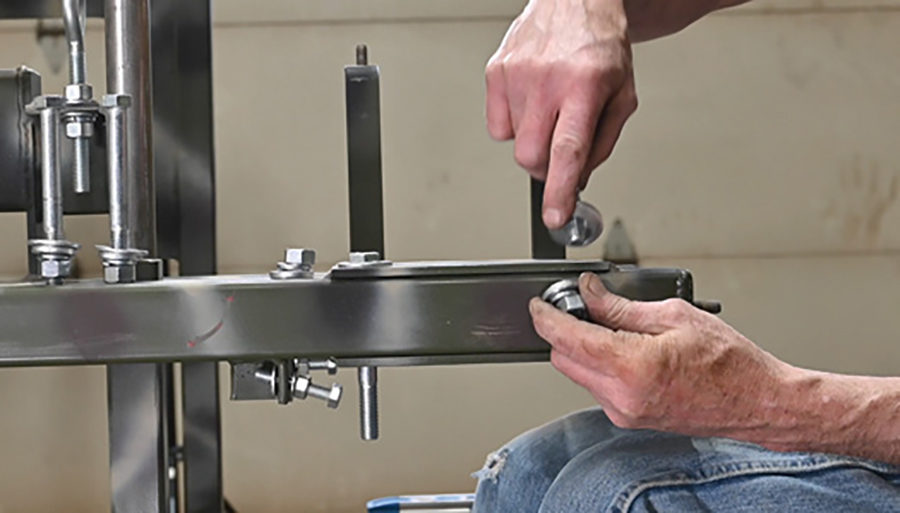
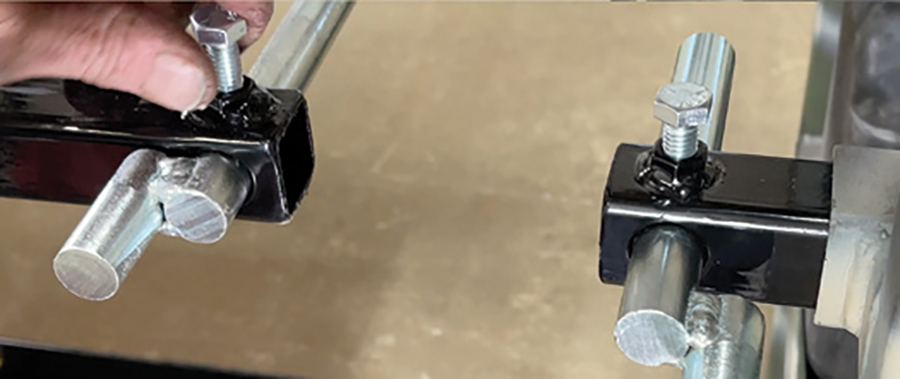
Install Bearing Adjusting Bolts. (Video-14:18)
Secure the four adjusting bolts, put two washers on first then a nut. The head of the bolt is going to be pressed against the bearing to make the adjustments.
Once you slide the bolt through the hole, put another washer on and then the other nut. Repeat this on both sides and ends of the mill.
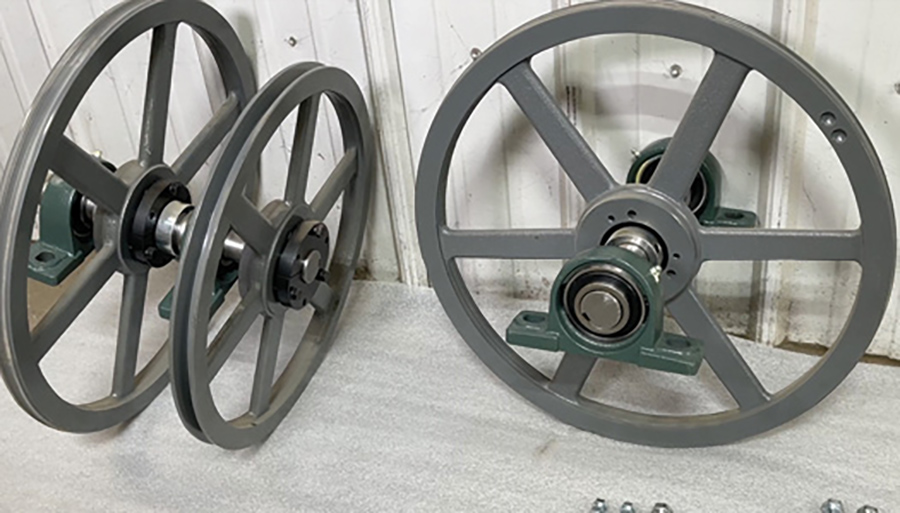
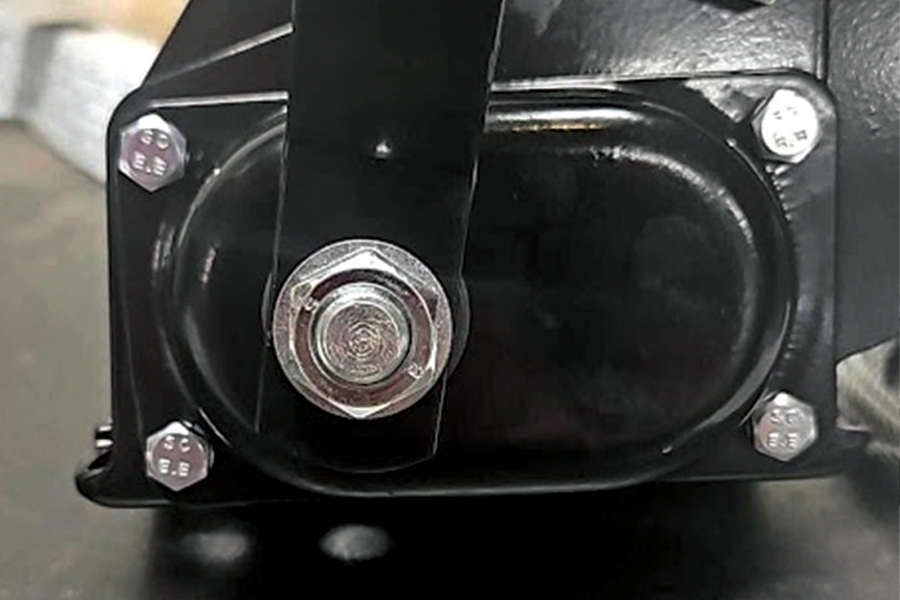
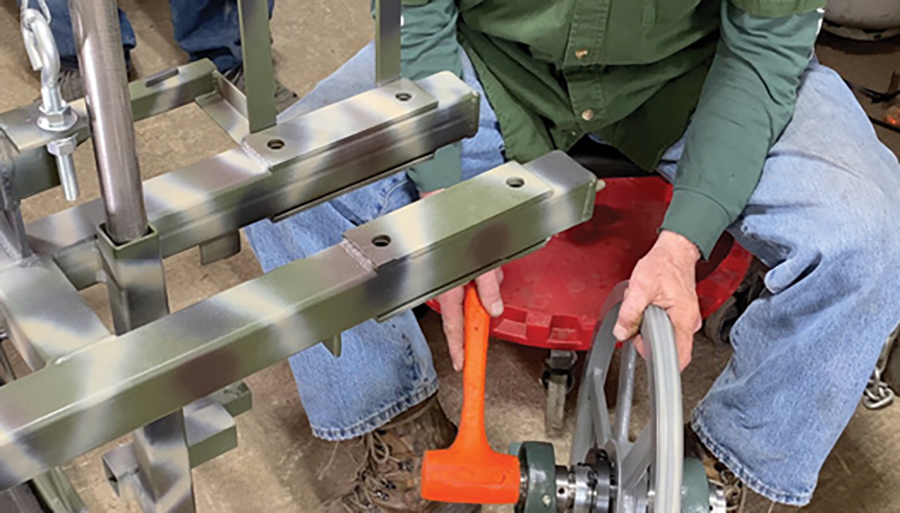
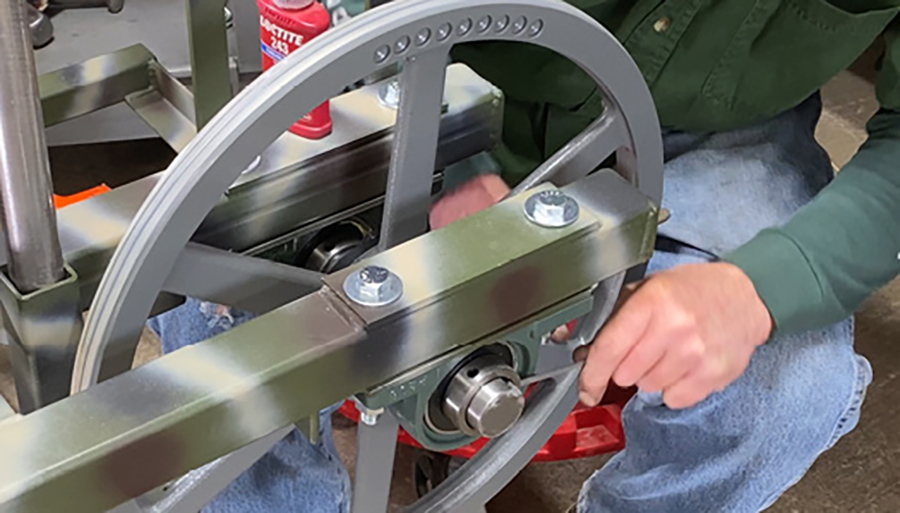
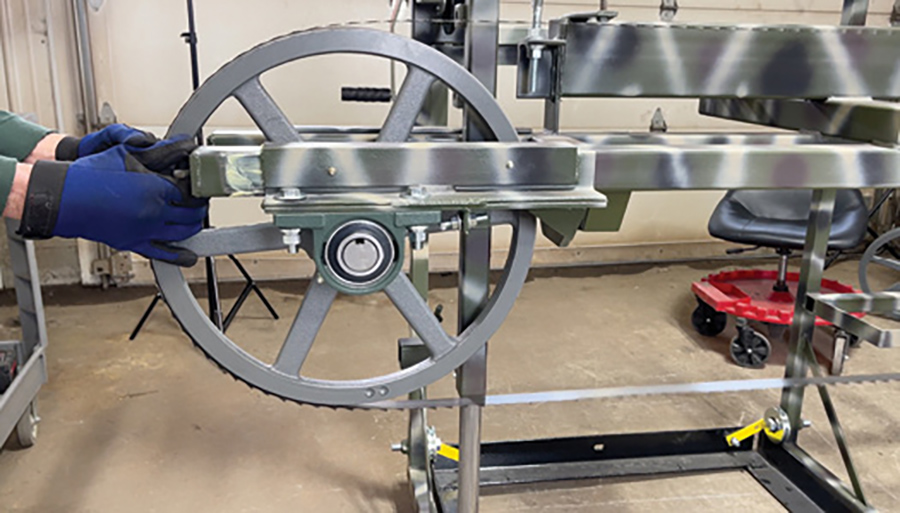
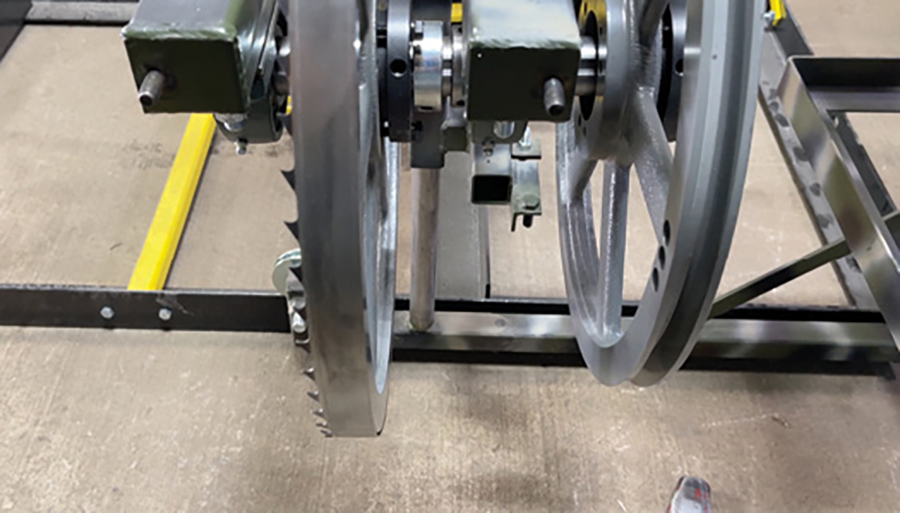
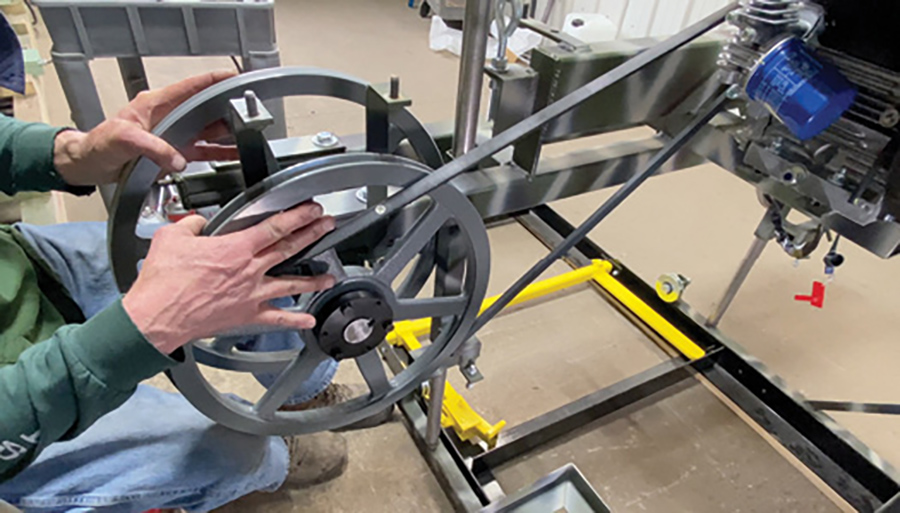
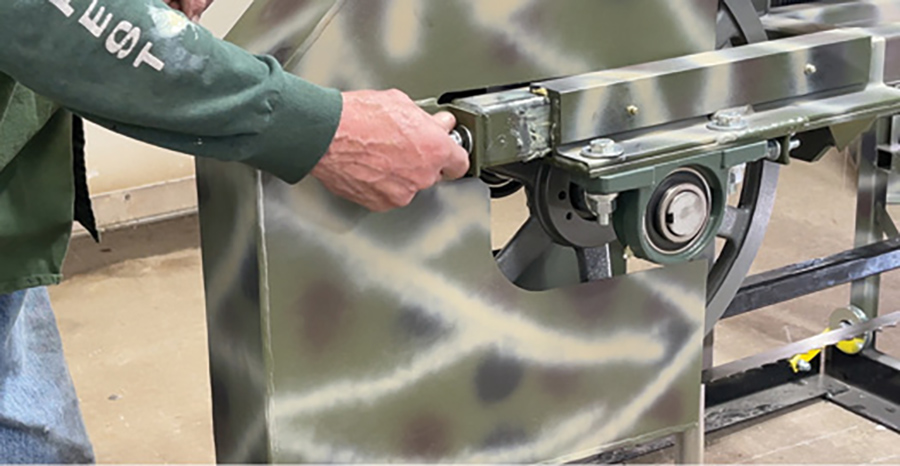
Install Main Bearings & Band Wheels (Video-14:45)
Two band wheels in the kit – a single pulley for the idler end of the mill (the tensioner side – use the short bolts) and the shaft with double pulleys for the drive side (use the longer bolts).
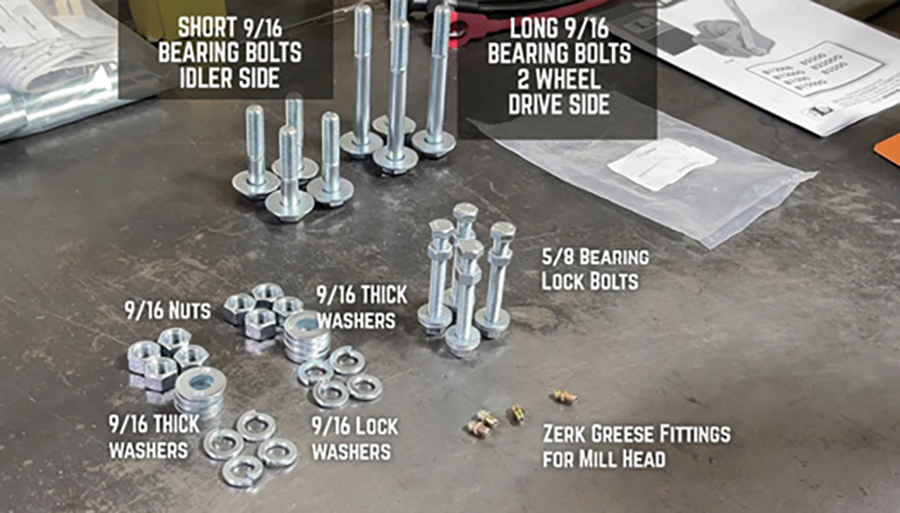
Separate all your hardware. Put the flat washers on each bolt. The thin washers going to the head of the bolt. The thick washers are going to go on the bottom.
Grab your short bolts to put the idler wheel on 1st which is your tensioner end, single pulley. Drop all your bolts in the holes. Secure your pulley with the bearings mounted on it.
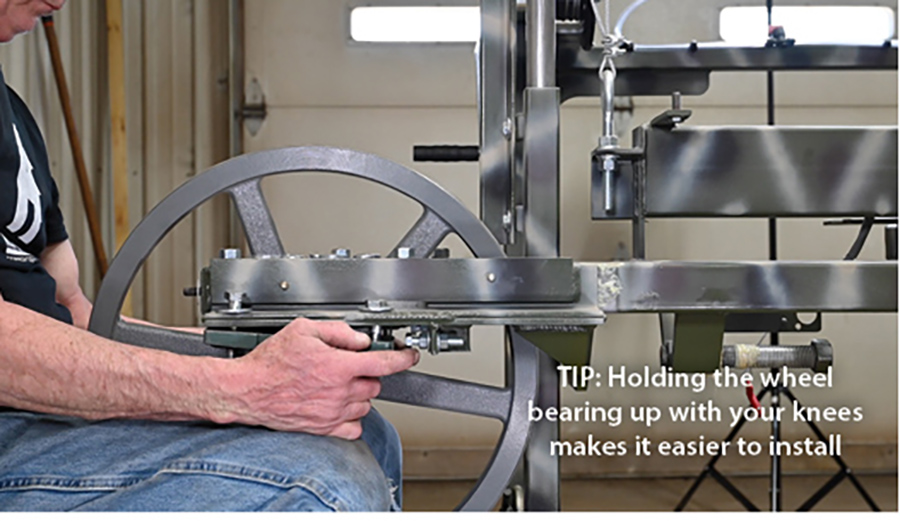
Easiest way is to sit on your chair and hold it up with your knees as shown. Start all your nuts and washers. The thick washer goes up against the bearing then lock washer and then nut. After you get all your bolts on, snug them up.
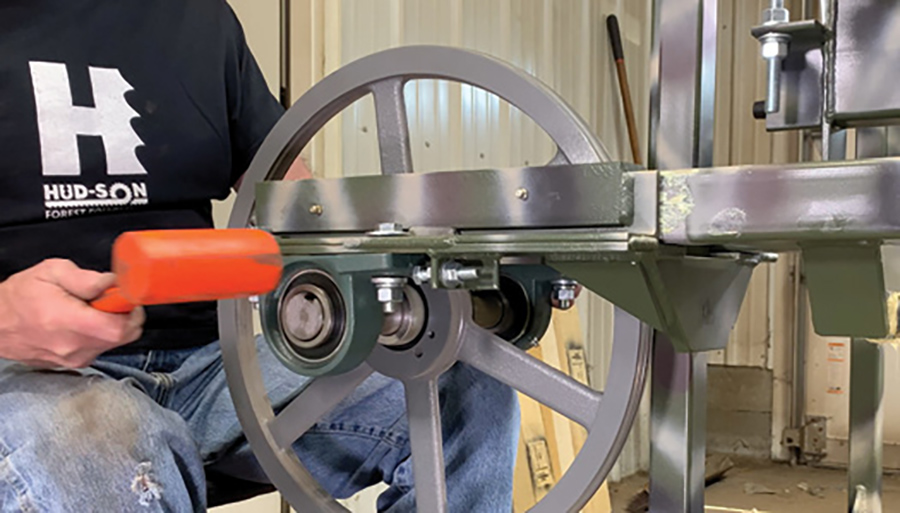
You may have to align the bearings with the head. Just take a hammer and lightly tap to self align. They will swivel on the shaft. Tap them to get them straight with the frame.
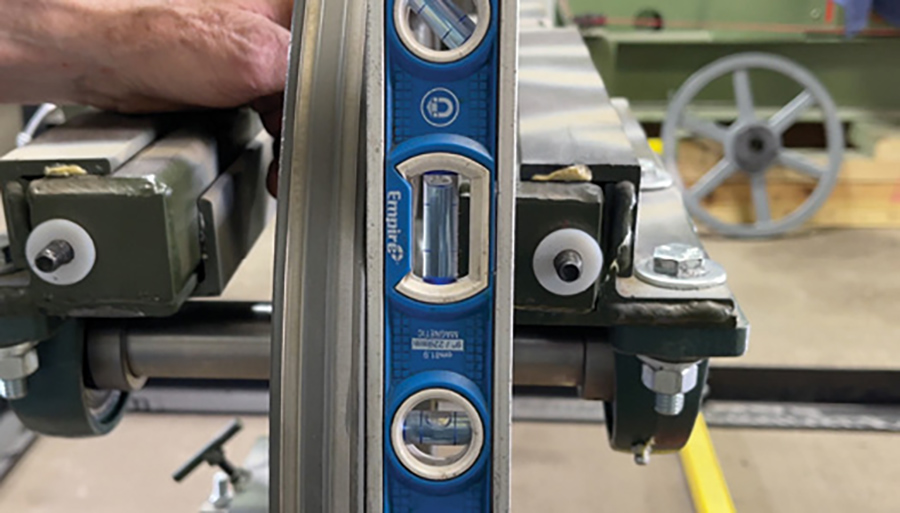
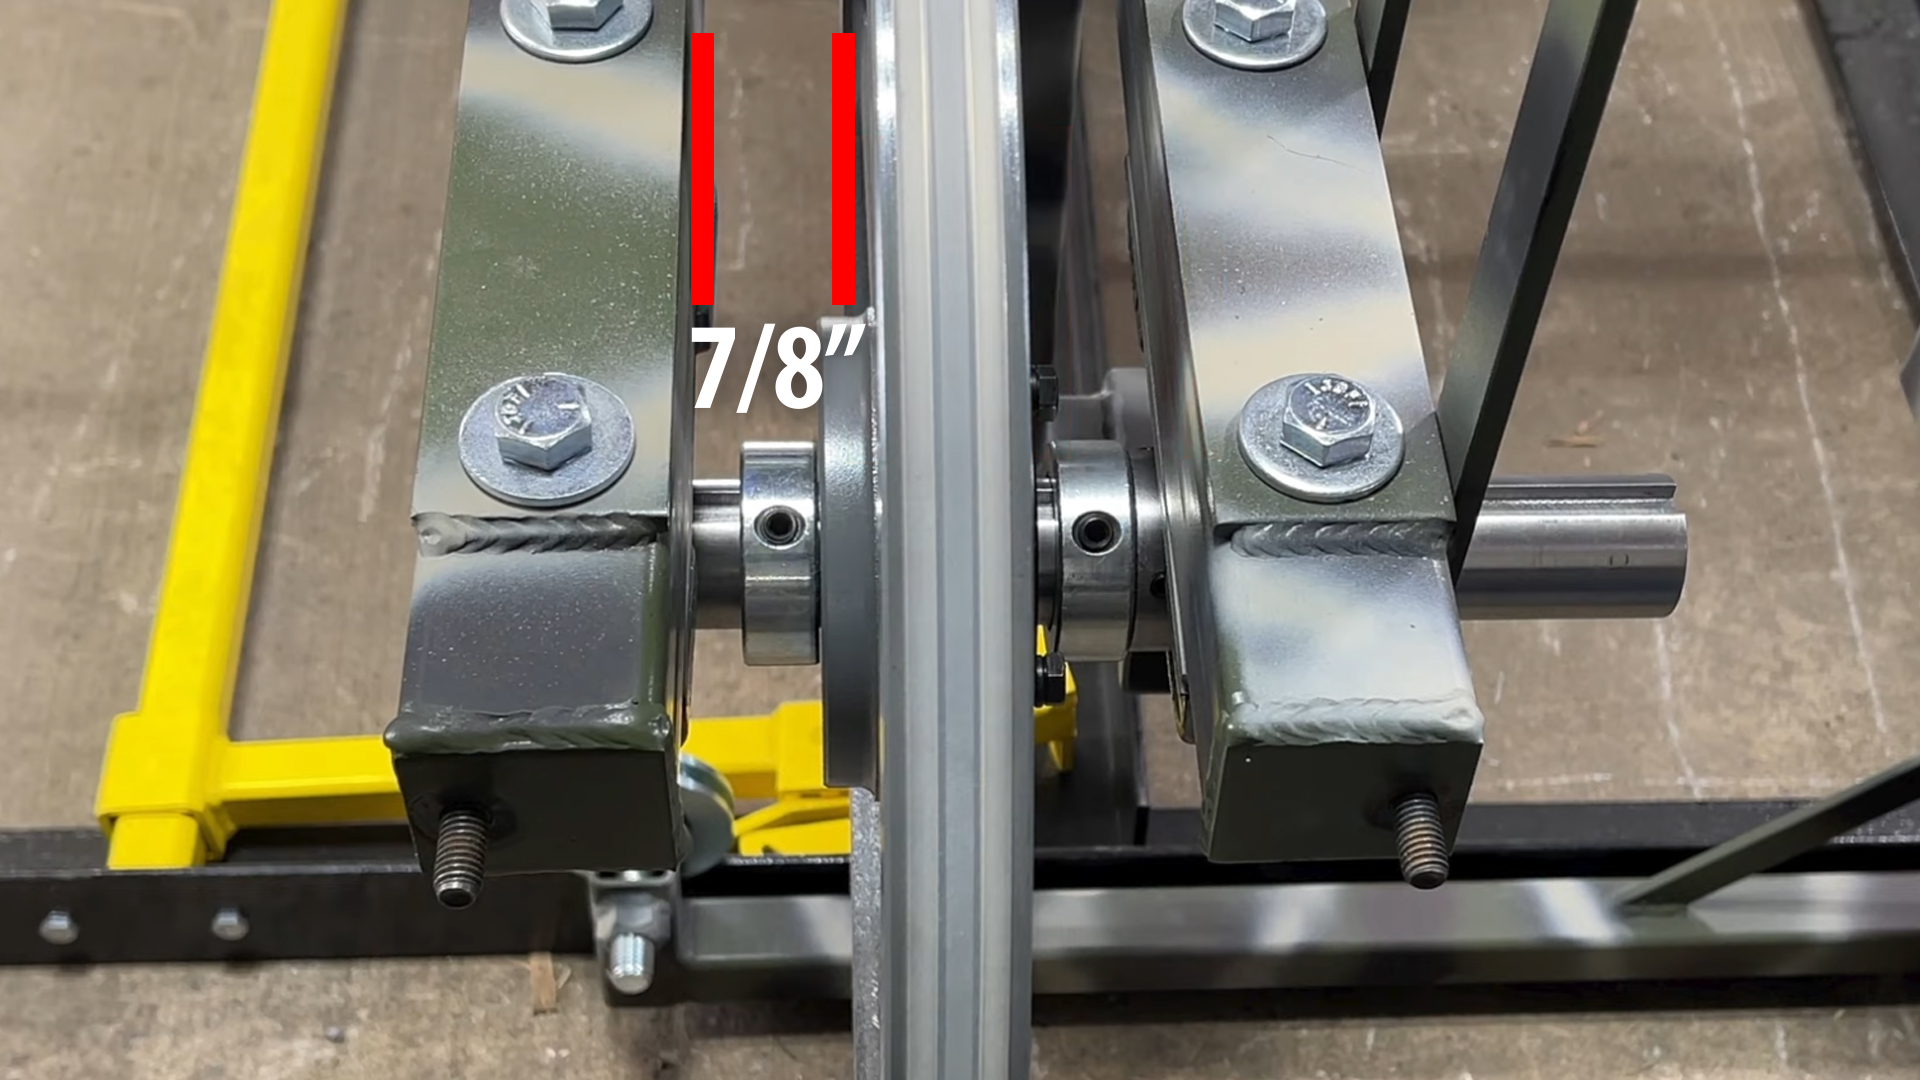
Check Wheel For Plumbness. (Video-16:26)
Take your level, put it on the band wheel and make sure that it is Plumb up-and-down straight. If the band wheel is not plumb up and down, then we have to put one of the shims (supplied in kit) under the bearing.
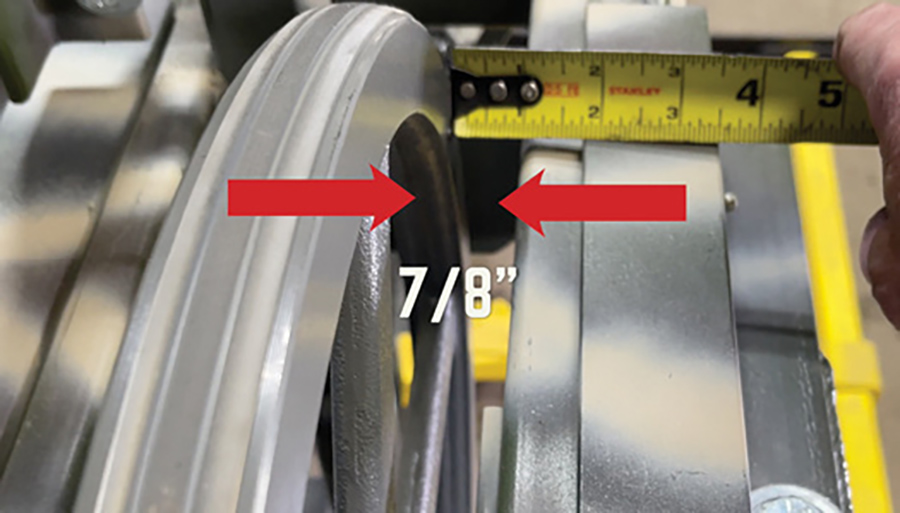
Measure from the inside of the frame to the edge of the wheel for a distance of 7/8 inch. Put your tape against the band wheel holding up there and look for 7/8” looking right down the edge of the frame.
Make sure it doesn’t move then tighten up the bearing bolts. Do one side at a time. When you’re tightening it make sure that the wheel does not move. Once you get done tightening it, check it and make sure it stayed 7/8” on that front side.

Set the Set Screws. (Video-17:25)
We’re going to come back and set them with a drill later but we need to snug everything up tight right now and get everything aligned and set up.
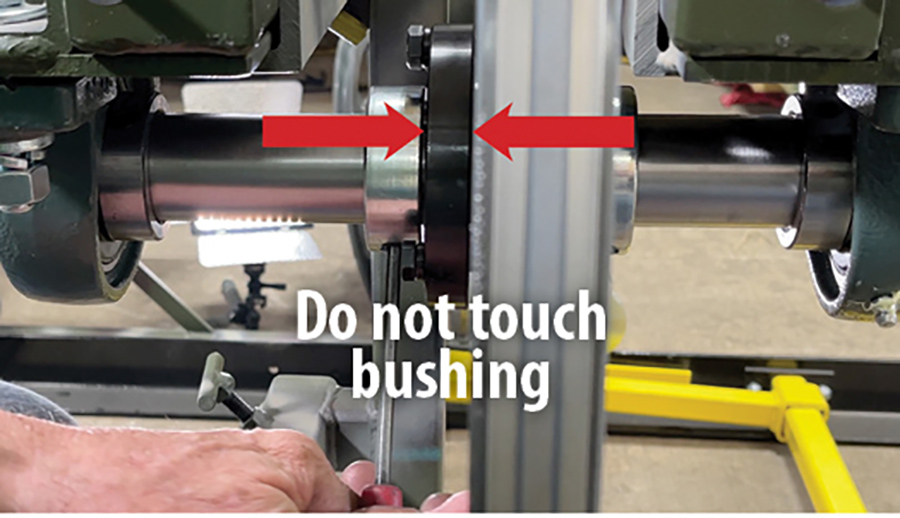
In this shot we are showing you the bushing for the band wheel. Do not make any adjustments: they are preset at the factory.
Put the Locktite right on the locking collar set screws against the band wheel itself, one on each side. Pull the screw out, clean it off, put some Loctite on it. Put that collar as tight to the pulley as possible. Make sure it’s off-set from the keyway in the shaft and lock it right on there.
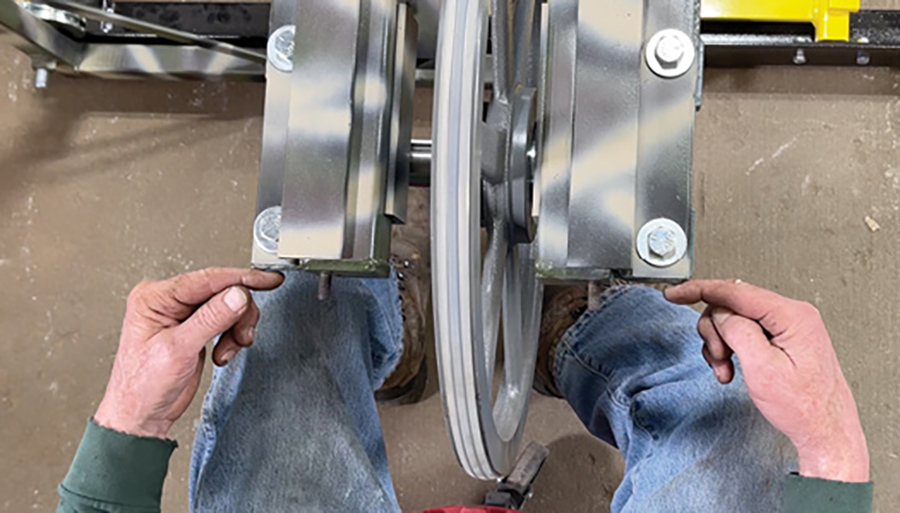
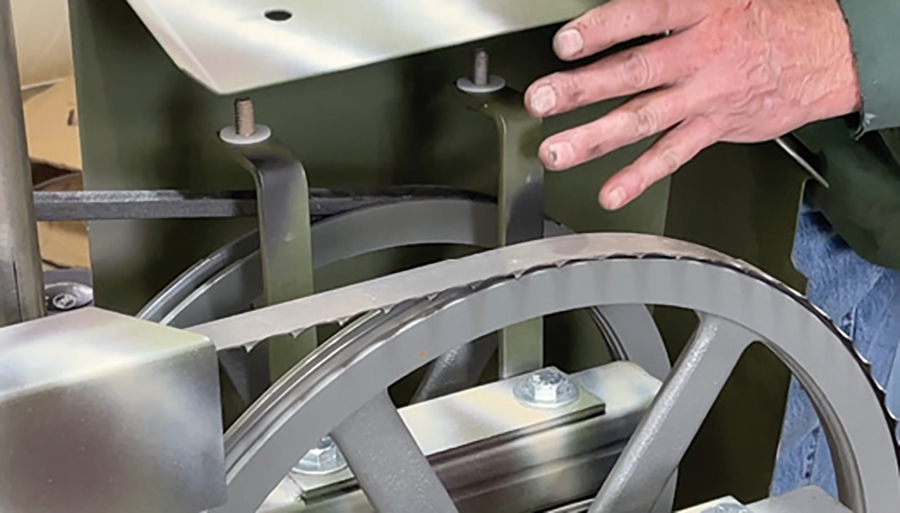
Install Drive Side Main Bearings (Video-18:19)
This side shipped with two pulleys on it. To remove the main Drive pulley from that shaft: Loosen that set screw in the collar of the drive pulley and it should slide right off.
Self Aligning Bearings may have to be straightened up. Tap with a mallet and get as straight as you can on the shaft.
Center long bolts in the frame. Set the band wheel up into place- set it on your knees, lift it right up into place and hold it. Make sure you put the thick washer against the bearing then the lock washer and the nut. Hold it as straight as you can and snug everything up. Double check it for squareness against the frame.
Measure from the inside of the frame to the edge of the bandwheel and double-check your distance when tightening the bolts. Check the wheel for plumb like we did on the other side.
(Video-19:48)
This side is off a little, so we’re going to have to add in the shim. Loosen up one side, tap the bearing down a little, pull your bolts out and slide the shim in. Snug it back up there tightening everything back up. Make sure that your wheel is straight with the frame as you’re tightening things. Check it for plumb again and tighten up the bolts again. Go back and verify your distance on the front of that band wheel to the frame again.
Loctite the inner collars against the pulley so those can’t move. Make sure they’re off set from your keyway. Just tighten the set screws on the Locking collars on the bearings. Do not put Loctite in those yet.
On this drive wheel set up a locking collar is on the outside of the bearing.
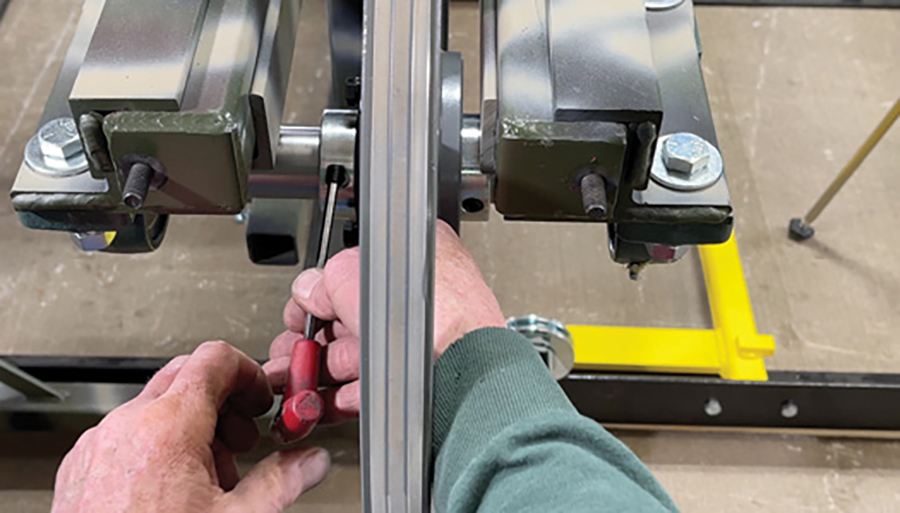
Counter Sink Bearings (Video-21:25)
There are four set screws on each end of the mill, two on each side on each bearing. Ensure set screw is not on the key way- that’s in the shaft.
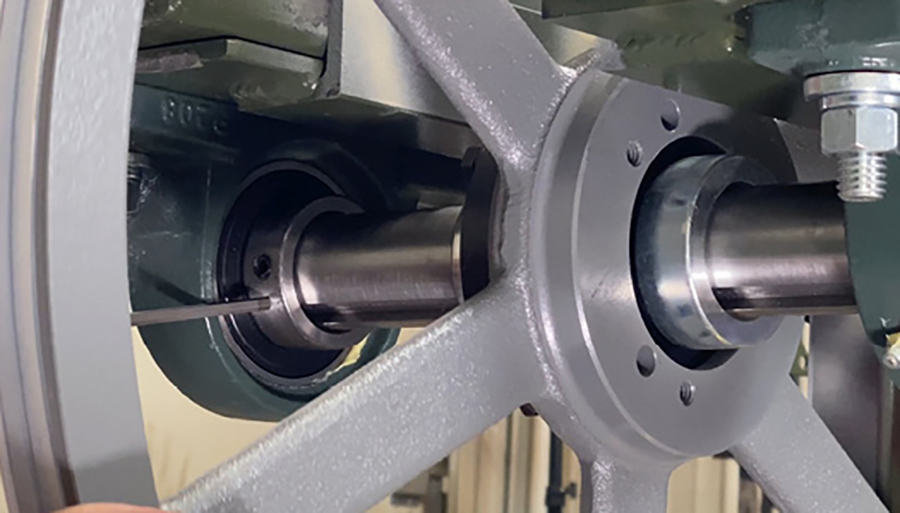
Set one above and one below the key way.
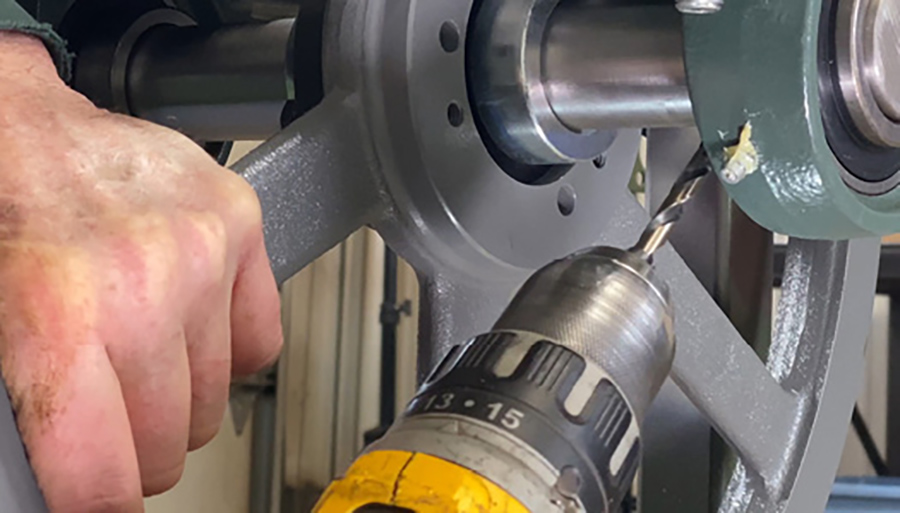
Remove the set screw on the top two first. Drill into set screw hole to drill shaft. This prevents the shaft from sliding or spinning inside the bearing. Use your 3/16 bit, hold your wheel nice and tight so it can’t roll on you. Be careful not to hit the threads for your set screw. Drill in about 1/8” to create the dimple to set the set screw in. Clean off the oil that’s on the set screw that you took out. Put your Loctite on, put it back in and lock it in tight. Turn your wheel and do the next two set screws the same way.
Move to the other side of the mill and tighten up and Loctite the set screws on these bearings. Remember on this side the bearing is facing outward and not inward on the one side. Remove the set screws, drill it, remove the oil, Loctite and screw back in tight. Make sure you do all 4 set screws on each end.
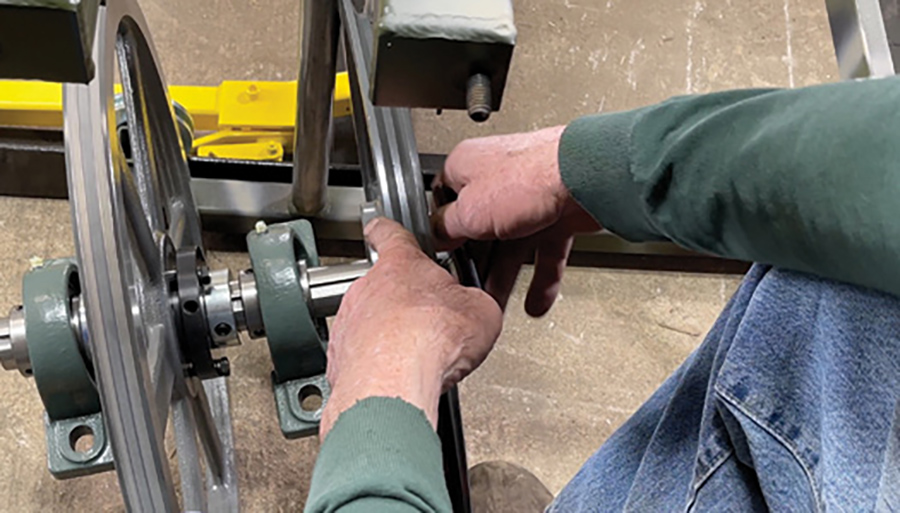
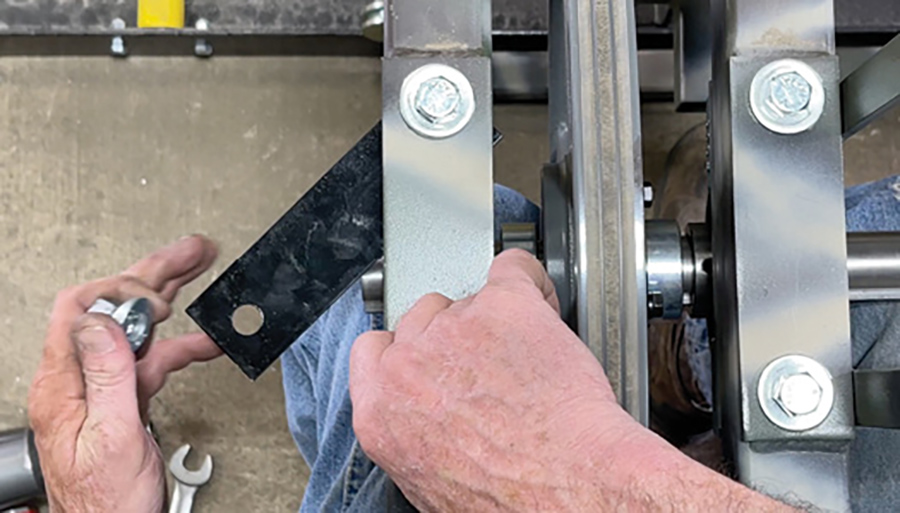
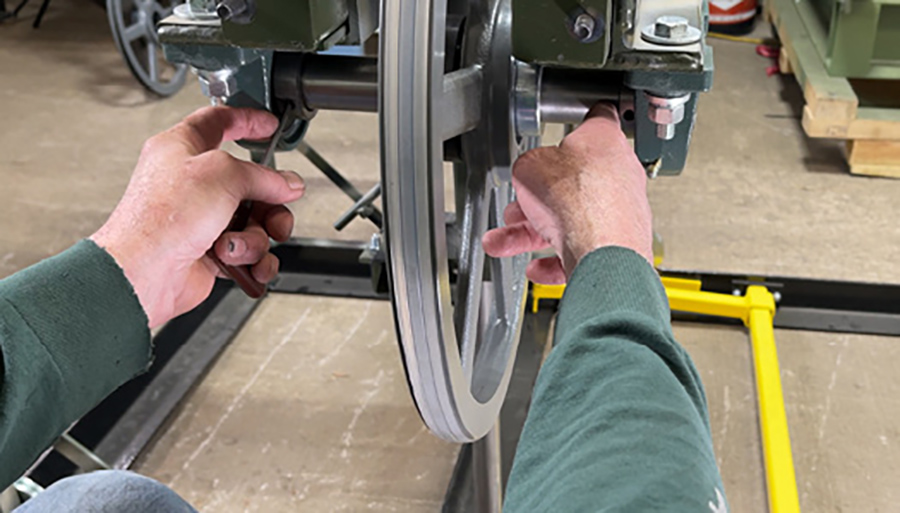
Check Band Wheel Alignment (Video-23:28)
Take your straight edge – a long level works best. Go from one band wheel to the other – they should be touching at 4 points on each side of the band wheel on both wheels.
If it’s out of alignment a little bit because we did make the measurement off the frame. Just loosen your bearing bolts and make that come in straight so they both come in line together. Go ahead and retighten all your bearing bolts.
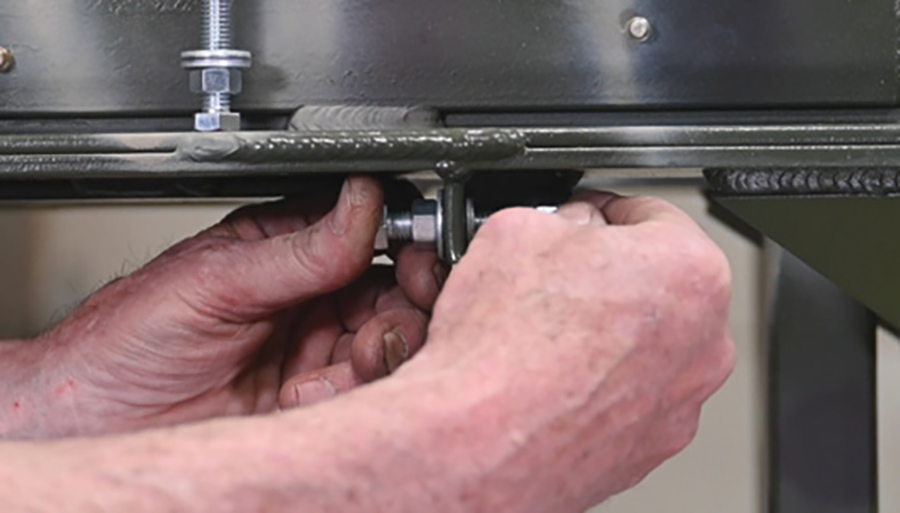
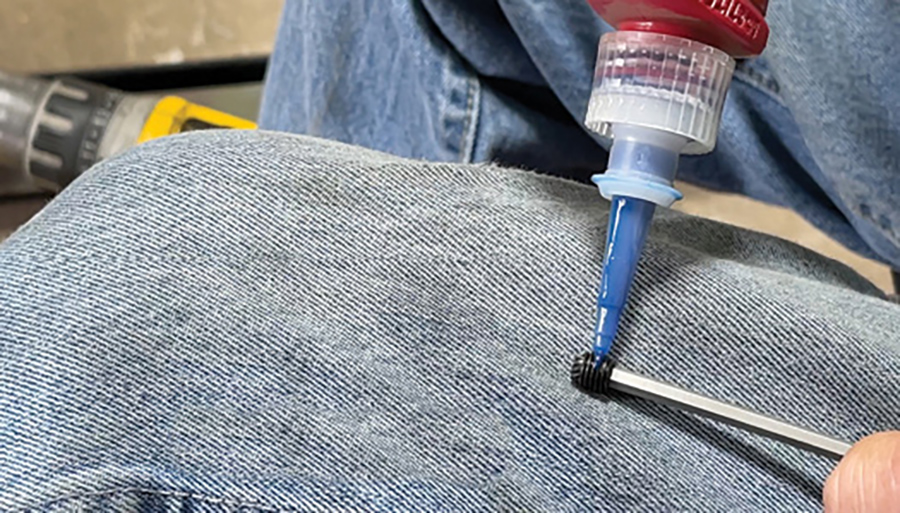
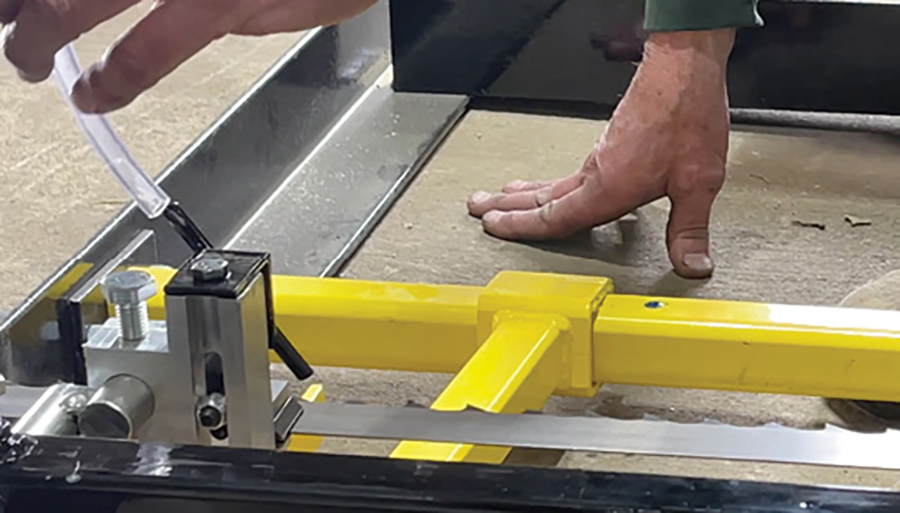
Install Zerk Grease Fittings (Video-24:03)
These allow grease to get in on the sliders when loosening and tensioning the blade. When installing the zerk fittings, you can make a tool – sometimes you can use a hardwood block or you can go to the hardware store and buy a tool. They’re simple to put in as long as you put good steady pressure on. Tap them in nice and snug.

Once you get your grease fittings in go ahead and grease them: four squirts per grease fitting. Grease all four fittings.
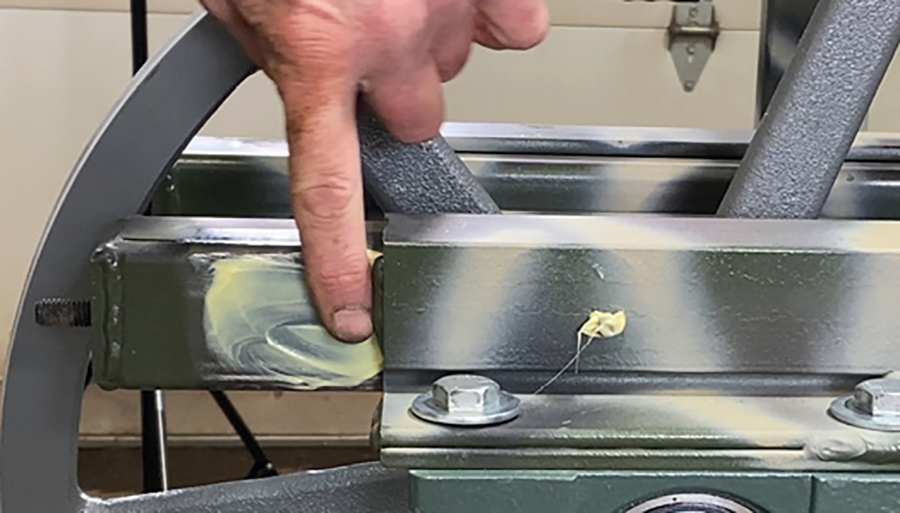
Then smear a little grease on the ends of the sliders and on all three sides so they slide in and out easily. Grab the bearings on each side and work that assembly in and out a couple times to make sure it moves nice and freely.
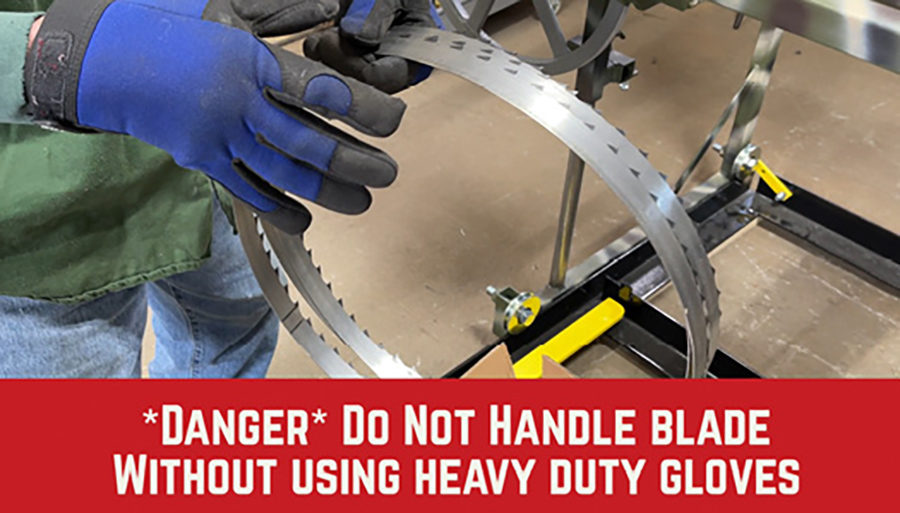
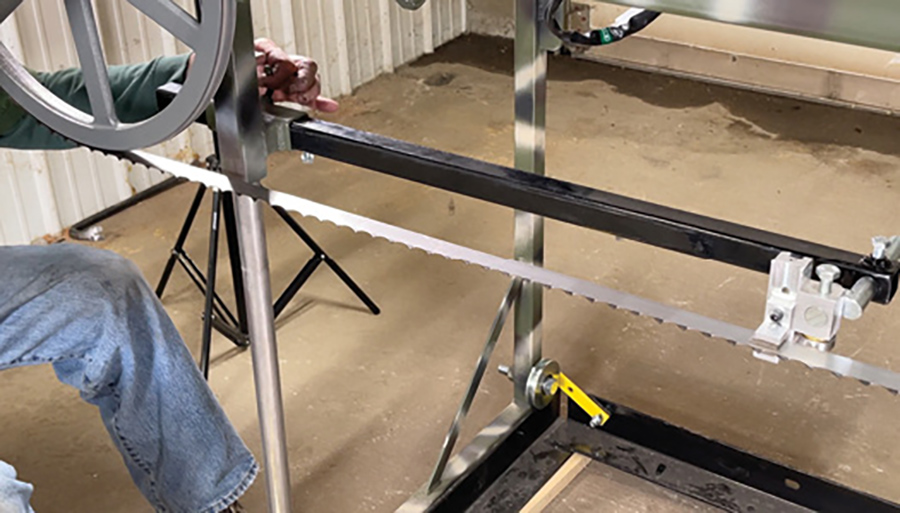
Mount The Blade. (Video-25:18)
Be careful handling these blades – they are very very sharp and they will cut you in a split second. Make sure you’re wearing gloves when you’re handling the blade.
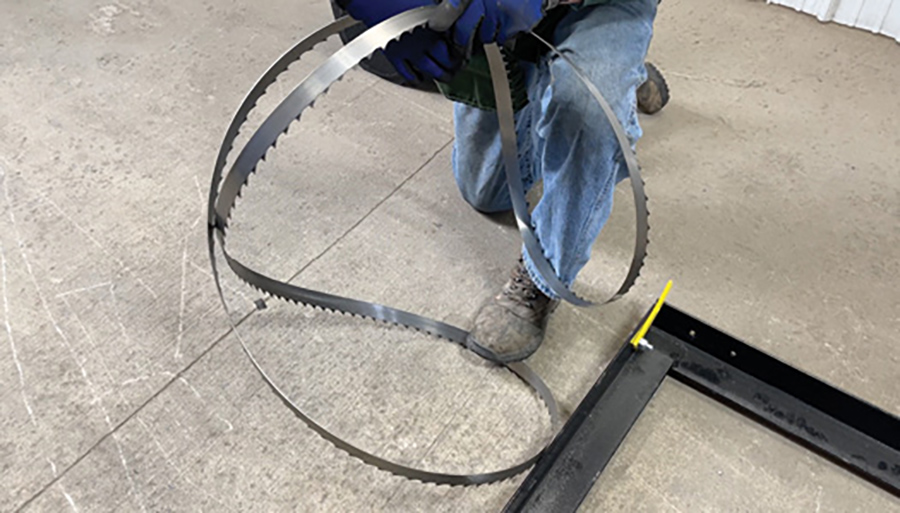
The easiest way to uncoil the blade: take it out of the box, get a little bit of loop started, step on it with your foot, slowly uncoil the blade standing up with it. Be careful not to cut yourself or let it come slinging back at you. There’s a lot of tension.
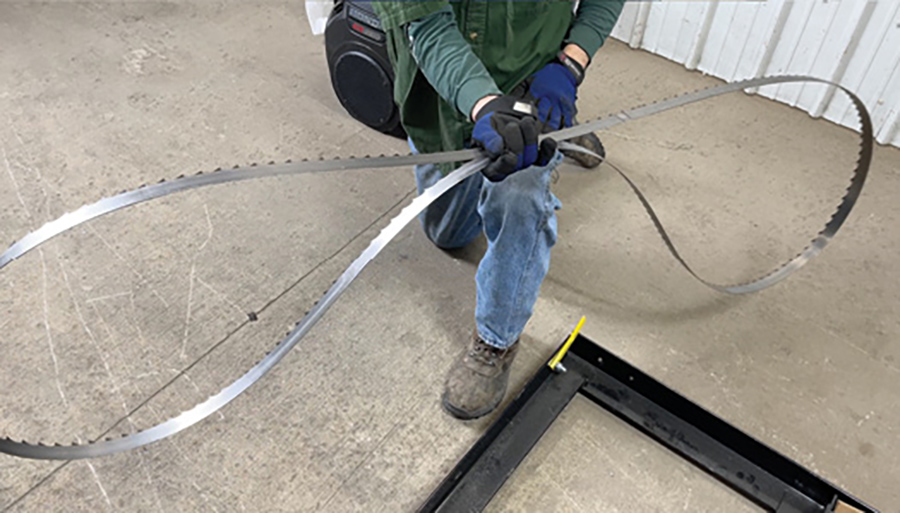
Once uncoiled, pinch it together in the middle.
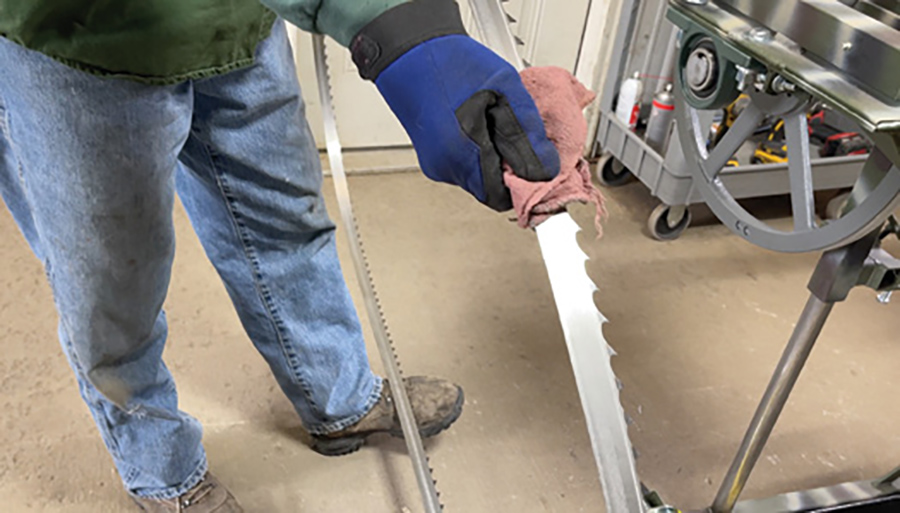
Clean the oil off the blade. When you’re cutting, you always want to clean the oil off the blade before you put it on the mill. With the teeth facing away from you, hold the band blades, just let the bottom rest, pull it through. Take it around 1 whole loop, make sure you get it all off.
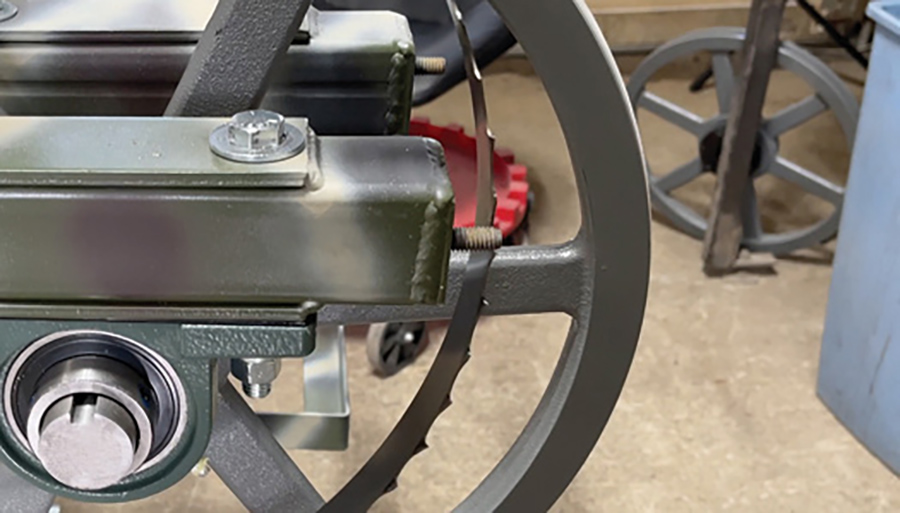
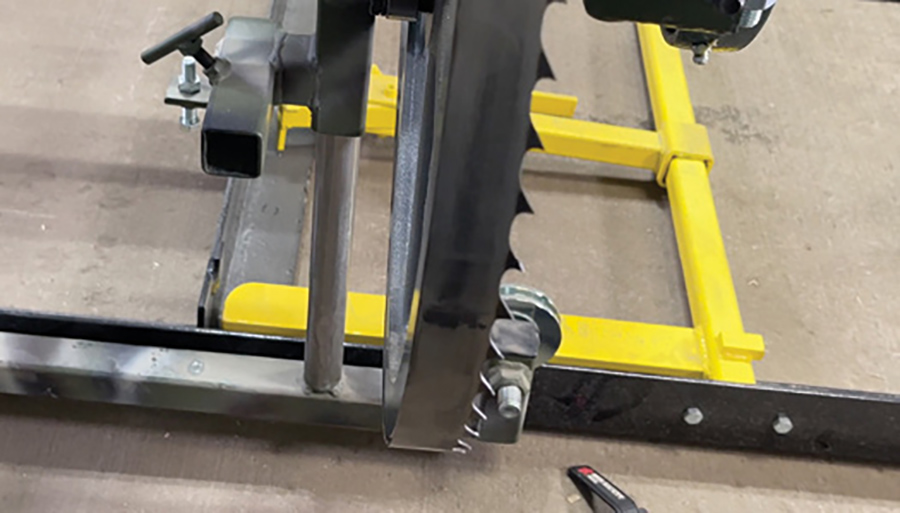
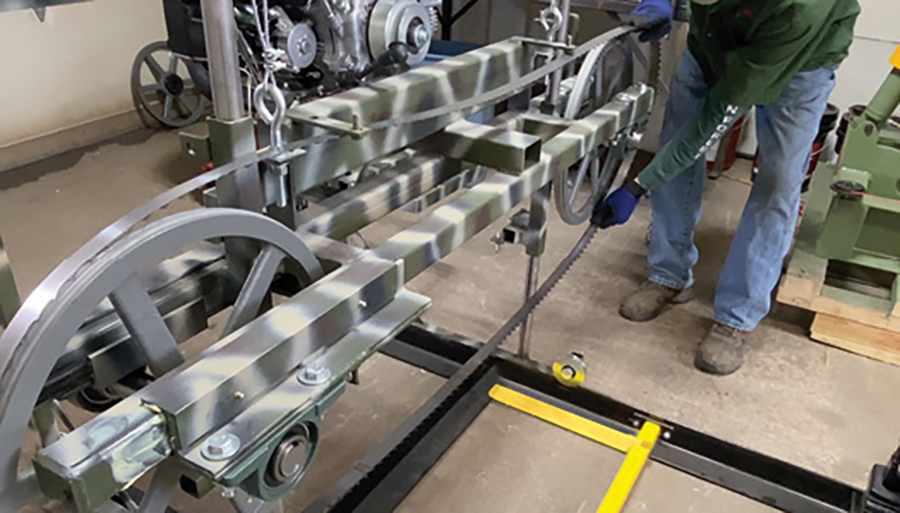
Put Blade on Band Wheels (Video-26:40)
Hook the blade over the one end of your frame just inside the guard bolt.
Bring it slowly to the other end and seat it over your band wheel. Keep the blade flush with the backside of the band wheel.
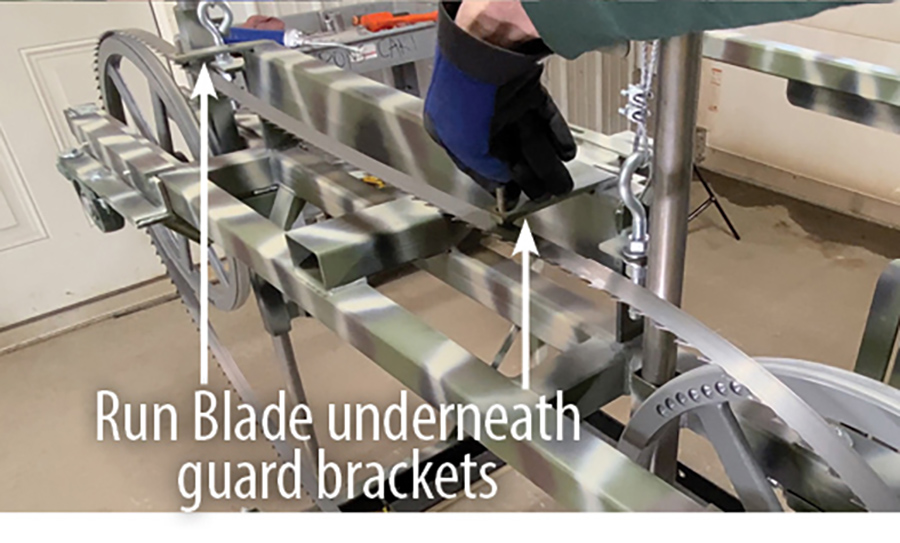
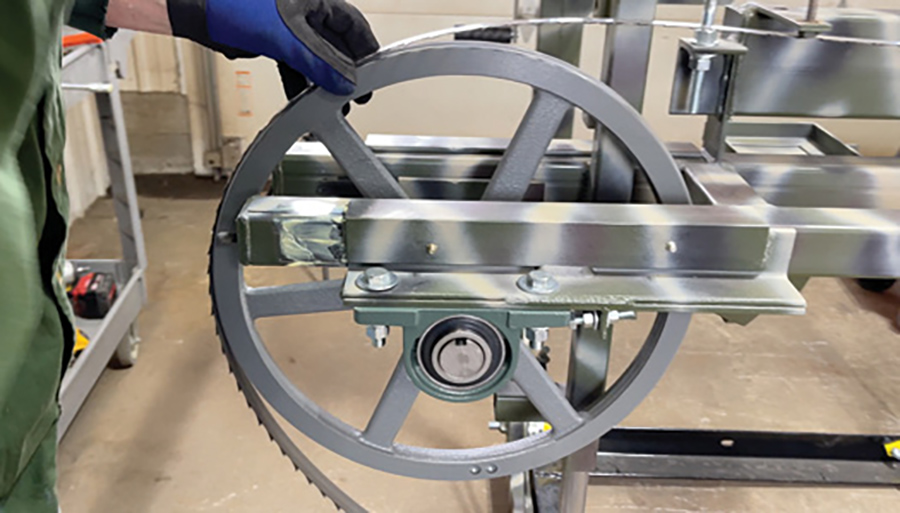
Move back to the other side, work it over onto the band wheel. Make sure that you put the blade underneath the guard brackets (The two flat brackets with bolts sticking out of them) that are on top.
Slide it onto the wheel, the back flush with the band wheel again. The back side of the blade should always be flush with the back side of the band wheel.
Next move to the other side of the mill and grab the band wheel right in the center with both hands and give it a good tug backwards. That will snap the blade up taut.
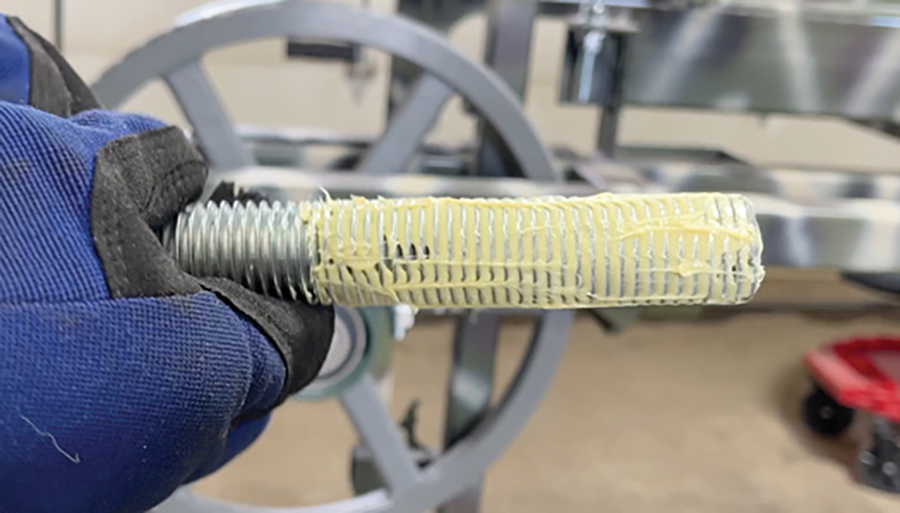
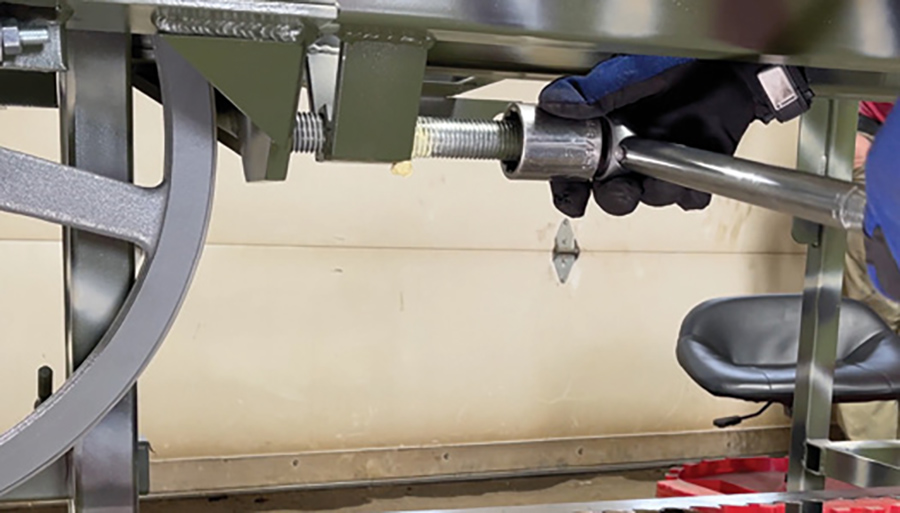
Tensioner Bolt. (Video-28:10)
Secure tensioner bolt- it’s about 8 inches long and 1 inch in diameter and has 1 & 3/8 inch x head on it. Grease first.
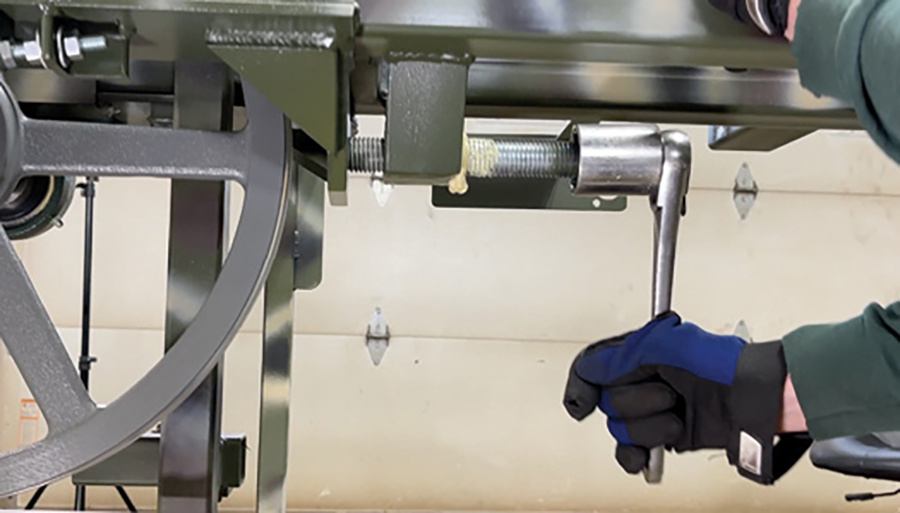
Put the bolt all the way through the nut. Grab some grease off the end from the threads and put right at the end of the bolt and on that plate it’s pushing up against that also reduces friction. When it starts to push on the tensioner plate just get a little tension on the blade so it’s snug.

Before we torque the blade we want to make sure we got our bearings all set – the mill head bearings should all be torqued to 75 ft lbs.
The torque on the saw blade should be 35 ft lbs.
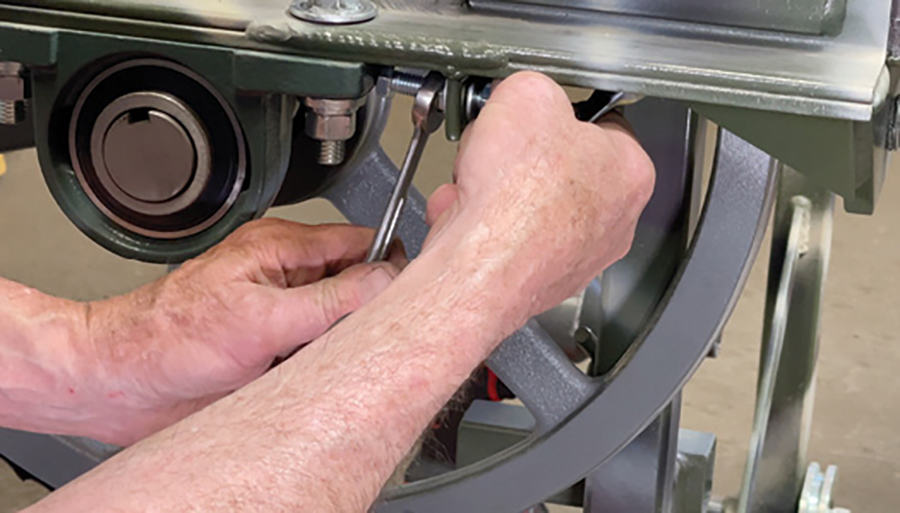
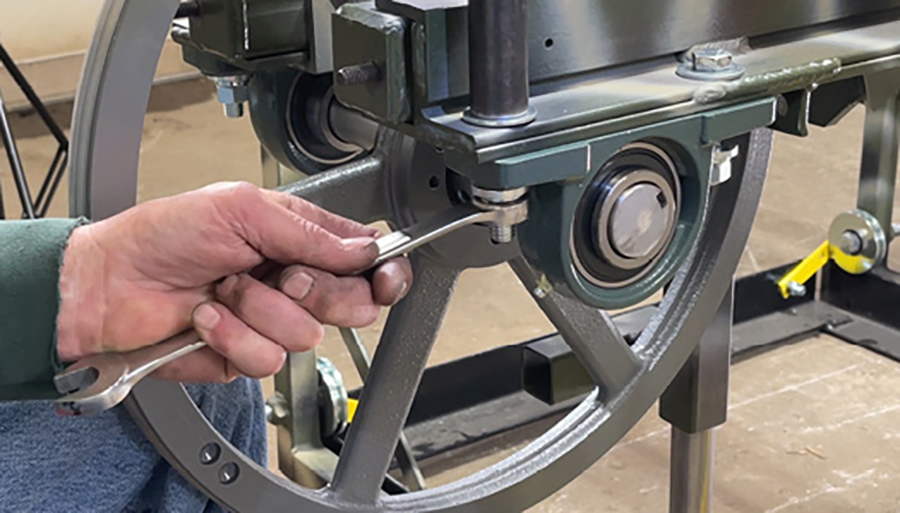
Adjust Locking Bolts. (Video-29:24)
Tighten all four of the bearing lock bolts tight to the bearing, just snug so we can make adjustments.
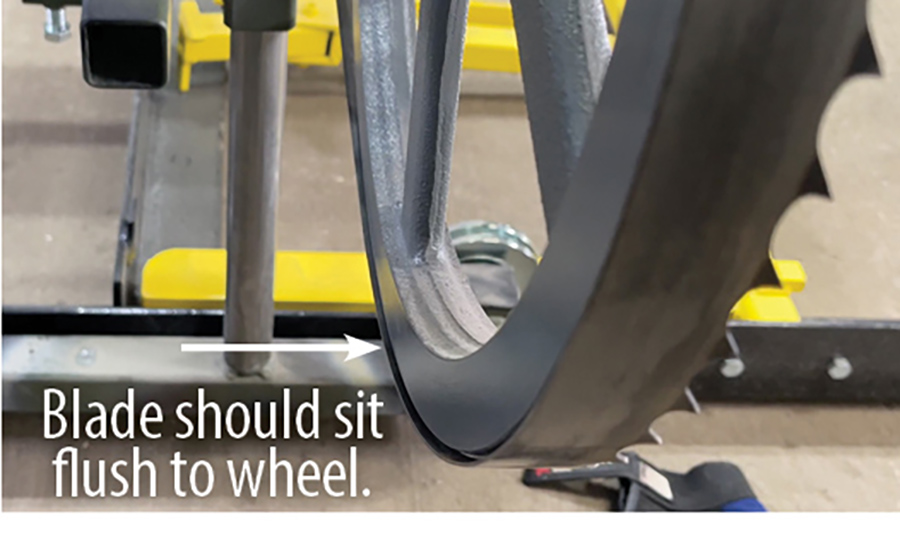
Spin the band wheel three turns around in the direction it will be cutting in. Check the back side of the band wheel to the blade, see if they’re flush. Here you can see they’re not flush, so we’re going to have to make the adjustment.
Loosen up the bearing just a crack so that we can move a little bit, make the adjustment on your bearing adjusting bolt – either to push the bearing backwards to make the wheel move a little bit or let it come forward. Which side you move and how far you have to move it this should be a slight movement on the bearing, not much at all.
Spin the band wheel again. Ours came out flush. Retorque bolts to proper torque setting.
Once you get the idler side set, move to the drive side and we’re going to do the same things. Spin band wheel 3 times, if it’s off a little bit, loosen up your bearing, make the proper adjustment. Tighten back down and check. It should be flush to the back of the band wheel as shown.
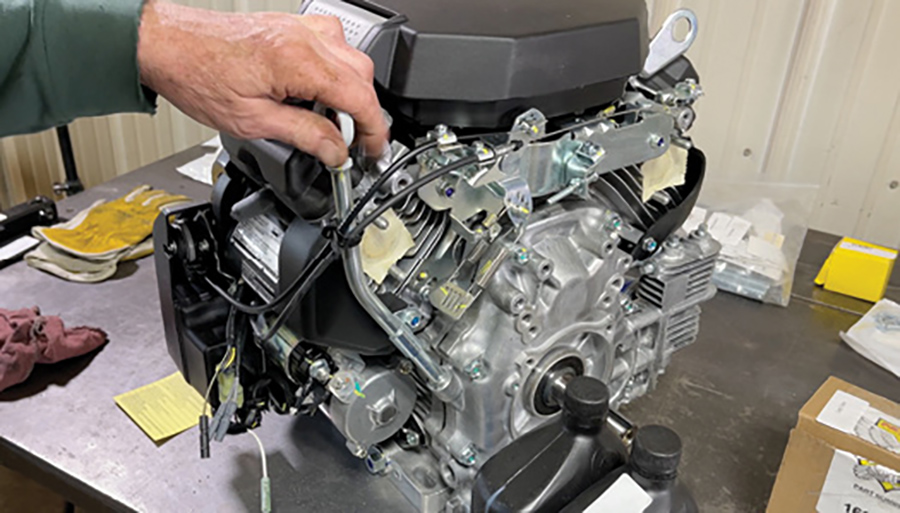
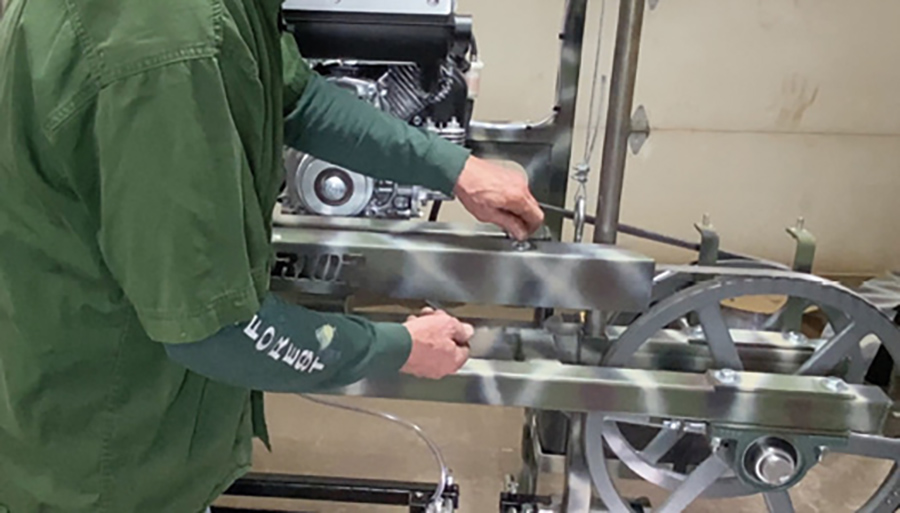
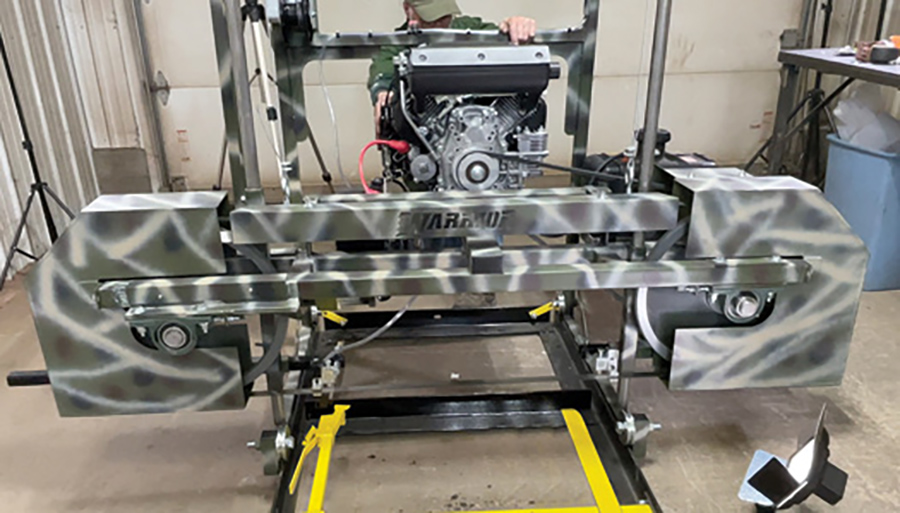
Engine Set Up. (Video-30:48)
Pull out your dipstick, wipe it off clean, put back in but don’t seat it all the way, just leave a little bit loose so the air can get out before pouring in the oil. Pour your first quart then check your oil level. It’s going to be low- you’re going to use just about all of the two quarts shipped to you, but when you put in your second quart, get 2/3 of it in and check your engine. It should be up to full.
Install Clutch (Video-31:31)
Secure the clutch hardware kit: should have the washers, shim washers, the washers for the bolts that hold on the clutch and the key way. First put on your two big washers- those are the spacer washers – to get the proper spacing for your clutch distance. Slide your clutch on, do a test fit, pull it back off.
Set the key way into the shaft all the way and tap it in with your mallet. Make sure it’s seated properly and slide your clutch on to the shaft the key way lining.
Secure bolt that holds clutch on the shaft. Put the lock washer on first, small flat washer, then your expanded serrated washer(cup washer). Put Loctite on the end of the bolt and tighten up.
Use a torque wrench, you can torque that to about 28 to 32 ft lb and make sure that it’s seated properly. We want to make sure we don’t over tighten this clutch bolt. Watch for the lock washer to flatten out when you’re tightening. When that’s flattened out, torque is sufficient.
Install Muffler on Motor (Video-32:45)
Secure your muffler kit. Peel tape off engine block over the manifold holes. Slide the gaskets over the studs; make sure that they are clean.
Secure muffler and slide it on to the studs – a lock washer and a nut goes on each stud. Torque setting for these manifold bolts should be 23 ft lb. Tighten them up securely and your muffler should be in place.
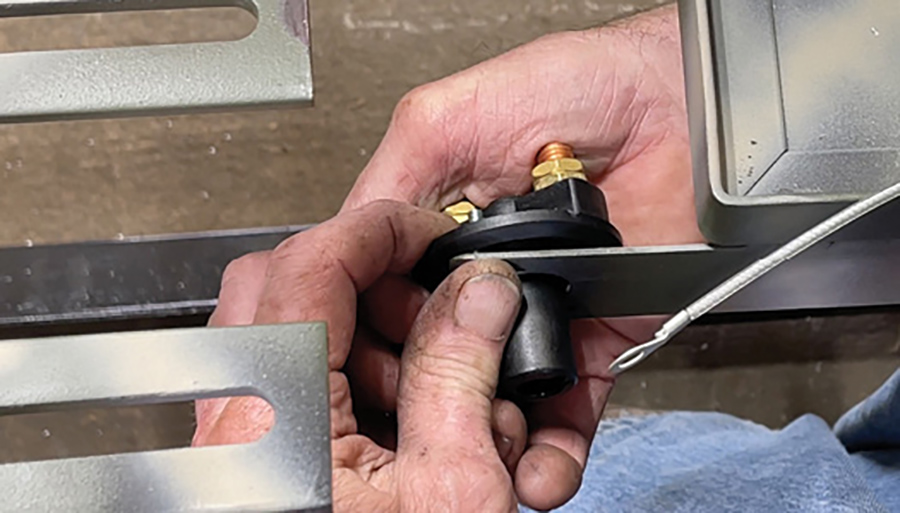
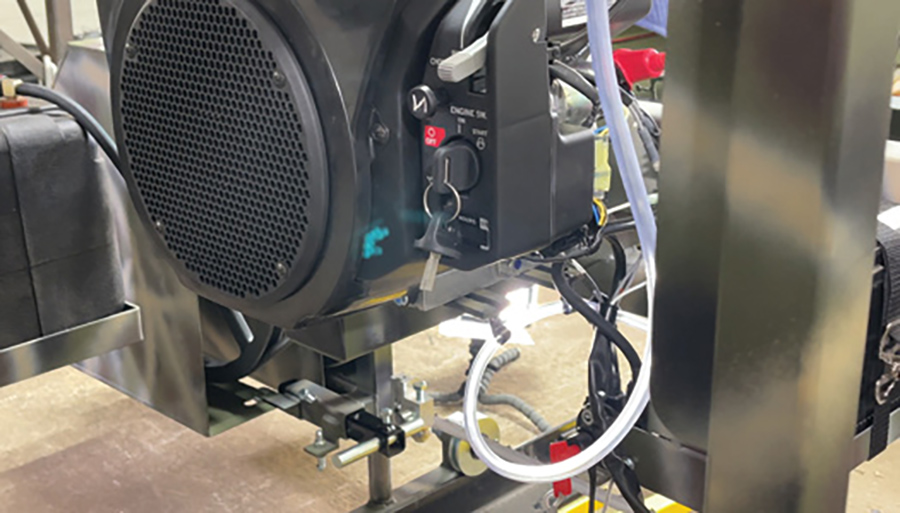
Install Master Switch (Video-33:27)
When you install the master switch, just line up the two holes. Test fit your key in the slot -it should be about a 2 o’clock position, that makes it more user-friendly.
Secure the key itself to the unit so you don’t lose the master switch key. Drill a hole next to the plastic key switch and secure it with the screws provided.

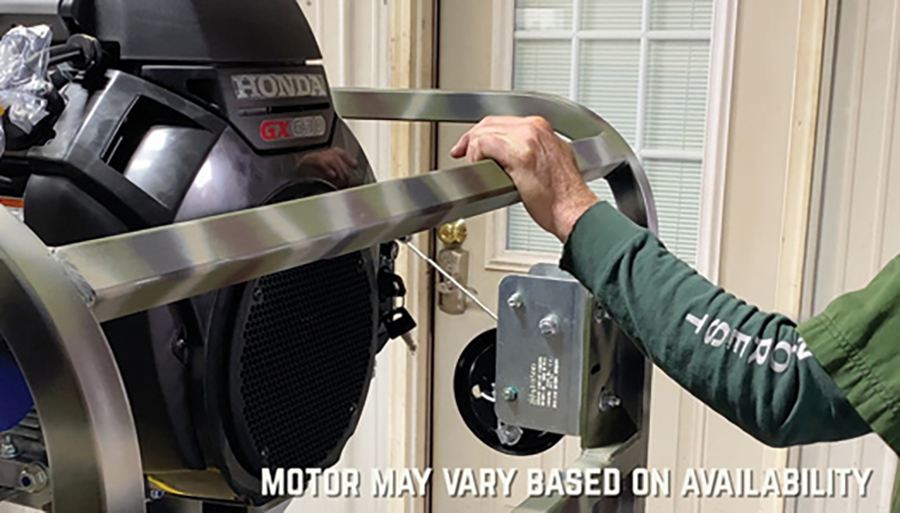
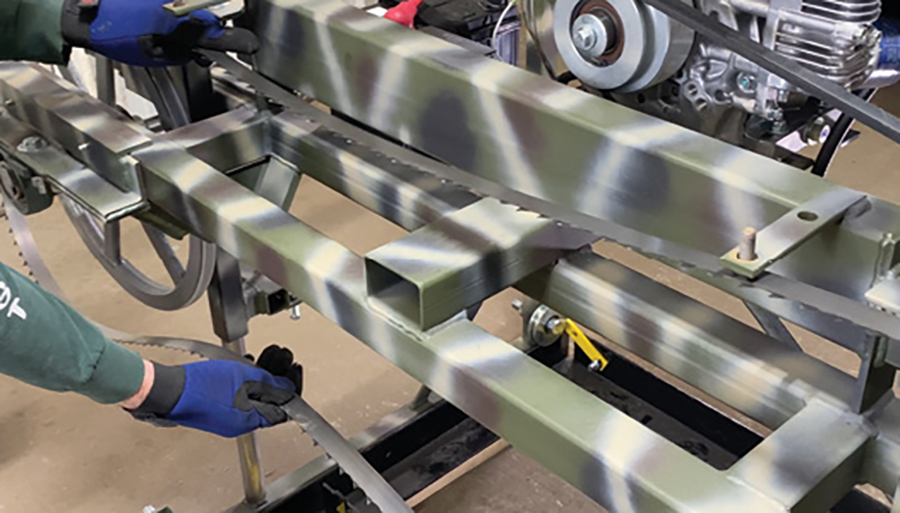
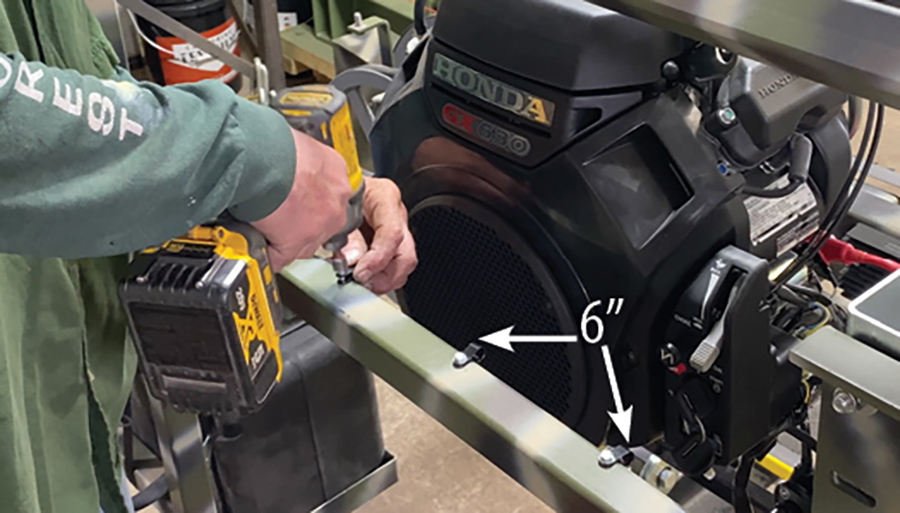
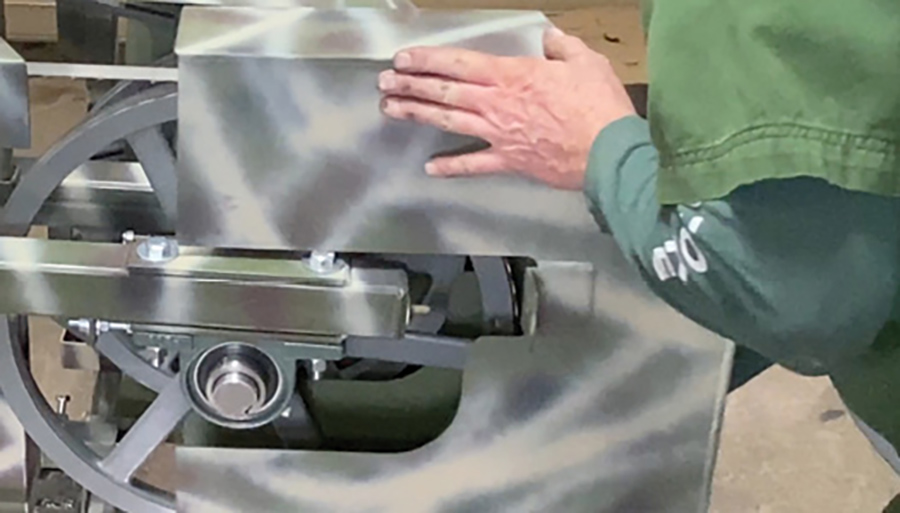
Mount the Engine to Sawmill (Video-34:16)
Preferably use two guys: set the engine first on to the lube tank bracket (or the gas tank bracket), have the other guy go inside the mill frame and help lift it and set it on to the motor mounting bracket. Once you get the motor set on the bracket, carefully raise the head up bringing up about halfway. It makes it a lot easier for installing mounting bolts.
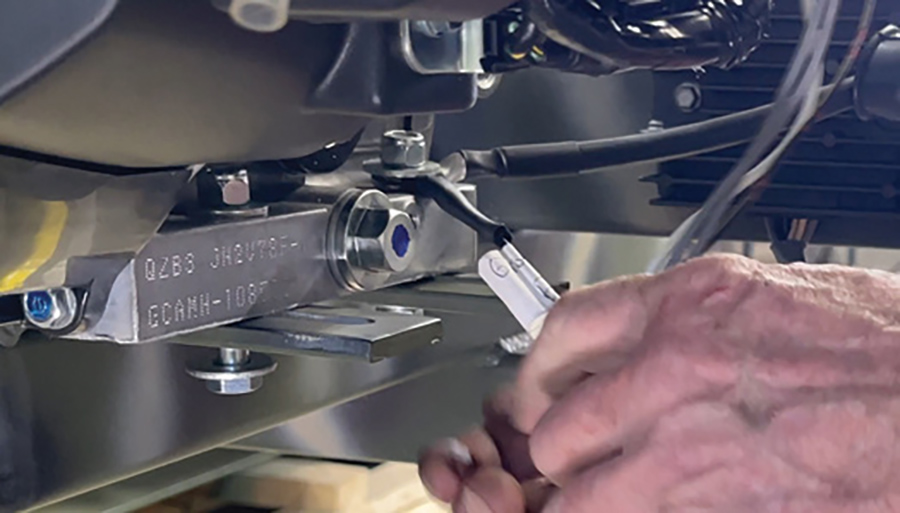
Put on the flat washer on top of that one and then put the nut on. Don’t tighten it up at this time. Position your wires so they’re not going to be in the way or have excess tension on them.
Now put in the rest of the engine bolts. When you set the bolt in, make sure the washer’s on the head of the bolt underneath the motor mount bracket. Make sure the washer is on top of the engine fastening it down, put nut on.
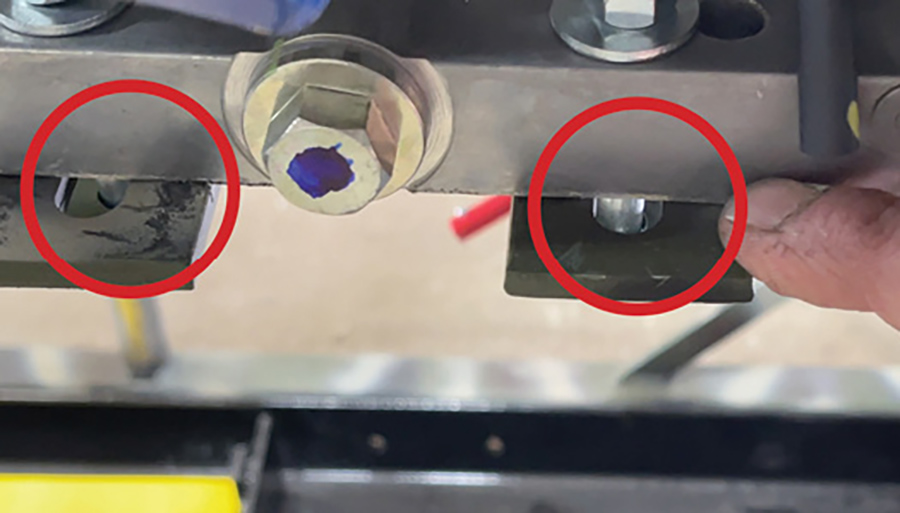
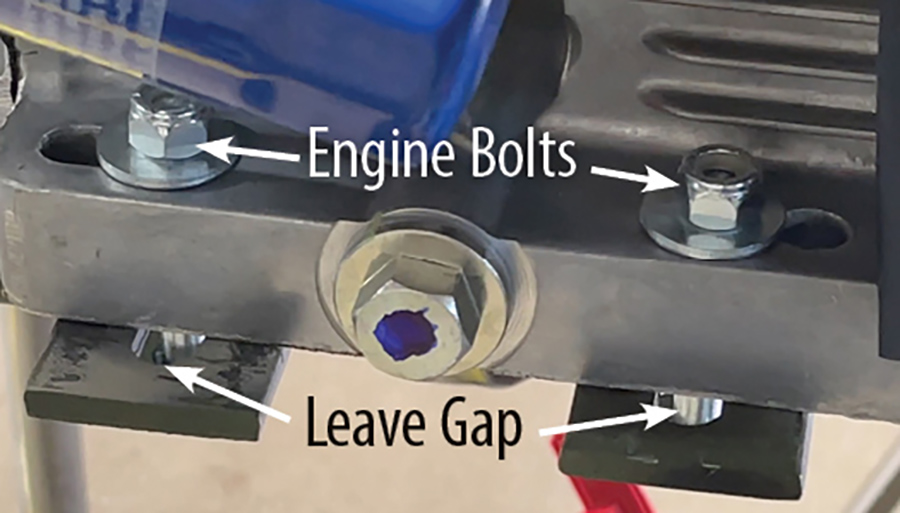
Move the motor as far forward as you can. Make sure bolts stay straight and aligned. Push motor to the right and watch motor mount- you’re going to be about three quarters of an inch from the end of that motor mount bracket to the base frame on the motor.
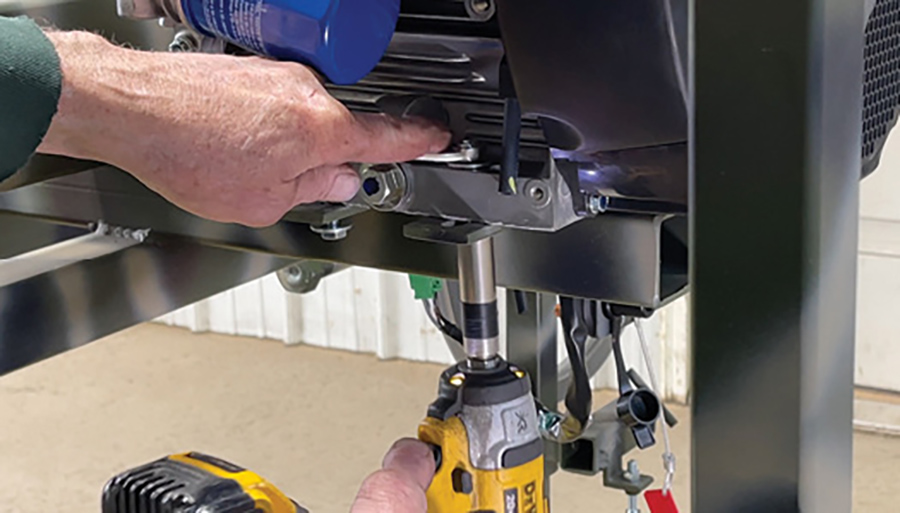
Make sure engine doesn’t move and start tightening up all bolts on motor mount. Don’t torque them at this time- just snug them so it’s not going to move.
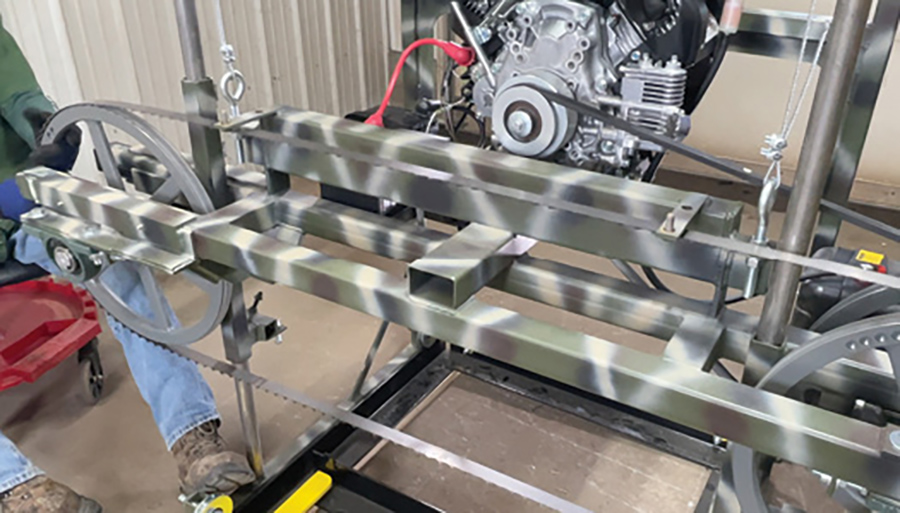
Install the Drive Pulley. (Video-37:00)
Remove the blade for safety. It makes it a lot easier to line things up. Loosen up your tensioner bolt – back it all the way off. Take your foot, put a little tension on the bottom of the blade, and push down, pulling your idler wheel in, which slacks the blade for removal.
Put blade in a secure place – usually hanging on the wall is the best way with the teeth pointing inward.
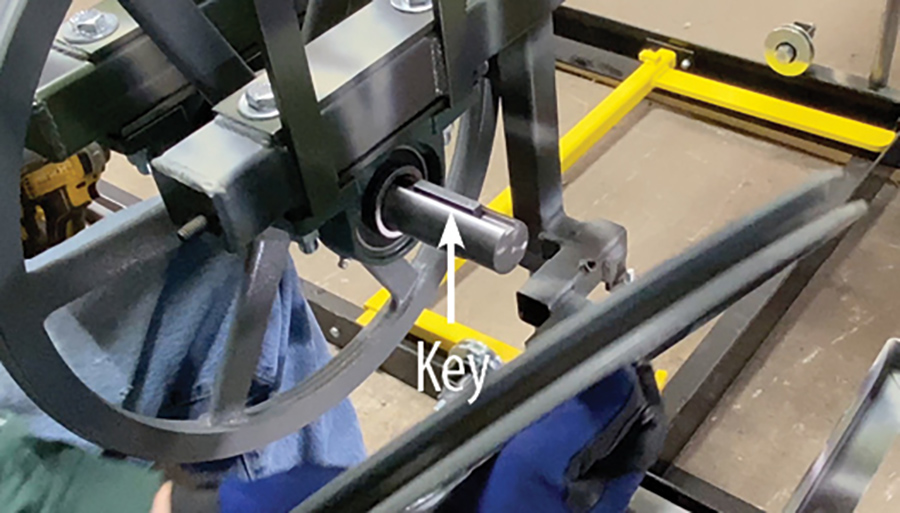
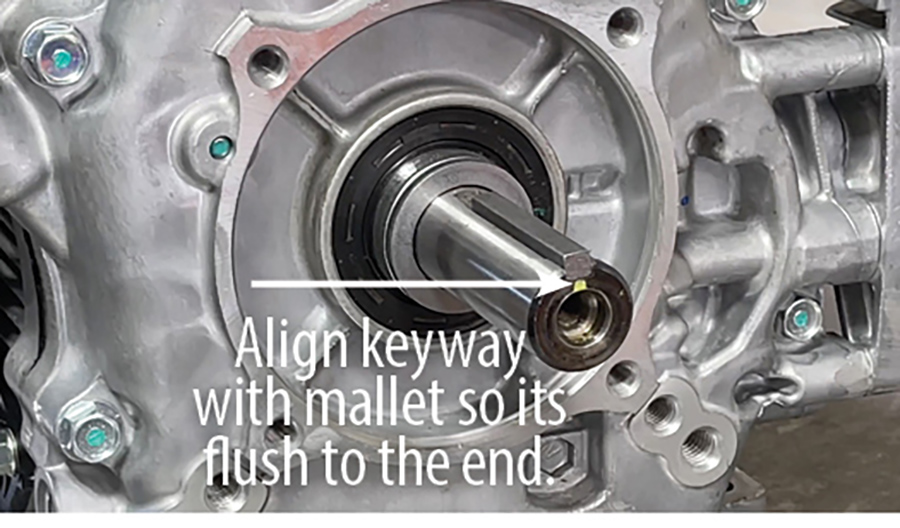
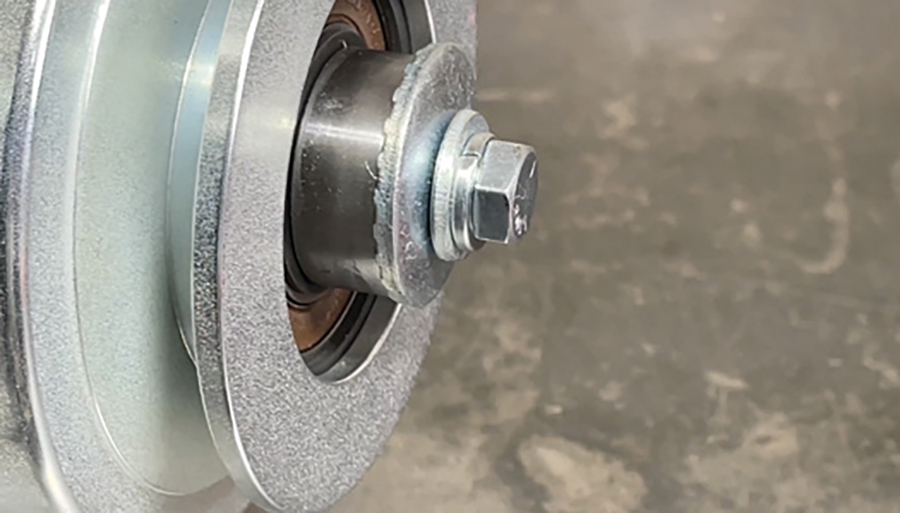
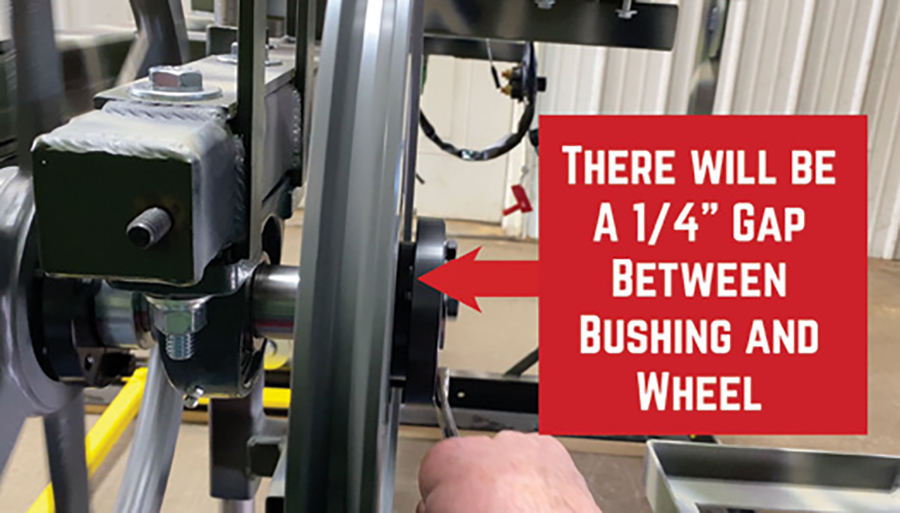
Now secure your drive wheel that you took off from the shaft before we mounted the bearing. Slide the key way onto the shaft, make sure that the bushing is straight in the pulley when you’re putting it on. Line up the key way onto the bushing, slide it onto the shaft. Make sure your key way is all the way in to the bushing.
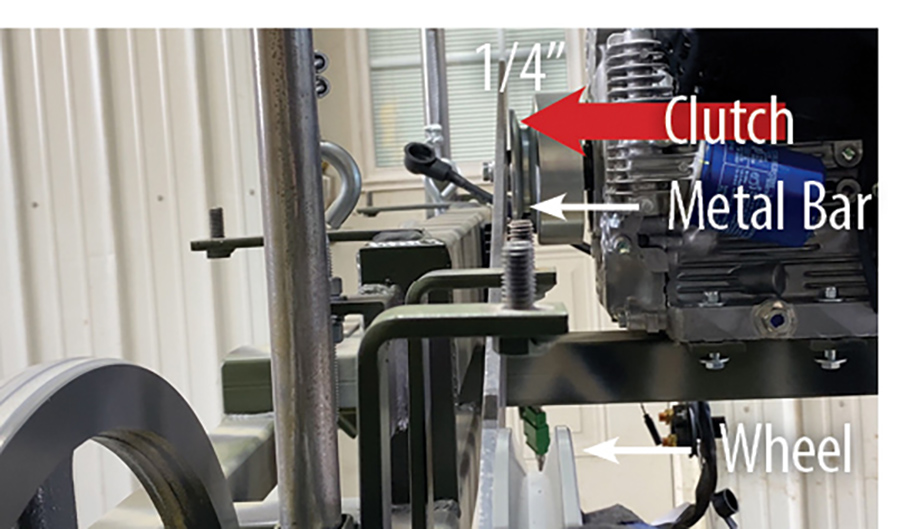
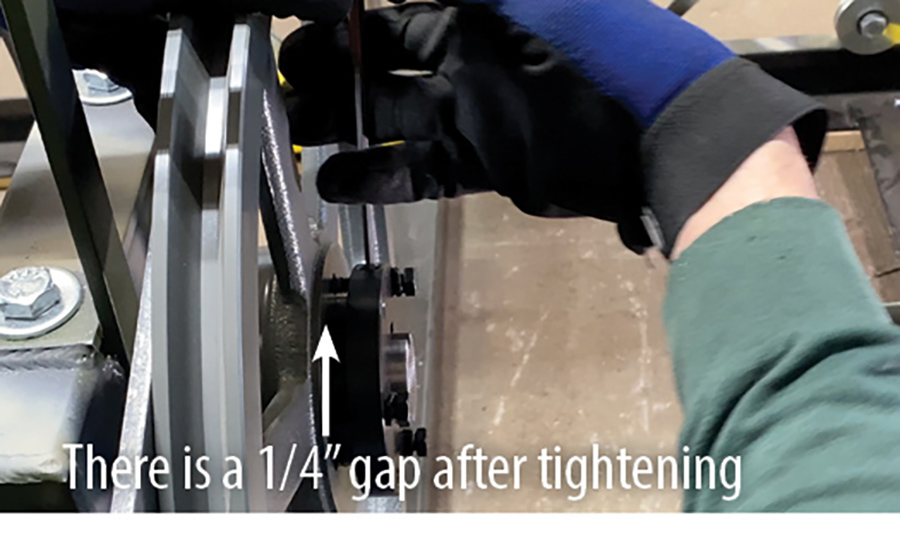
Grab a straight bar or string line to line up for the motor. Put bar against drive pulley. Look for a quarter inch between the clutch on the motor off that bar down to the drive pulley.
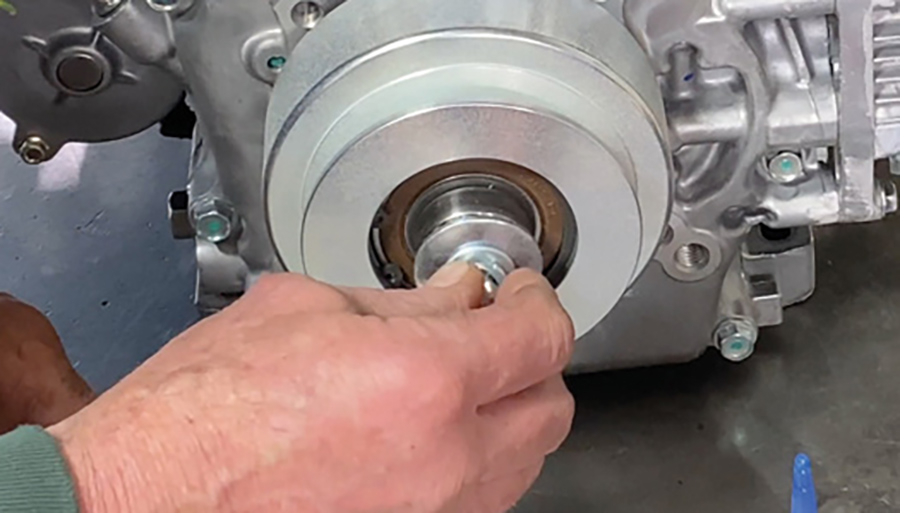
Tighten the set screw on the bushing against the shaft on the drive pulley. Tighten up the 3 bolts on that bushing collar – turn them evenly all at the same time – do a half turn on each bolt as you go around. When they start to get snug, check the wheel for balance and make sure that it spins evenly and does not wobble.
The collar will not come tight to the pulley when tightening the bolts. Once your wheel is spinning true then we have to torque the three bolts to 15 ft lbs.
The bar should be used against the drive pulley and it should touch on the outside edge of the clutch. If you use a string line, it should be square against both sides of drive pulley – the clutch and the motor.
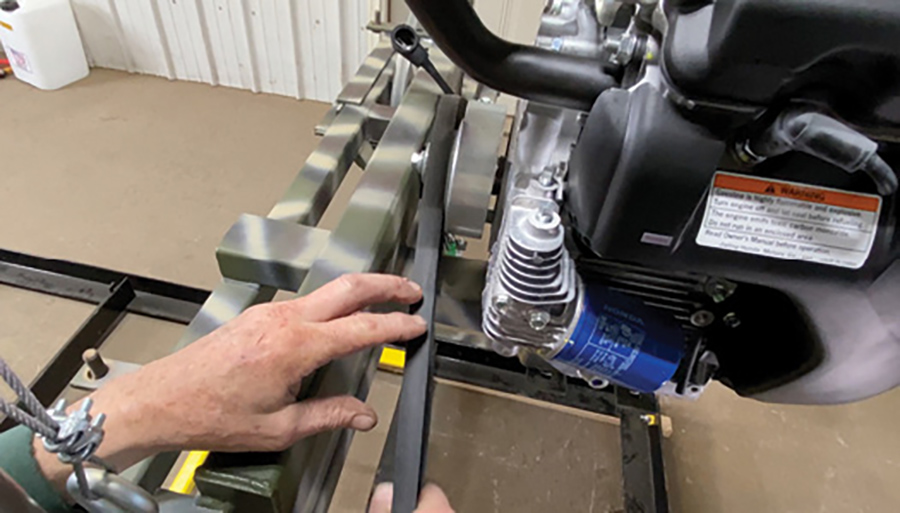
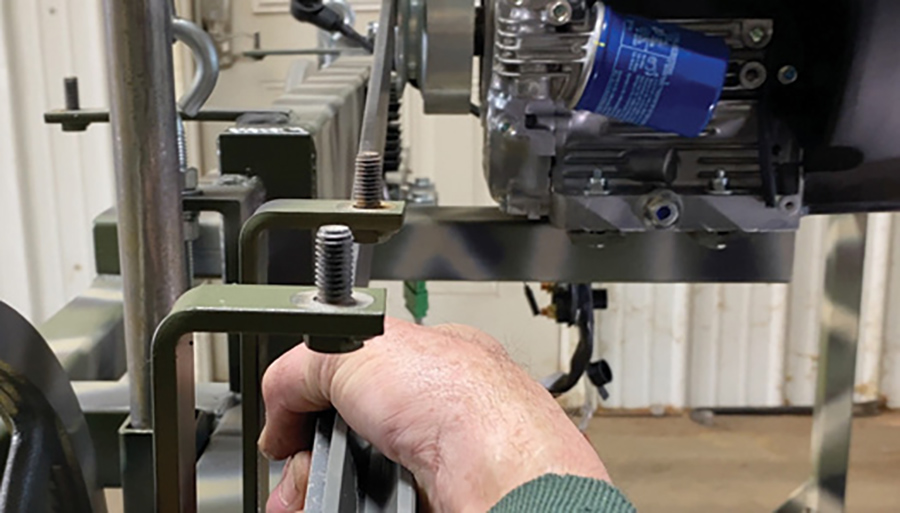
Install Drive Belt. (Video-39:09)
Put the belt over the clutch on the motor first, seated straight in the groove. Then come down and keep it taut and go on the bottom side of the drive pulley.
Turn your pulley until it comes up taut. We use a two-finger rule for tension – it’s about that distance for tension to be good. Roll up on pulley the rest of the way. The belt will go right up on to the pulley and seat in there nicely. It should turn freely. Check for snugness.
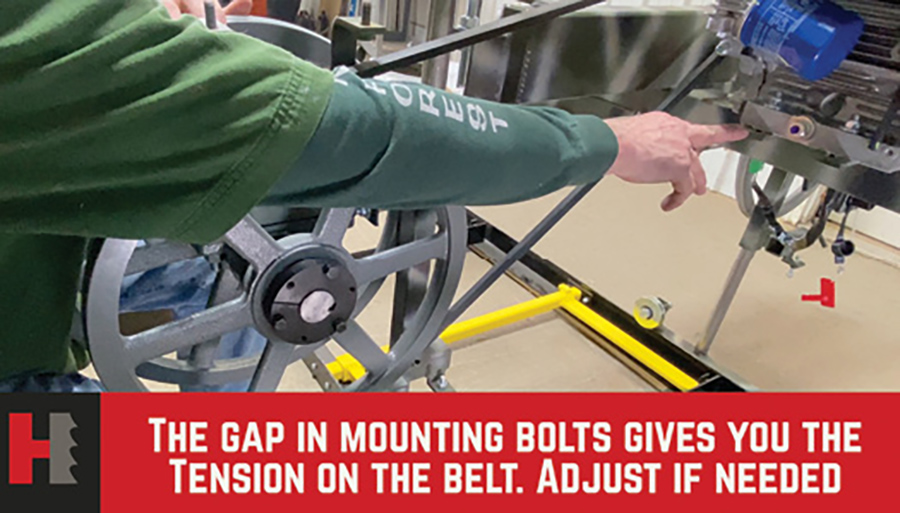
The spacing that we did on the motor earlier dictates the tension on the belt. If you need to reset the tension on the belt, you need to loosen up all four bolts on your motor mount and slide it in the proper direction.
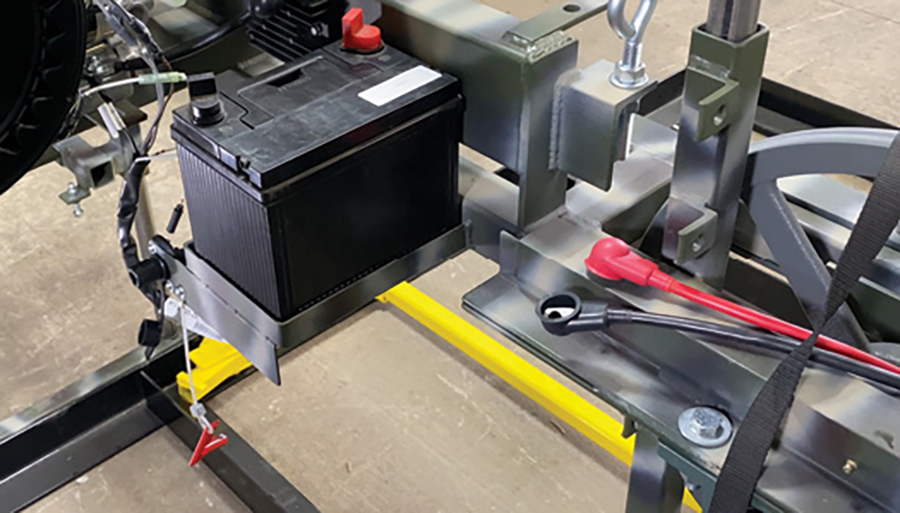
Install the battery. (Video-40:11)
Secure your battery facing with the positive side to your right against the metal bracket on the frame.

Put the strap around the battery snugged up tight and cut the excess.
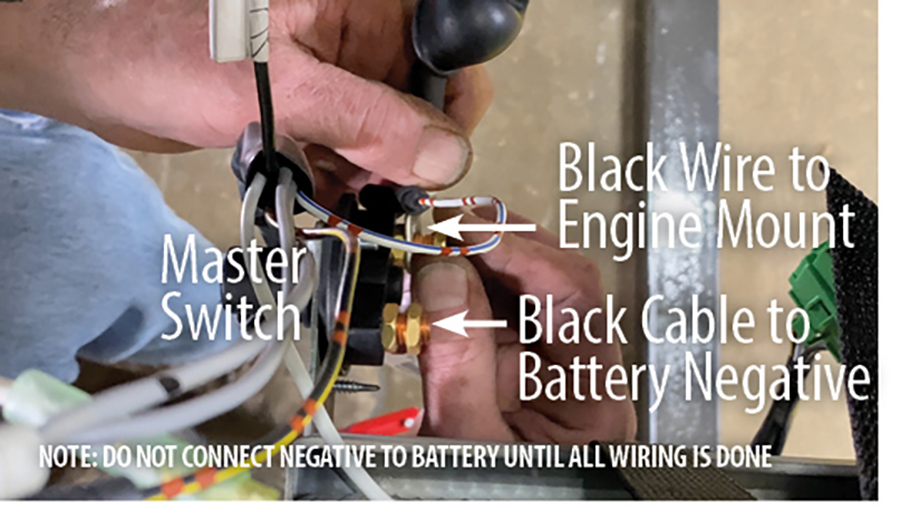
Mount the ground wire – the one coming from the motor mount – mount on to the left side of the master key switch. Put second black wire from kit and put on the other post of master key switch. Do not hook to the battery, just secure to switch.
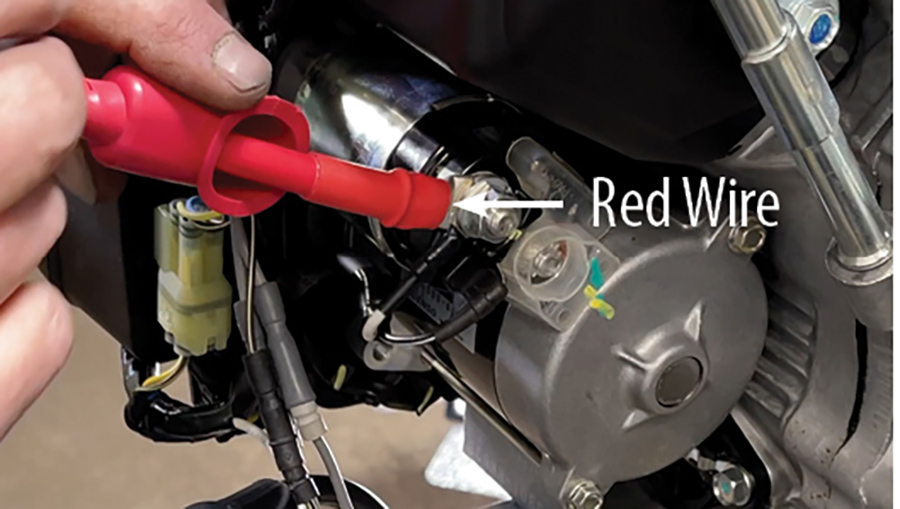
Grab your red wire and go right up to your motor on the starter solenoid. Find the bolt and take that top nut off. Put on red wire, replace cable, put the washer back on and tighten up nut.
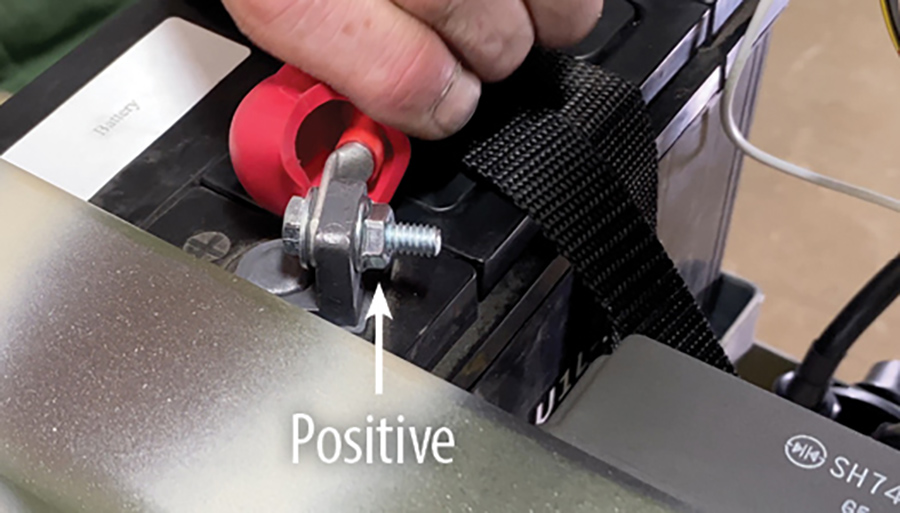
Bring that wire down and hook it up to your battery. Once you get everything hooked up, slide your boots over the caps of the wires to give protection.
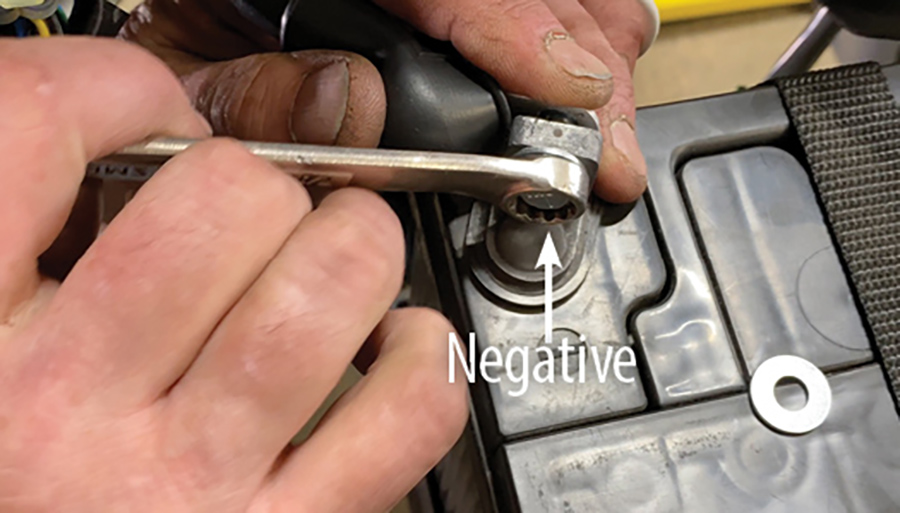
After your positive side is hooked up and secured then go over to your negative and ground wire and make that final connection to your battery. Tighten up that bolt.
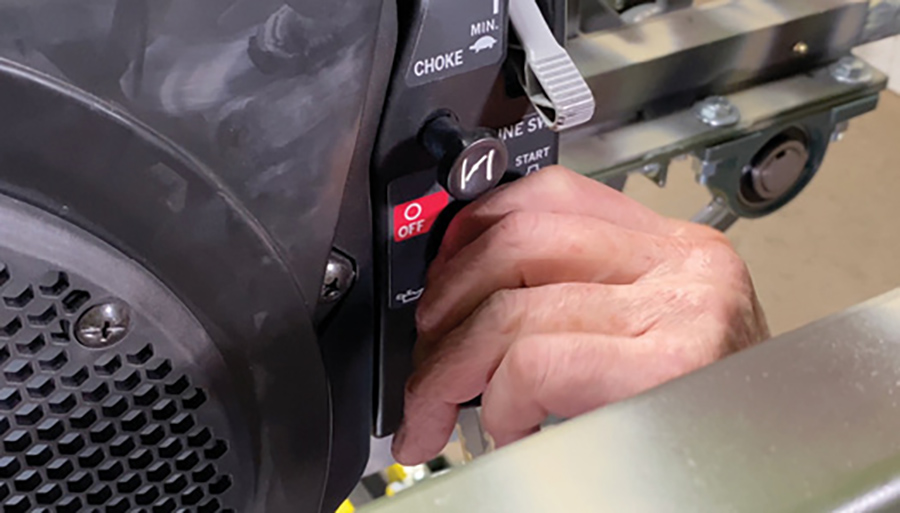
To test the connection: put the key in the master switch and turn it on. Grab the key ignition on the motor and bump the starter. Turn up the starter, make sure you got power to the motor. After you do your power test, make sure you shut your master key off and pull the key out of the ignition.
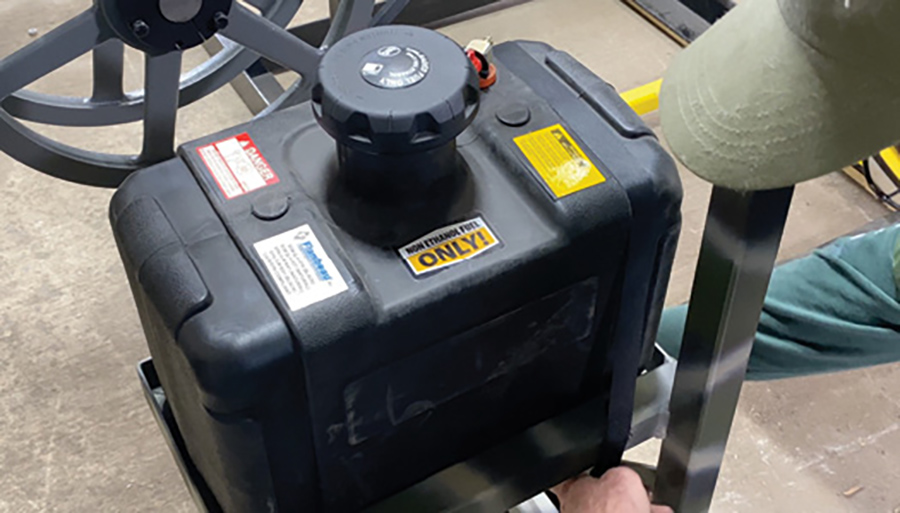
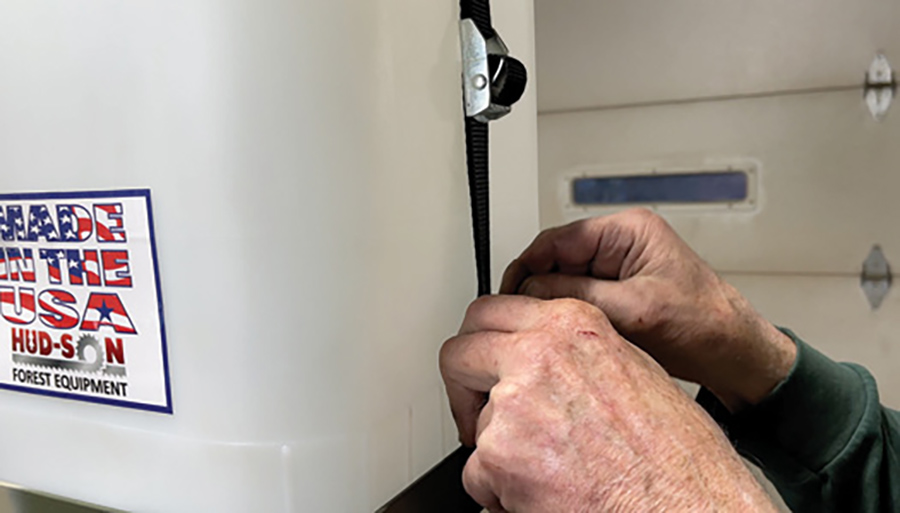
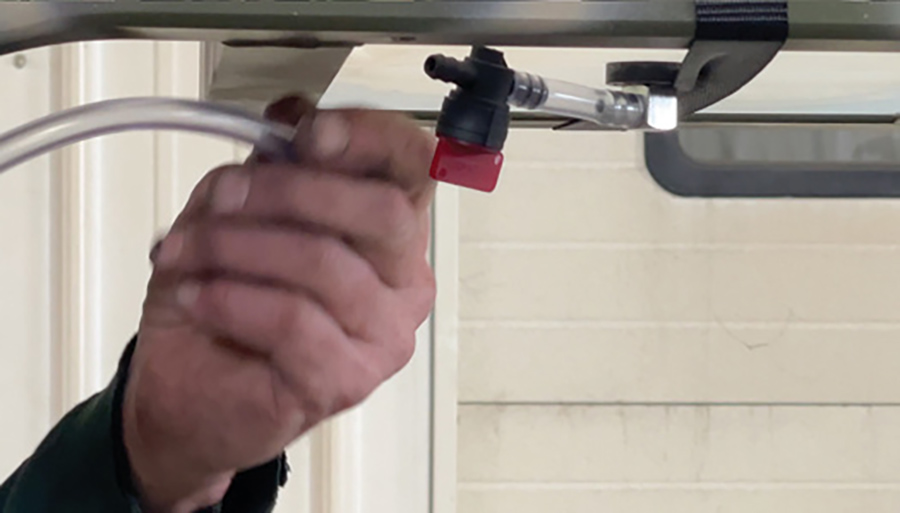
Install the fuel tank. (Video-41:56)
Secure your tank and when you put it into the fuel tank bracket on the machine make sure that the red nozzle is pointing inward toward the motor. That’s your on/off for your fuel. Take the two straps provided with your kit and secure the tank into the bracket.
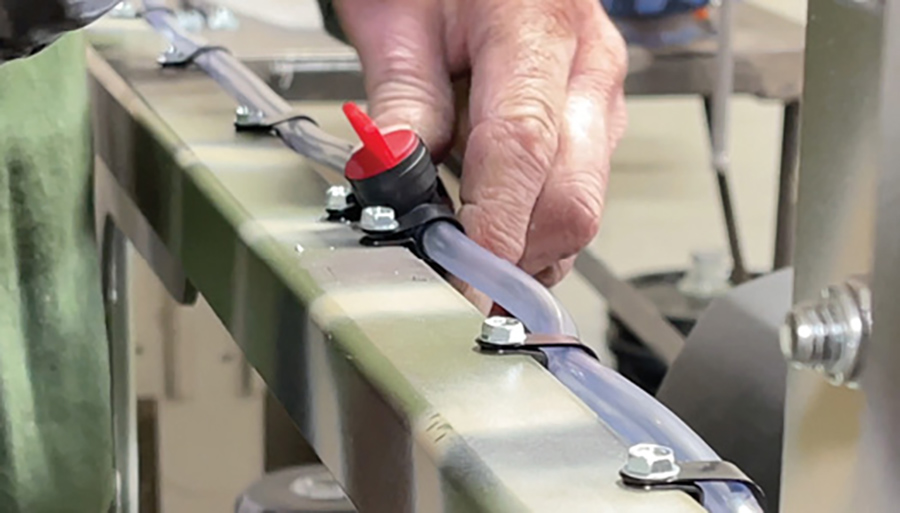
To put the fuel line on: raise the head up so it’s more comfortable to work on.
Get your piece of hose – should be cut to length – put it onto the filter that’s already on the motor.
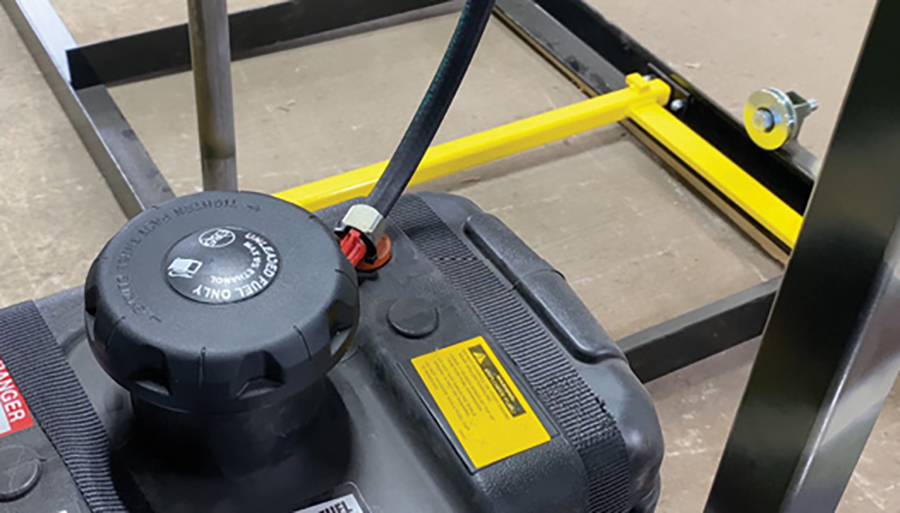
Then slip it on to the tank on the red nozzle where we see the brass fitting.

Lower the head all the way down and put some gas in the machine, at least a half a tank – enough to get it running.
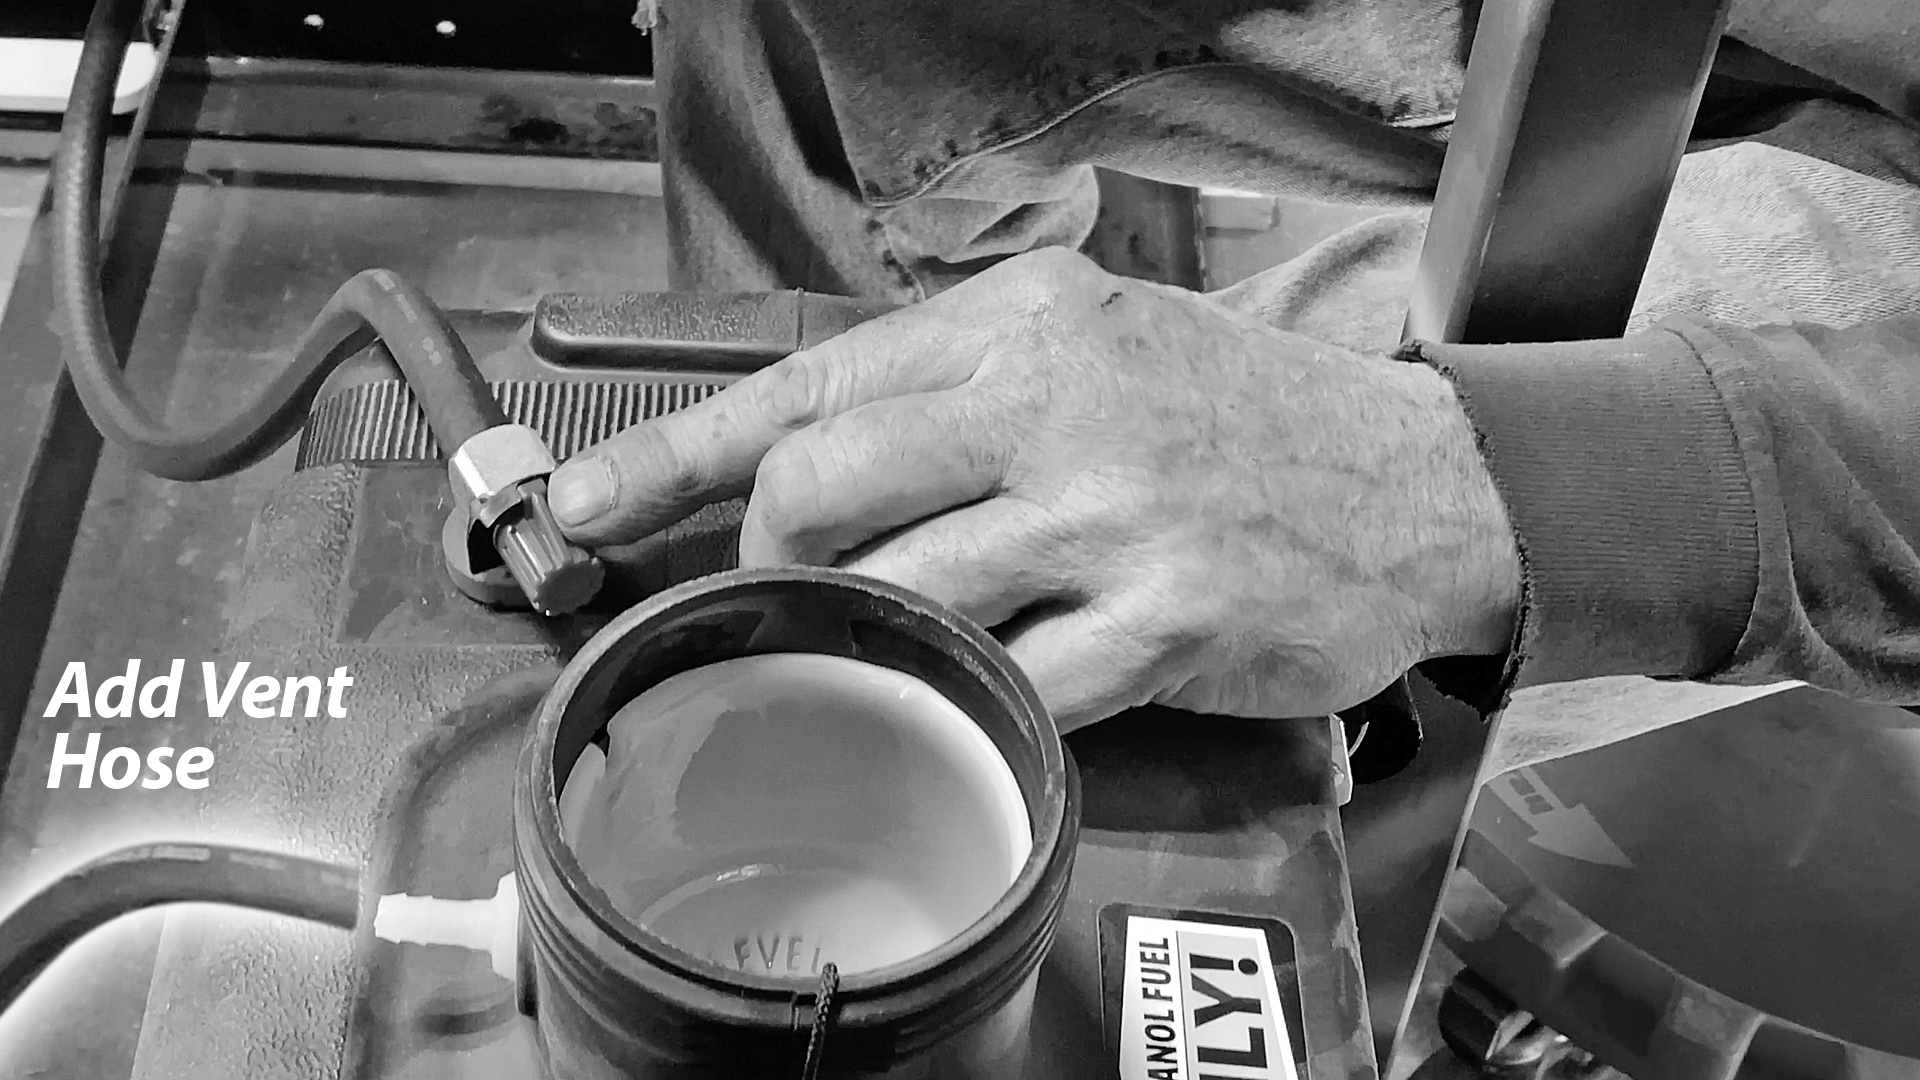
The red knob on the top is your on/off. When the tab is pointing upward, the fuel is on. When it’s turned sideways, the fuel is off.
Note for Black Tanks: Add a vent hose
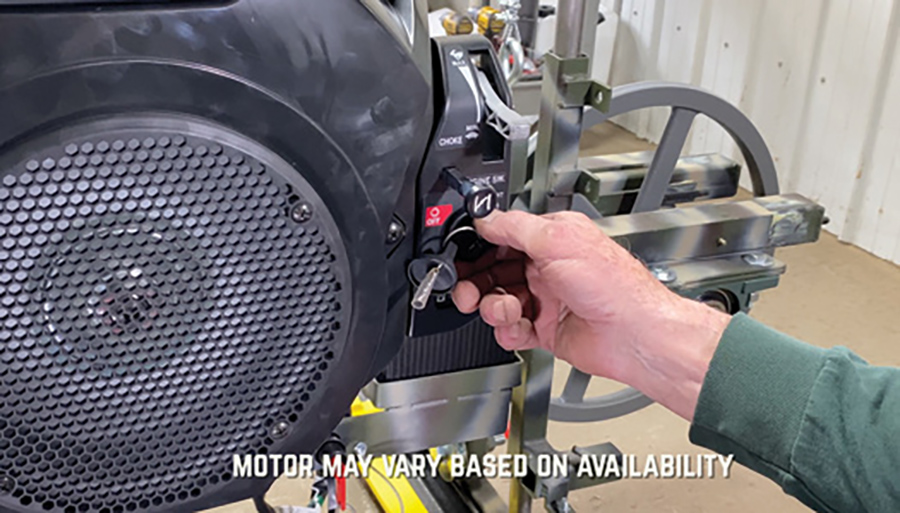
Crank the throttle up about just above minimum and pull your choke out. It’s going to take a little bit to get the gas into the motor. Put master key in and turn on. To get power to your motor, crank it over so it fires up. If it doesn’t fire up within 20-30 seconds of cranking, give the motor a break and try again. Don’t burn up your starter. Once running, let it warm up for about a minute at low idle – don’t rev it up immediately. Slowly rev up the engine. The clutch should engage and start turning the drive pulley. When your motor’s at low idle, the drive pulley should not be turning and your clutch should not be engaged.

Once it’s warmed up, rev it right up to the top rpm and check belt. Make sure it’s aligned properly when running and it doesn’t flip over.
Shut it down and re-install the blade. (Video-44:08) Put the blade back on, hook it on the end. Keep it taut. Pull it over band wheel on the other end and make sure it’s under blade guard brackets on top. Hang down on the bottom. Come back to the other side, slip it over band wheel, make sure back of blade is flush with band wheel.
Go around to your adjuster side grab it with two hands and give it a quick pull back for tension. Put the tensioner bolt back and set the tension to 35 ft lb. Roll blade around and make sure you’re rolling in the direction it’s going to be cutting in, about three times around. Blade should align to back side of band wheels on both sides.
Install the plastic caps. (Video-45:13)
Place caps over the holes on the end of the mill on the tubing. Two on the bottom next to your track wheels-set them in there and tap them in with your hammer lightly. Two at the top and one in the center on the frame just in front of motor.
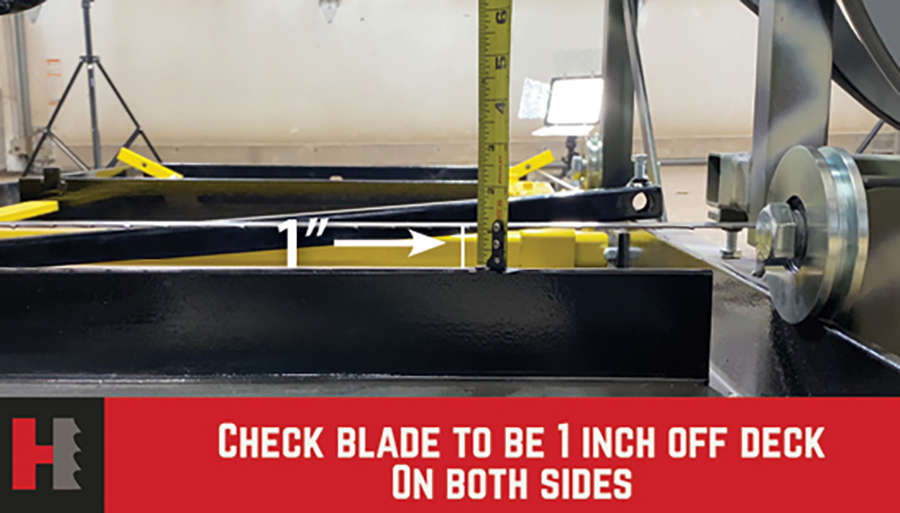
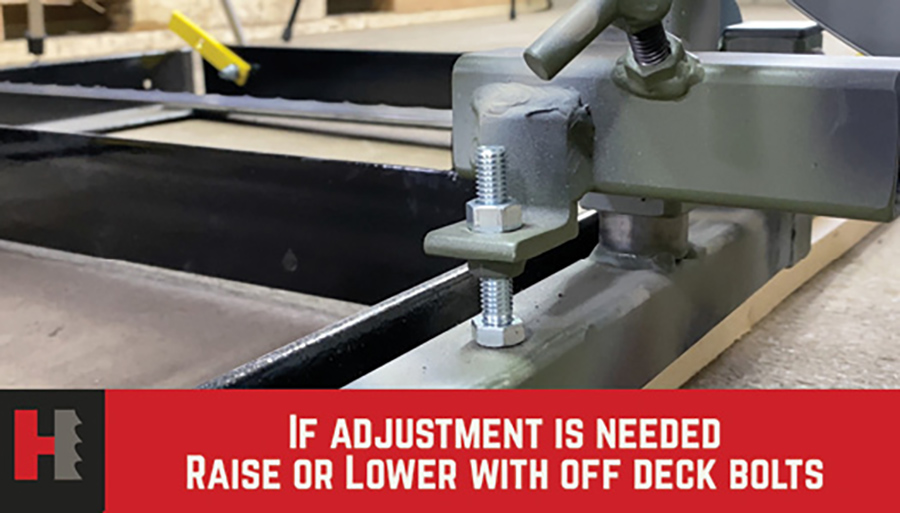
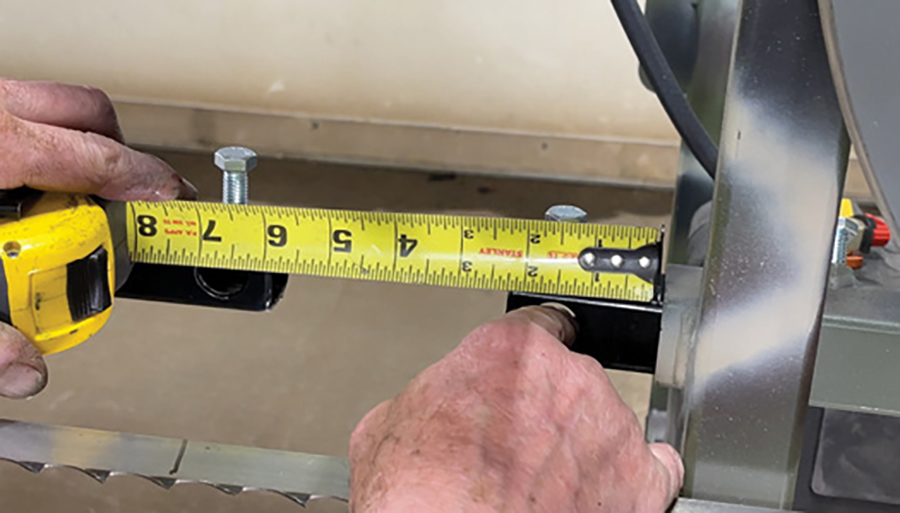
Set Offdeck Distance. (Video-45:39)
From the blade to the crossmembers. Roll mill forward to get the blade over crossmember. Measure from the bottom side of the blade to the top of the crossmember – should be 1 inch on each side of the mill. Then tighten the locking nuts on top.
Install the guide bars. (Video-46:03)
Ensure the bolt is facing upward and the large hole is going horizontal. We got a long guide bar and a short guide bar. The short guide bar is the fixed guide bar. The long one is the adjustable guide bar.
Raise the head up, check your blade for levelness. If the mill is level on the track, everything’s going to show up level here. Set level on guide bar. Ensure your T handle bolt, which secures that in place, is tight whenever you’re adjusting the guide.
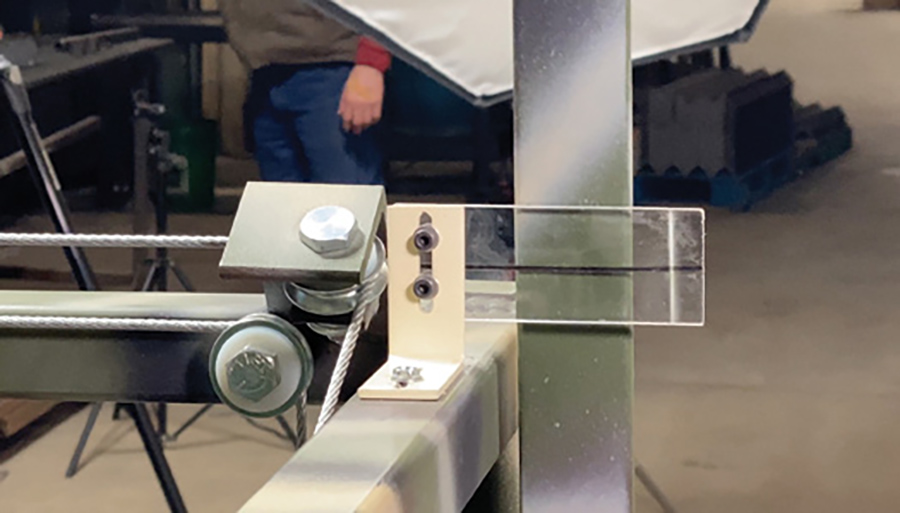
Install Measuring Bar. (Video-46:49)
Clean any powder coating out of the holes. Mount it to the side of the frame on the operator side near the battery on the frame. Line up the two bolt holes, put your bolts in, flat washers, and the nuts. Snug it up – not tightly – leave it a little bit loose. Look at the side of it, up the tube on the mill frame. Ensure that it is parallel with that tube, so it’s straight up and down. Tighten it up.
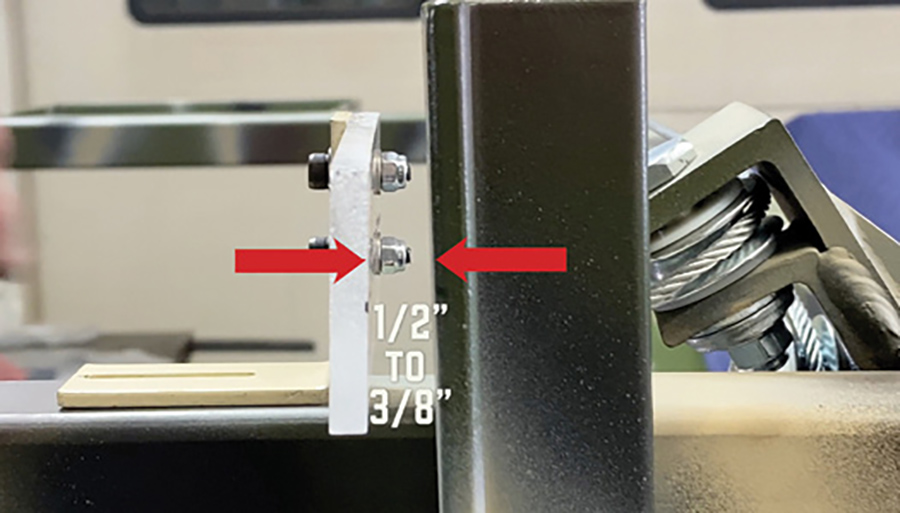
Put on Sight Glass. (Video-47:33)
Mount it about 1/2 or 3/8 inch away from the scale. Place on the top of the mill, make a center punch mark, center that on the top of the frame. Center Punch it, drill it with the eighth inch drill bit, then run screw in there, get it self-tapped. Unscrew it then mount your sight glass bracket on to the mill head.
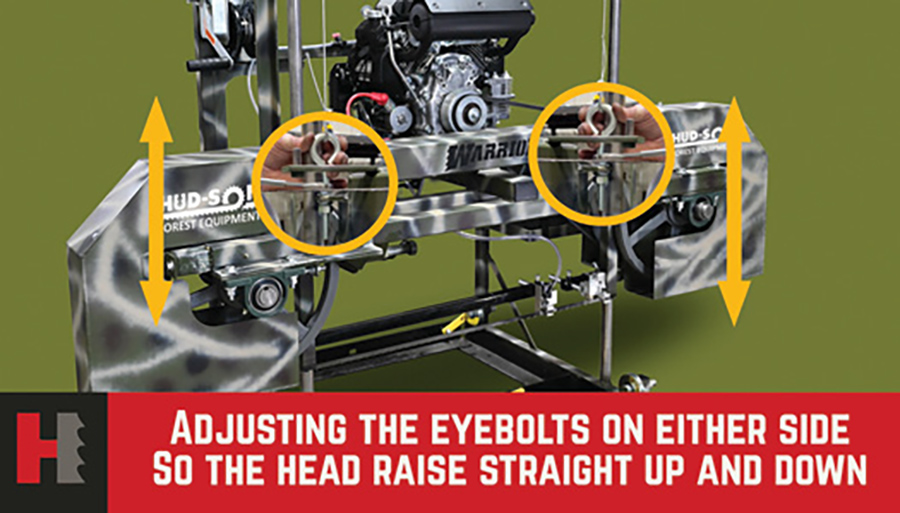
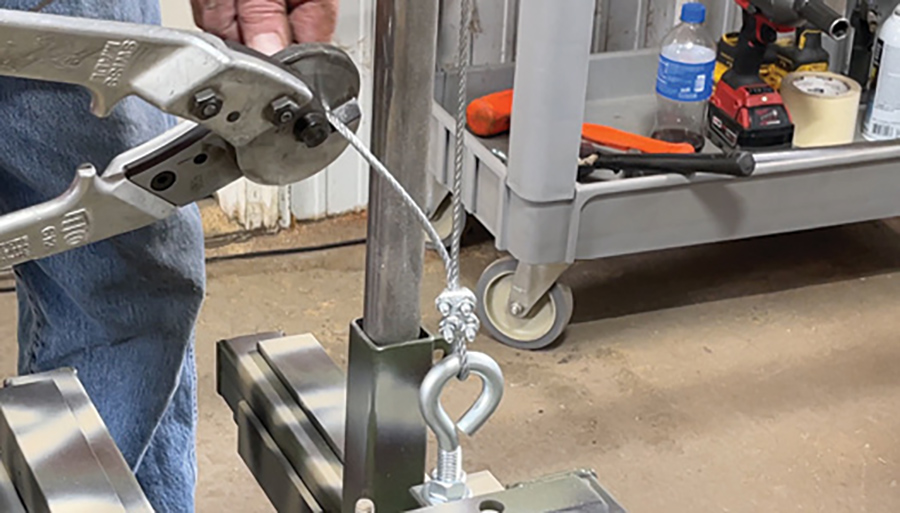
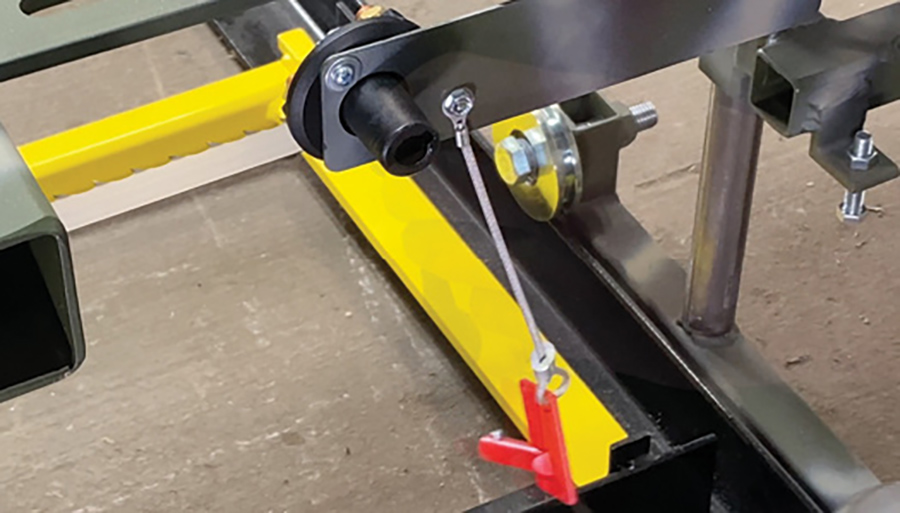
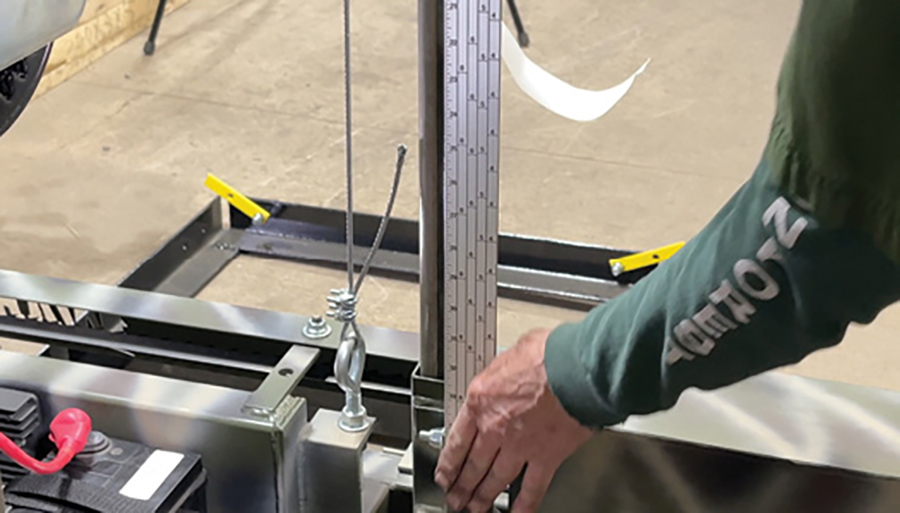
Adjust the lift on the cables. (Video-48:11)
We want the head to lift evenly on both sides when we crank up the winch. Crank up with winch and watch the scale stick -if it moves to the left or right, the head is not lifting evenly on both sides.
Using the eyebolt for cable adjustment (on opposite side of mill from the direction the scale stick is moving), take the tension off the cable. Loosen the bottom nut and move it down about a quarter of an inch, tighten the top nut back up to that. We’re extending that cable up a little bit so that doesn’t pull as tight when we start to lift the head.
Crank the winch again. This may take a few times when you’re doing it so be patient with it. When you crank up the head for the sawmill, that bar should stay perpendicular.
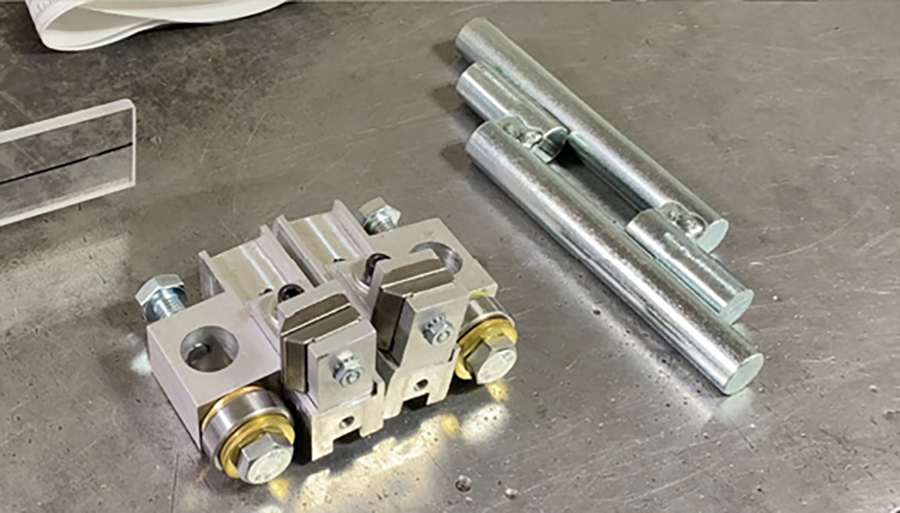
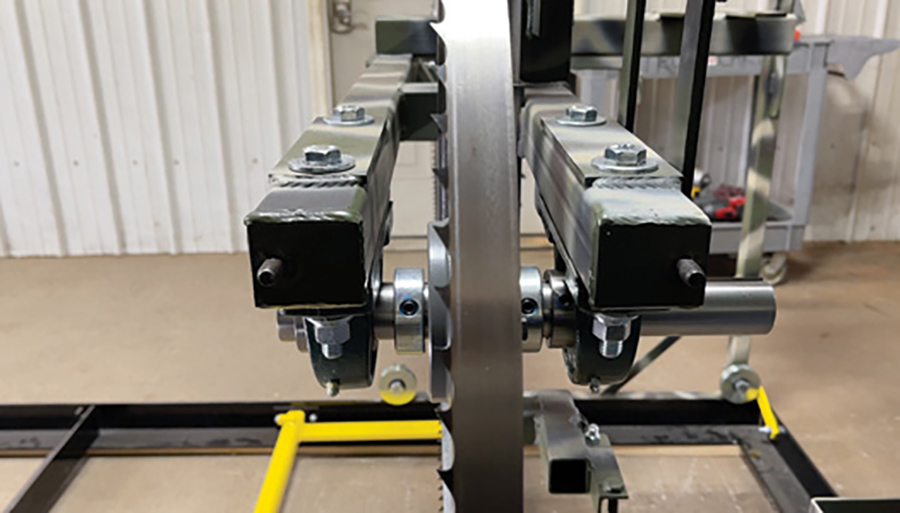
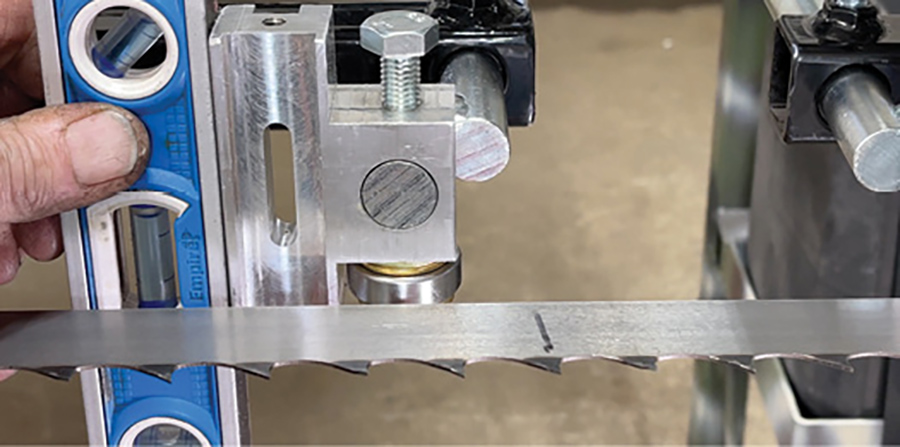
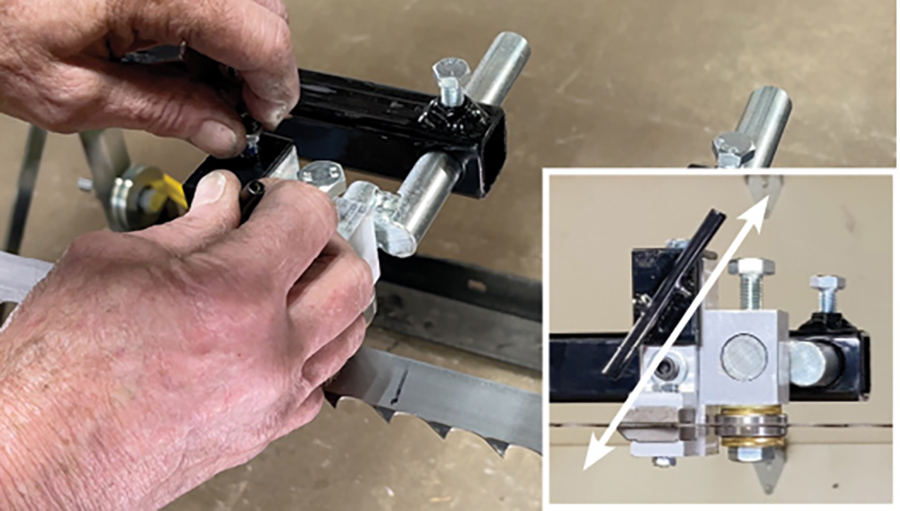
Installing the blade guides. (Video-49:45)
We’ve already installed the blade guide bars, we also have the blade guide pins and we have the blade guide assembly.
Set the fixed blade guide bar out to 2-1/4 in from the frame. Tighten the locking bolts on the back side.
The movable blade guide pin is fixed toward the outside edge of the mill. Put them in there, snug up the bolt on top to hold them in position.
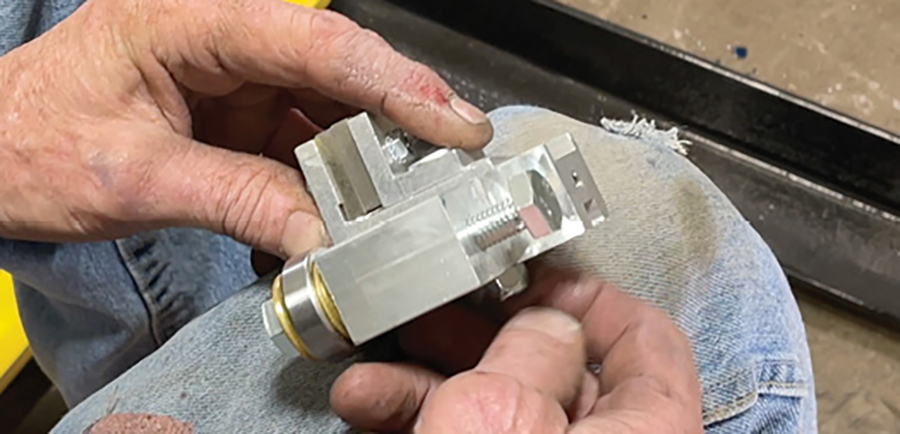
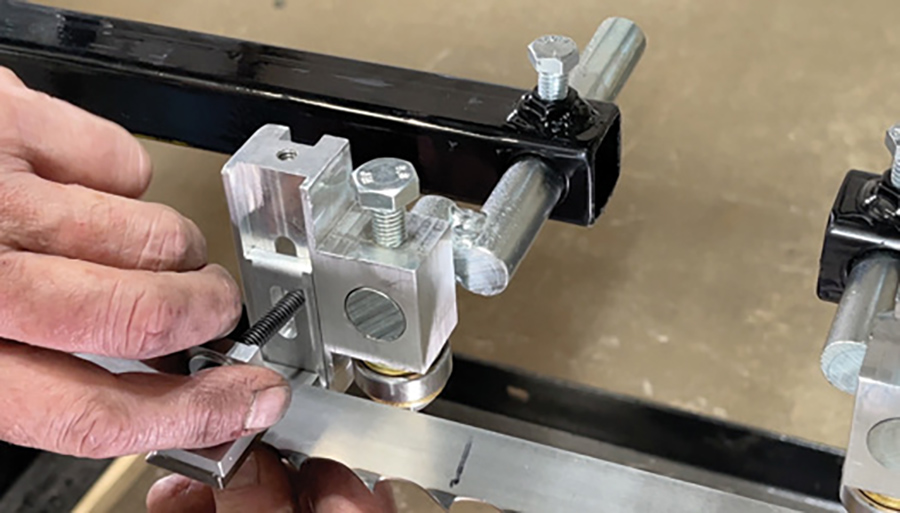
To remove the guide shoes from the guide block assembly, remove the allen screw from the front of the guide shoes and take the nut off the back.
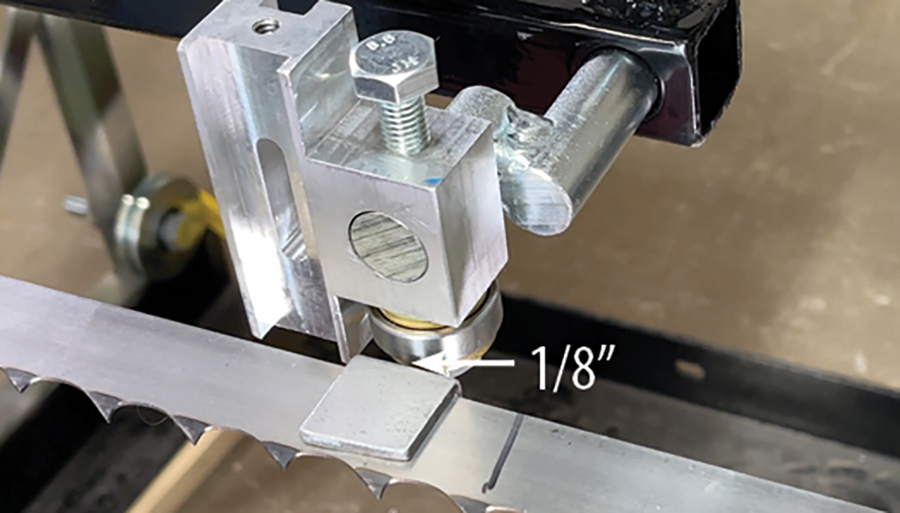
You need a distance of 1/8 inch between the guide bearing and the back edge of the blade. Use a metal shim to get the spacing correctly. (1/8″ angle shim not included.)
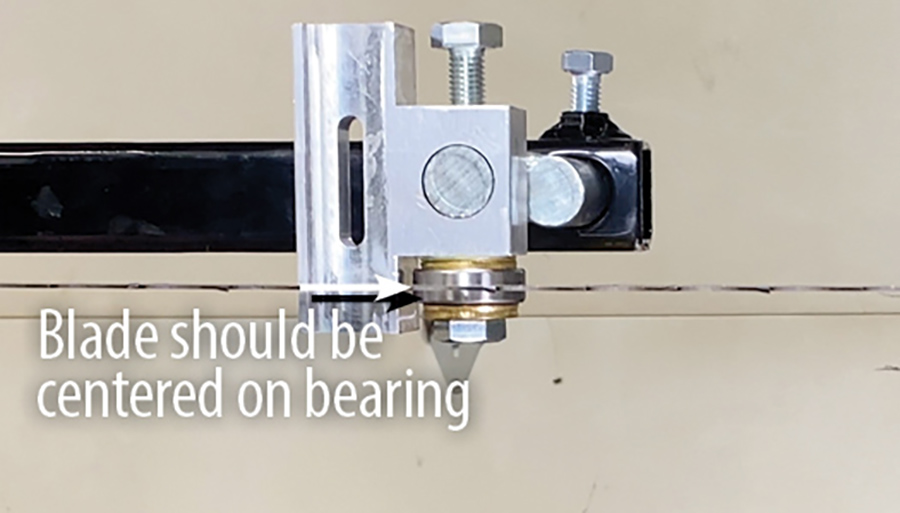
We want to make sure that that bearing is centered on the blade. Rotate the pin to get it to center where you need it then lock that in position.
Check and make sure the guide blocks are plumb up and down so that they’ll be square with the blade. If the guide block is not exactly plumb, tap it with your mallet and bring it into position.
Install the Guide Shoes. (Video-52:10)
There’s two components: a lower guide shoe and an upper guide shoe bracket. Shoe is fastened to the bracket. Line the bottom one up first then we’re going to slide the top one over into the slot.
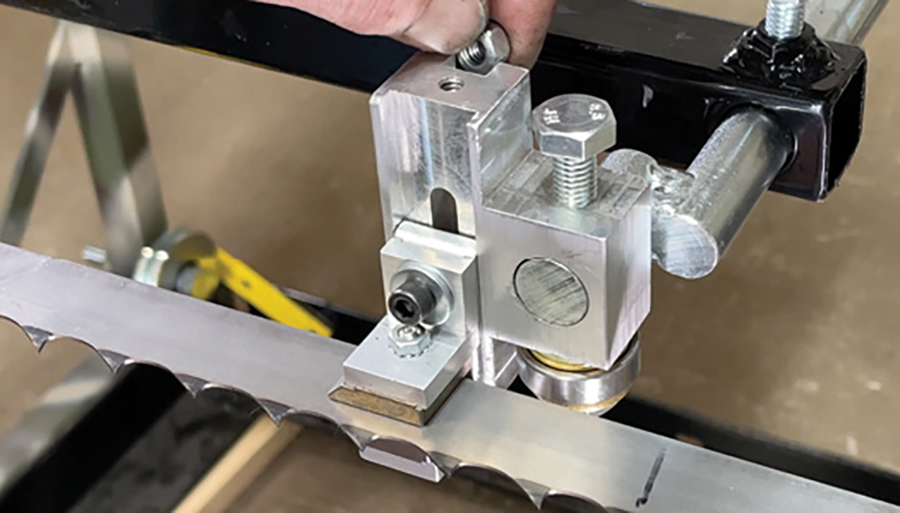
Install the allen head screw and slide the nut down the slide in the back. That keeps the nut from turning so you don’t have to hold it with a wrench when you’re making adjustments.
Set the space of the guides onto the blade – you don’t want to pinch that too tight. The best way to do it is to use a piece of paper between the guide shoe and the blade on each side. Pull them up snug and tighten them up. Make sure that the adjustable guide will slide back and forth on the blade nice and freely.
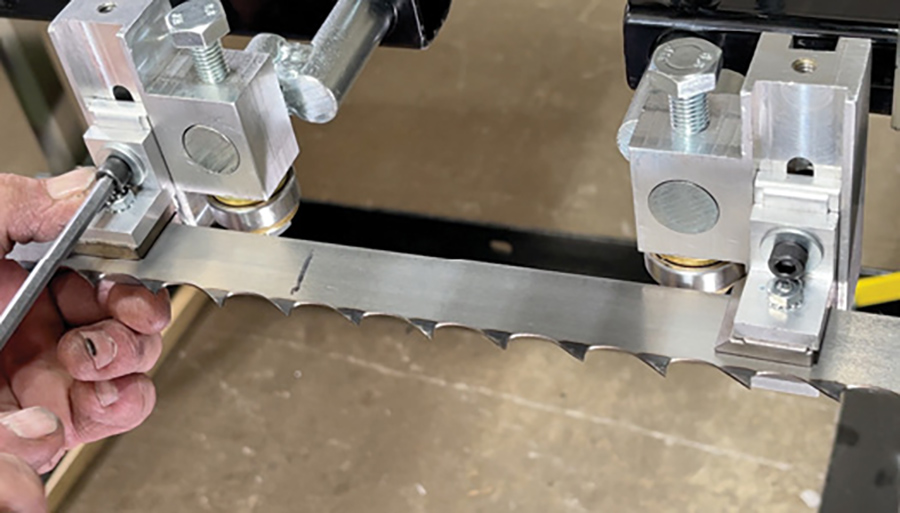
Do a couple checks with the sliding guide bar just moving in a couple positions along the blade and tighten up the t-handle. When you do this look at the guide at the end and make sure that the blade does not move up or down.
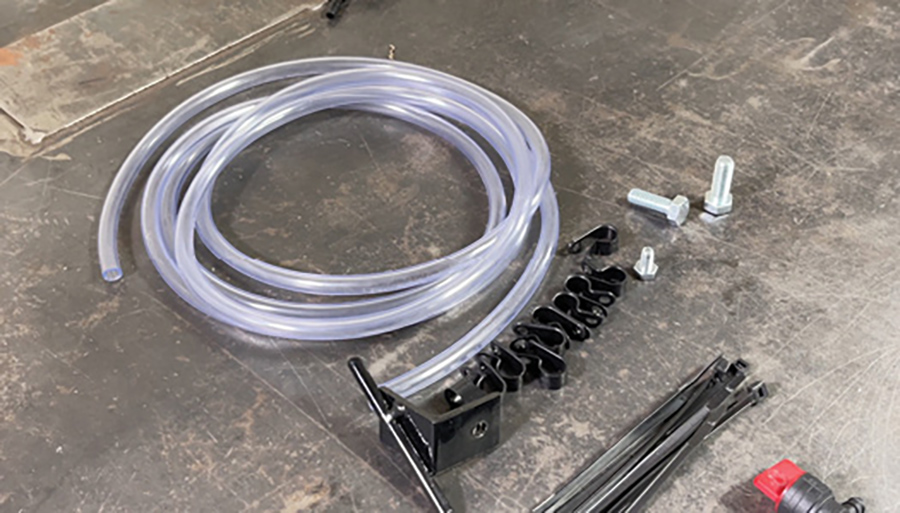
Installing Lube Line Kit. (Video-53:37)
Your kit comes with the hose, the brackets, the guide bracket, and clips.
First we’re going to install the guide tube bracket that mounts on to the guide block. Ensure it goes onto the adjustable guide arm and the tube is pointing downand to the left onto the blade. Loctite the bolt and tighten.
Grab your lube tank. You might want to put your decals on before we put it on. It goes in the bracket a little bit tight, so you may want to grab a screw driver and push on the one side as you pry it in there -it will slip in. Put the strap on it. Cut to length and burn the end so that doesn’t fray.
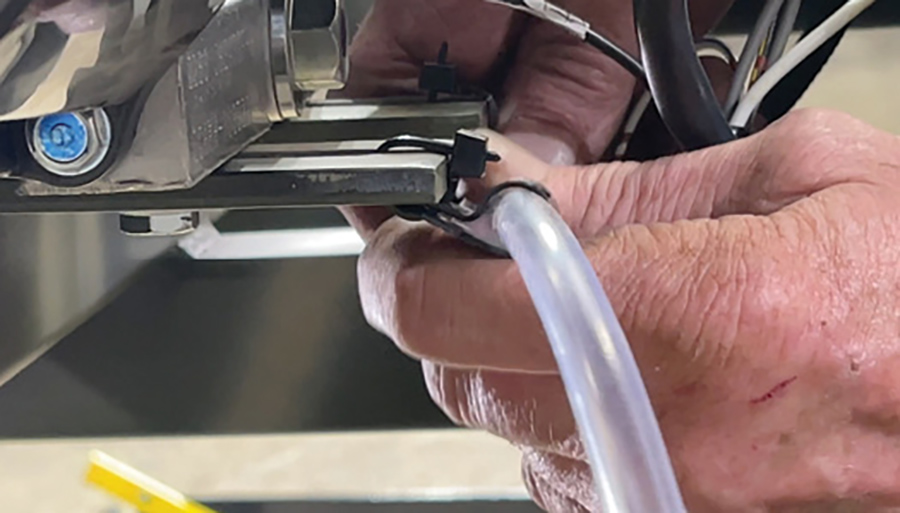
Install the lube line coming from the tank going down to the blade. Space clips about six inches apart on the frame as we’re going down. At the bottom of the motor, use a couple clips and just zip tie those to the bottom of the motor mount.
There are two valves in this lube line system. For the valve up by the tank, cut a piece of hose about 2 inches long and mount that first. That is your actual flow adjustment for when you’re sawing. You’ll adjust your flow rate there.
Your second valve goes down on the frame in front of you by the motor. Put a clip close on either side of it, that way it won’t move around on you in warmer weather. The valve is your on/off. You’ll set your flow rate for your cutting feed when you’re sawing. Just turn your on and off in front of you for ease of turning off your lube without having to adjust it every time you turn it on.

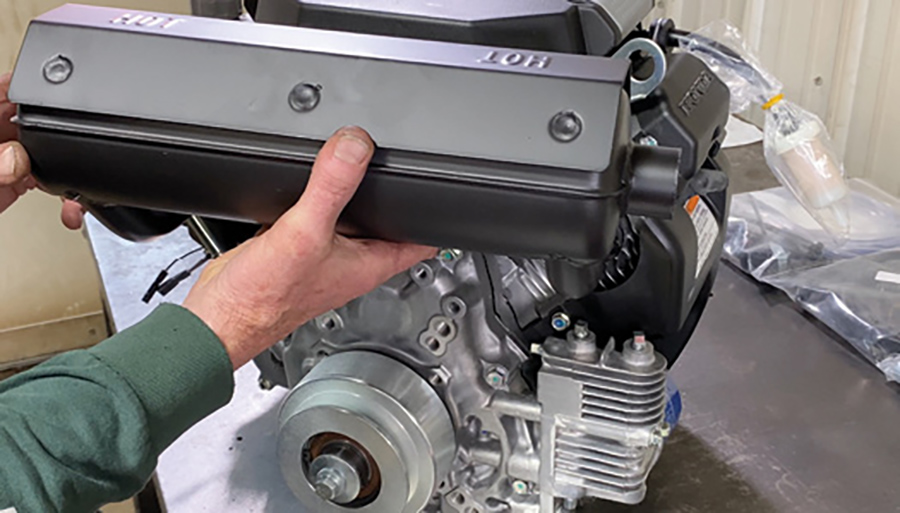
Install Top Blade & Wheel Guards. (Video-55:48)
Start with the top blade guard. Grab kit with the nylon washers and nuts.
The nylon washers go on first, set them on your pegs and set center guard right over the top. That’s the top blade guard. Put on flat washer and nuts. Snug up, don’t tighten them at this point. There’s a slot cut in the top of that guard – center the guard in the center of that slot.
Move to end guard: Put nylon washers on the studs so they’re on the mill head. There’s a half guard and a full guard on the drive side of the sawmill.

On the half guard, there’s a stud at the bottom. There is a nylon washer with a flat side on it. That goes on the bottom. Slip that up. Put the guard over the top of the nylon. Snug up flat washers and nuts.
On the full guard, put your nylon washers on the studs and slip the guard over the end of the band wheel. Put on your flat washers.
On this end we have what we call an extended nut. One side gets the regular nut, but in the center you can’t reach in there, so we made an extended nut. Put the flat end against the guard and tighten that right up. On the end of that extended nut, there’s another nut where you can put your wrench on to make it easy to take it off and on when you tighten it.
Move along to the other end and do the same thing. Put your nylon washers, guard, flat washers, and nuts. Tighten it up. Center in the slots.

 Go back to your blade guard on top and line it up with your end guards so everything looks nice and straight as you look down across the top of the mill. Once everything is lined up, tighten all the bolts on your guards.
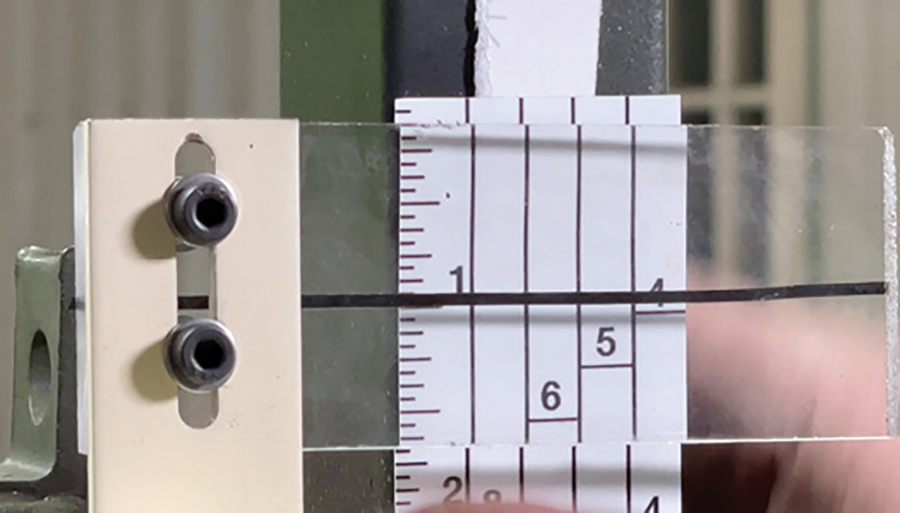
Install the Measuring Tape. (Video-58:01)
Peel backer off the top of the scale sticker and put it on the back. This helps you adjust it when you’re putting it on the actual bar. Line the 1″ mark up on the line of your sight glass. If you’re looking straight at it, the 1in mark should be lined up with the line on your sight glass. That gives you 1 inch off deck. Stick it on there with that little piece that you got taped at the top.
Hold it in place and start peeling down the backstrip off your tape and work it down the bar. Don’t stretch the tape as you’re pulling it because that’ll throw your measurements off. Leave it slack and pull it evenly. It should go down nice and straight with the scale bar. Once you get to the bottom, pull off tape and finish. Go back up to the top, raise the head up a little bit, get the tab off the back and rub your sticker on good. Make sure you don’t have any bubbles or creases in the decal when you put it on.
At this point the mill is fully assembled. Make sure all your guards are in place to do a test run. Never run the Sawmill without all the guards in place. Open up the main adjustable blade guide, bring it all the way open.
Start your engine up and let it idle for a minute at low idle. Your blade should not be turning. Start speeding it up once it gets warmed up. Bring it up to speed and let it run for a minute. Bring it all the way up to full throttle, listening for any vibrations. Make sure all the guards are tight. Check for loose bolts. If you see something move shut it down, make the adjustment.
Shut the sawmill down. We’re going to put it away like we’re going to store it, like you would everyday after you’re done cutting. Loosen the tension on the blade. You never want to store your Sawmill with tension on the blade. It’ll create flat spots on your band wheels and cause trouble later on down the road.
Set your head all the way down every night when you’re done cutting and take the tension off the blade.